Today I'm going to digress from glass - New Year's is just around the corner and the media is filled with the annual "lose weight as your resolution" commercials. Ugh! As if extra weight didn't already make you feel bad about yourself, there's a commerical full of before and after pictures to make you feel bad. Ugh.
Yes, I've changed my diet but I wasn't spurred on by the ubiquitous New Year's lose weight resolution. I've developed a health problem that has forced me to re-evaluate my entire diet. I had thought the foods I ate were good, no junk food, no red meat, mostly vegetarian - that's good right? Wrong. Even though I was eating "health food" it was all highly processed. Not good. I can't eat processed foods anymore without a serious reaction. Or wheat. Or nuts and seeds. Or dairy (sniff sniff - I'm made of cheese you know and I grew up on a dairy farm). So, I've been on a mission to learn how to include unprocessed grains into my diet and find recipes that don't include meat and dairy...ummm that would be vegan recipes.
Right off the bat, I've been frustrated trying to find grain recipes. Most vegetarian and vegan cookbooks include a "grain" section that is primarily rice recipes. Rice is a grain but little if no fiber. It's like a potato, all starch.
At the health food store, I found a whole grain, Kamut. Very few recipes out there for it as well as other whole grains so I've had to be creative. One of the things I do with grains is to cook them in lemon broth. It gives the grains additional flavor and makes them a tasty addition when sprinkled on a salad. What is lemon broth? It's my own recipe:
Kamut in Lemon Broth
1 cup Kamut
2 and 1/2 cups vegetable broth
1/2 cup organic lemon juice
Cook the kamut in the lemon broth until all liquid is absorbed.
I cook up a pot of Lemon Broth Kamut and then place it in the refrigerator to sprinkle on my salads like the one below.
Yum!
Sunday, December 30, 2007
Saturday, December 29, 2007
Year End Loose Ends
Thursday, December 27, 2007
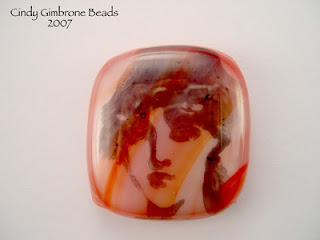
Altered Art: Prototype
I've talked about the creative process and making prototypes. I love the look of altered art. I experimented with the idea and this is what came out of my kiln: a prototype fused cabachon with an image created in enamels. I'm going to polish the edges and drill a hole for a bail. Any thoughts on this one?
Tuesday, December 25, 2007
Happy Holidays
Monday, December 24, 2007
Spontaneity or Wandering Thoughts at the Torch
I'm weird, I know. When most other bloggers are slowing down or suspending posting during the holidays, I seem to be revving up. Why would I do that? I probably have even less readers now than normal. But when you're a self-employed freelance sign language interpreter, now is the time when contract work slows down to nothing. A natural lull gives me time to torch and be creative. New glass work starts to pour out of my studio. When new work is pouring, it's time for posting.
That's what today's post is about - sparking creativity or how following a wandering mind is worth it sometimes.
Last week, I was working on an order for spirals and had particular colors of glass chosen. Once I had made the order, my attention started to wander. I made a wind of glass on the mandrel that wasn't quite right. Using dots to even it out, I thought what would happen if you layered dot on dot on dot for a horned bead but flattened out the end of the horn?
This what happens:
The beads look like plumbing parts but with alot more color. I like them and made a set of twelve. I like the idea of a flattened horn, it's very Dr. Suess - ish to me. This is different for me, but I don't think I'll continue making them as part of a round bead. I have other ideas in mind for them.
I wouldn't have those other ideas if I hadn't following my wandering thoughts.
Saturday, December 22, 2007
Goth Kid Series: Big Heart
Here's another in my Goth Kid Series...this one is called Big Heart after some of the real life kids I know who are big hearted.
I'm working on a newsletter to send out to my customers. Since there is no more Urban Glass Bead Expo, I won't be making a trip to NYC this year. Instead, I'll be sending out a newsletter and offering a special sale to my customers. So, keep an eye on your inboxes in early January 2008.
Friday, December 21, 2007
Developing New Designs...the process
Yesterday's Twisted Blues for Ornament Thursday included a new design. I thought I'd let you in on my creative process - a few days ago, I posted on The Big Mouth Series and how the look of the bead was inspired by the 1979 playbill art of Sweeney Todd. Still working on the Big Mouth beads they aren't quite there yet. My studio is full of prototypes like the Big Mouth and today I'll show you another series that is going to be added to the website soon.
Flameworked glass headpins is what I've been working on for about three (3) years. No, I haven't struggled with the design nor the actual process of attaching glass to wire, it's the prototypes - I wanted to be sure the glass and wire were compatible so they didn't cause cracking even though the glass was thoroughly annealed. I won't sell anything that won't hold up for the customer. So prototyping is critical to me, it allows me to stand behind my work.
I made these silver and transparent glass headpins three years ago.
Not a crack on them! No cracks mean the glass and wire is compatible and will hold up for a customer. Now that I have the practical elements of the design worked out and tested, I start making the design regularly and make them available for sale. The new designs are made with copper and sterling wire and are on my website under Glass Headpins and Findings.
Thursday, December 20, 2007
Ornament Thursday: Twisted Blues
The final ornament for 2007 is quick and easy just like I love 'em,and is called "Twisted Blues" for the spiral and twisted glass headpin and the music. I love the blues although I never liked the smokey bars where you could listen to it. I guess with the no smoking laws the bars aren't smokey anymore. You won't have to make this ornament in a smokey bar, just turn on some BB King and enjoy!
You'll need one (1) extra long spiral in transparent aqua; 2 small rainbow spacer beads in purple; 3 daisy spacers and 1 twisted blue glass and copper headpin.
String together on the twisted blue headpin in this order: 1 daisy spacer, 1 purple spacer bead, 1 daisy spacer, 1 extra long spiral, 1 daisy spacer and last one purple spacer (optional).
Make a small loop at the end of the remaining wire and then make a large loop for the ornament hanger.
Quick, easy and almost instantaneous gratification! Turn up the blues and enjoy the Holiday!
The ornament project above were posted in celebration of Ornament Thursday, a fun blogging event happening this holiday season on the blogs of a growing group of popular designers. Jewelry makers, mixed media artists, plush artists, ceramic artists, paper artists, and more have been making ornaments and using their blogs to show how they do it! Check out some of these great blogs today to see more:
Christmas cookie - Jennifer Heynen
Christmas tree finger labyrinth - Hali Chambers
Ring in the New Year - Kriss Kramer
Quilty pieced snowman - Linda Augsburg
Simply striking sparkling spheres - Margot Potter
Beaded memory wire - Elaine Luther
Wire & beaded tree - Lynn Kvigne
Beaded sun catcher - Debba Haupert
Lovely Ornament- Lisa Liddy
Jolly and yummy ceramic candy - Melanie Brooks Lukacs
Polymer snowflake embedded in resin - Melissa Lee
Beaded candy canes - Candie Cooper
Polymer clay gift tag/ornament - Heather Powers
Twisted blues - Lampwork Diva aka Cindy Gimbrone
Holiday spiral tree & party pixie - Art Bead Scene
Wire bird's nest - Rebecca Peck
Plush gingerbread doggie - Jenny Harada
Swell ornament - Alexa Westerfield
Holiday paper crafting - Brandy Lung Gill
Shaving cream & chipboard ornament - Michelle McGee
Easy needle-felted orb - Katie Hacker
Labels:
glass headpin,
Ornament Thursday,
twisted blues
Tuesday, December 18, 2007
This time it's political....Big Mouth Series
I don't readily parade out my experimental beads. Usually, they're very rough and I'm not sure an experiment are a part of the body of work I want on line. But sometimes you have to do something outside your comfort zone. For me, that is actually showing a experiment,a less then perfect bead. First, a little background.
Upset over political rhetoric one day about 18 months ago and sitting at my workbench with a large hollow mandrel in hand, I remembered the artwork from the original 1979 Broadway production of Sweeney Todd. I wanted to create a statement about the political rhetoric, how a politician becomes a "talking head" and their bodies don't seem to be a part of them anymore. I wanted to portray that concept in a grotesque way to represent the content of the rhetoric. The Sweeney Todd drawing perfectly captured what I was going for - I had the image in my head but wanted to double check my memory by finding a picture on line. Could NOT find it. Seemed it had disappeared from the public record. Ah, but now that the movie with has been released and Johhny Depp is making the rounds on tv with Tim Burton, the 1979 original playbill is readily available.
Although, my experiment is about 18 months old, I unveil my EXPERIMENTAL Big Mouth bead today - inspired by a politician's rhetoric, my disgust with the rhetoric and the original artwork of Sweeney Todd.
Saturday, December 15, 2007
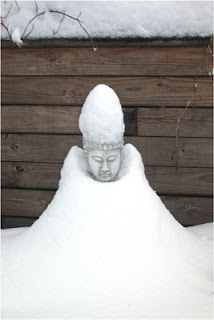
The Zen of Snow....
Snow storm is on the way and I'm feeling philosophical about not having finished Xmas shopping yet. Every year I wait until the freelance interpreting work falls off before I start shopping, I mean, I need to have $$ to be able to shop, right? This year, my phone is still ringing with offers of work. I finally had to schedule in time and now I'm wondering if I'll have enough time to do all the shopping I need to do.
I'm sure I'm not alone. How many of you are finding yourself in the same situation?
So. let's use this picture as a metaphor - quietly overwhelmed, the buddha is still able to remain calm. I've still got a week!
Thursday, December 13, 2007
Ornament Thursday: Jingle Spiral
I'm all about instant gratification when it comes to crafts. If you're like me,today's Jingle Spiral Ornament will satisfy your need for craft speed! I used one of my handmade extra long (55mm or 2. 25 inches) flameworked Holiday Ornament Glass Spirals, 20 gauage silver wire and tiny oxidized silver metal bells. You'll need your flush cutters, round and flat nose pliers. (Pictures follow directions.)
Since measuring impedes instant gratification, I used the spiral to figure out how much wire to use. Unwind twice the length of the spiral or about 4.5 inches of wire. Cut using the flush cutters, it will give you a nice smooth end.
Use your round nose plies to make a loop at one end of the wire.
Straighten the remaining length of wire at the neck of the loop. You'll want the ornament to hang straight.
Add 3 tiny oxidized metal beads.
Add spiral.
Make small loop above the spiral.
Use your index finger to make the large loop for hanging the ornament.
Your Jingle Spiral is now ready to hang!
Other crafters and designers are making beautiful ornaments for Ornament Thursday. Hop on over to their blogs and snatch up more ornament projects!
Sara Naumann
Lynn Kvigne
Candie Cooper
Katie Hacker
Margot Potter
Linda Augsburg
Melanie Brooks Lukacs
Art Bead Scene
Suzanne
Humblebeads
Polymer Clay Craft Gossip
Alexa Westerfield
Debba Haupert
Elaine Luther
Melissa Lee
Rebecca Peck
Jean Yates
Michelle McGee
Jenny Harada
Jennifer Heynen
Hali Chambers
Kriss Kramer
Brandy Lung Gill
Labels:
Jingle Spiral,
ornament,
Ornament Thursday,
tutorial
Monday, December 10, 2007
Twelve Days of Projects at ABS
Happy Holidays from the editors of ArtBeadScene! As a thank you to our readers, we, the editors of ABS will be posting the Twelve Days of Xmas Art Bead Projects. Click on over and make that last minute holiday gift!
Labels:
12 days of Xmas,
Art Bead Scene,
artbeadscene.com
Subscribe to:
Posts (Atom)