Showing posts with label Ornament Thursday. Show all posts

Thursday, January 29, 2009

Ornament Thursday: Celestial and Ice Blue


Happy Ornament Thursday! My OT project is this lovely ice blue cashmere neck scarf. I crocheted on my favorite G hook and finished it off with a lovely art button.


So, check out what the OT Grlzz have been up to this month!

Farm Girl Roots, City Girl Style
Linda Augsburg shares her celeste-inspired card.

Uniquely Mine for $20
Cindy Gimbrone hooks up lovely ice blue cashmere into a celestial colored neck scarf. Finished off with an artist made button - it's uniquely hers for $20!

Seriously.No.Seriously

Deanna Chase

Heather Hertziger

Joolz by Lisa

Beading Help Web

Wednesday, January 28, 2009

Uniquely Mine for $20

When frozen out of my unheated glass studio, I keep creating to keep the inspiration flowing for when the studio thaws out. Curious about cashmere, I bought a few skeins of Debbie Bliss 100% Cashmere yarn on sale at Webs. I wanted to create a one of a kind piece so I made my own crochet pattern.


Such lovely yarn deserved something special. So I hunted around until I found the perfect finishing touch - a lovely artist made button called A Button Succeeding from Mamacita Beadworks on Etsy.


There's no one with a scarf like mine - created with my own pattern and topped off with a lovely art button. The best part is that it cost me $20!

Thursday, December 25, 2008

Merry Christmas and Happy Ornament Thursday

Merry Christmas! Since many of us are busy today, myself included, I wanted to share my Jingle Spiral from last year with you. Enjoy your day!


I'm all about instant gratification when it comes to crafts. If you're like me,today's Jingle Spiral Ornament will satisfy your need for craft speed! I used one of my handmade extra long (55mm or 2. 25 inches) Glass Spirals, 20 gauage silver wire and tiny oxidized silver metal bells. You'll need your flush cutters, round and flat nose pliers. (Pictures follow directions.)

Since measuring impedes instant gratification, I used the spiral to figure out how much wire to use. Unwind twice the length of the spiral or about 4.5 inches of wire. Cut using the flush cutters, it will give you a nice smooth end.


Use your round nose plies to make a loop at one end of the wire.

Straighten the remaining length of wire at the neck of the loop. You'll want the ornament to hang straight.

Add 3 tiny oxidized metal beads.

Add spiral.

Make small loop above the spiral.

Use your index finger to make the large loop for hanging the ornament.

Your Jingle Spiral is now ready to hang!

Let's see what the Ornament Thursday Grlzzz are up to:


BeadStyle Magazine
A seed-beaded ornament for the holidays.

Strands of Beads
Melissa shows off a simple snowflake necklace for her final seasonal piece of the year.

Thursday, December 18, 2008

Ornament Thursday: Bring in 2009 with Confetti!


Bring in the New Year with a confetti ring. This is easy easy easy to make.


Materials:

1 silver plated adjustable ring finding

4 feet of 28 gauge craft wire

handful size 6 glass seed beads


Wrap the wire around one of the rings on the ring finding.

String a bead at a time and thread the wire through the next ring.

String the beads on tightly so it looks like an explosion of beads - bead confetti!

Wear it to you next holiday party!


While you're in the crafting mood - check out the Ornament Thursday Projects for this week:

Holiday Sparkly Fan Pull
Lisa creates a dress up look for a ceiling fan

Linda's snowman
Some paper, beads, and fabric are transformed into an adorable snow guy.

Poinsettia Ornament
Polymer clay and glittery snow recreate a Christmas memory

Strands of Beads
Melissa has a quicker than quick snowball pendant for a perfect last minute gift.

Thursday, December 11, 2008

Ornament Thursday: Putting Up the Xmas Tree


I'm sure I'm not the only one who is looking at the calendar and saying,"How did this happen?" It's December! I barely have any decorations up and when am I going to be able to put up the tree?

Do you think the Ornament Thursday Grlzz have the same problem? Check out the Ornament Thursday Blog and see what they've cooked up this week!

Having Christmas Trees on a the brain, I created one in glass. It's a take on a tutorial using glass rods or glass "shorts" for the Glass Forum on WetCanvas!

So if I don't get the real tree up soon, I've got a substitute - a lovely glass Xmas tree ornament made of glass!

Bring it on, December, I'm ready!

Thursday, December 04, 2008

Ornament Thursday: Painted into a corner


It's Ornament Thursday! Since I'm currently overwhelmed with life in general so I've painted myself into a corner I can't get out of, I didn't have time yet to get the project up. I've done it, photographed it but haven't had time to actually write the post. YET. But that's no reason the OT Grlzz should suffer - Check out the OT page with all the great links!

Wednesday, October 29, 2008

Grateful for Ornament Thursday


I'm grateful for the opportunity to join and post monthly with a great group of crafty-beady bloggers, Ornament Thursday. You can see all of the great projects we've posted since last December on The Ornament Thursday Flickr Group and here I'm giving a little mini-review of my first few months from the past OT year.

December 2007, Jingle Spiral


January 2008, Spiral Christmas Tree


March 2008, Art Flower Inspired by Brooklyn's National Anthem


April 2008, Modern Glass Links Earrings


Make sure you check out what the rest of the OT Grlzzz are grateful for over on the OT Blog!

Monday, September 22, 2008

A Special Brew on Thursday....


Feels like I just did Ornament Thursday, don't know where the time goes! But the OT Grlzz have another set of fabulous projects brewing. Ornament Thursday has a Flickr so you can enjoy looking at all the OT projects from the entire year! DIY your holiday gifts by choosing a special project from OT. Here are a few of the projects I offered this past year on Ornament Thursday:


Thursday, August 28, 2008

It's Academic - Learning to Chain Maille


Happy Ornament Thursday! With the coming of fall, we all turn our attention to academics. I don't attend school anymore but it's always a good time to learn a new jewelry making technique to show off my flameworked beads.

I'm using my Single Glass Links to make chain maille earrings using the free tutorial called Flowers on the Blue Buddha Boutique website. The tutorial is full of great pictures and so it's easy to learn.

Don't forget to pop on over to the Ornament Thursday Blog and see what the Ornament Thursday Girls are up to!

Have you learned a new technique recently? Doesn't matter which media - leave a comment and tell me about it!

Thursday, August 21, 2008

WireHead Gets Color


Want some color in the wire you're using? I love Artistic Wire . It comes in lovely colors and above are two examples (photos taken from the Artistic Wire website) of the silver plated copper wire. I love the peacock blue and used it in The Red Art Flower Necklace. The light blue was a nice pop of color around the painted fused glass pendant.


Artistic Wire comes in a large range of gauges for any project you can imagine and reasonably priced too. Even better, there are jewelry design ideas on the website.

You'll need to order Artistic Wire through a distributor. I order from The Soft Flex Company

Wednesday, July 23, 2008

It's Red Hot at Ornament Thursday Next Week!


The heat has gotten to me! Why do you ask? Because I've created TWO projects for this month's Ornament Thursday! It's not the first time I've gone a little OT nuts. Maybe that was the cold? This time, it's the heat?

It's Color Week so I've paid particular attention to how I use color in the projects. Let's see how I do with next week's Ornament Thursday. Can't wait to show you!

Wednesday, July 16, 2008

Lucky Knots ties up Blogiversary

Today is officially 3 years of blogging! YAY! So, I'm going to "tie up loose ends" with the Lucky Knots and Lampwork project I posted this past February for Ornament Thursday. All you early Christmas present buyers and crafters can get started on this necklace for your friends and family!
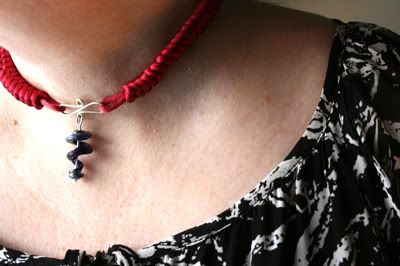

Wondering what the Ornament Thursday gals have been up to? If you have, I'm posting my Lucky project. Above, is the full picture of the Ornament Thursday Teaser - Lucky Knots and Lampwork Spirals. If you wonder what I'm talking about - I'm posting the Lucky Knots and Lampwork tutorial in two parts today. The Lucky Knots how to is posted here while the finishing is posted on Art Bead Scene where I'm one of the editors. The tutorial is for a bracelet using a large bead as the center/clasp. (Shown below)


You might be wondering why "Lucky Knots." For the design I had in mind, Chinese knotting would give me a "ropey feel" with a strong punch of color. To create the satin cord rope, I used the Snake Knot. I wanted more symbolism in the design so I researched the meaning of the snake in Chinese culture. A snake is a sign of luck. Perfect - now I had alliteration to add to the design - Lucky Knots and Lampwork.


Making the Lucky Knots for a Large Bead Bracelet:


1. Wrap some tape around the ends of the satin cording. Find the middle of the 12 feet of cording.

2. String the sterling silver 6mm large holed bead to the middle of the cording. (Note: To make a necklace like the Lucky Knots and Lampwork Spirals, skip steps 2-4 and make a loop instead of stringing on a large disk bead.)

3. Grab the opposite end of the cord and string through the lampwork bead. Pull all the way through until the sterling silver bead is wedged into the hole of the lampwork bead. Pull tightly and adjust so you can see little or no cording showing through (See Figure 1).


4. Hold the lampwork bead with your non-dominant hand and the sterling bead facing up.

5. Use your dominant hand to pull both ends of the cording out straight away from the bead. You will start the knot where the cording meets the edge of the bead. This leaves you enough room later for your loop to go around the lampwork bead.

6. Figure 2 shows the first knot of the bracelet so you can see where the knot will lie in your work. The directions and figures below will show two different colored cording because it is easier to see how the knots are made. You will be working with one color cording.

Note: At this point you can pin down the cords for the bracelet on the macramé board or if you prefer hold it in your hands while you knot.


7. Holding the bead in your non-dominant hand or pinning the cording to your macramé board, take the “top” cord (blue in the picture) and loop it first under and then over the “bottom” cord (red cord in the picture) (See Figure 3).


8. Hold the loop with your non-dominant hand or pin the first loop to the macramé board.

9. Take the “bottom” cord (red) and loop it over the top cord (blue) and under and through the top cord loop(See Figure 4).


10. Pull evenly on both sides of the knot (See Figure 5).


11. When you have pulled evenly and snugly on the knot, it will look like Figure 6.


12. Continue holding the bead and knotting with your non-dominant hand or pinned down on the board. Loosen the top knot (red) by pulling on the back of the knot.

13. Pull the end of the “bottom” (blue) cording through the top (red) knot (See Figure 7). Pull evenly and snugly to get the second knot (See Figure 8).


14. Turn the knotting over (in the Figure the red cording is on the top and the blue cording is on the bottom).

15. Loosen the top (blue) knot from the back (See Figure 9).


16. Pull the bottom (red) cord through the loosened top (blue) knot. (See Figure 10).


17. Pull evenly and snugly to tighten the knot (See Figure 11).


Repeat steps 14 – 17 until the knots measure 6.5-7 inches long or the length to go around your wrist. You should have extra cording. The finished clasp will add between 3/4 to 1 inch to your bracelet. You will need at least 10 –12 inches of cording left over to make the clasp and finish the bracelet.

Congratulations on knotting this far! Now, to finish the bracelet, surf over to Art Bead Scene

Don't forget the OT Girls Links:

Art Bead Scene
Lucky ABS! We're part 2 of Lucky Knots!

Cindy Gimbrone
Luck is knotted up in Part 1 of this tutorial!

Earthenwood Studio Chronicles
Melanie is inspired by a lucky Leprechaun to make a fairy tale, treasure filled necklace

Jennifer Heynen of Jangles
Lucky Charms Bracelet...The name says it all. This bracelet has everything to bring you good luck.

Joolz by Lisa
As Luck Would Have It...Lucky Earrings

Katie's Beading Blog
Make your own luck with these fun, swingy earrings!

Labyrinth O' Luck
Hali has created a finger labyrinth journal designed after a 4-leaf clover.

Linda Augsburg at Make It Mine magazine
Lucky doesn't begin to describe the adventure I had making this T-shirt...

Lucky
Lucky to be... based on a coin holder a friend made for me...

http://art-interrupted.blogspot.com"/>Lucky to be Me
Mirror, mirror on the wall, who's the fairest of them all? Well, YOU, of course. No matter who you are when you look into this magical mirror, you'll be reminded you're lucky to be you!

Lynn Kvigne - Beading Help Web
Irish Proverb Window Ornament - step by step instructions for making this year-round ornament that may bring luck right through your window!

Melissa J. Lee - Strands of Beads
Good fortune is yours with this cookie-inspired necklace.

Snap out of it, Jean! There's beading to be done!
You'll "make Jean's day " if you check out her lucky Pendant with a Clint Eastwood eighties twist

Swell Designer
Swelldesigner gets lucky this month with some super colorful, sparkly painted bangles

The Impatient Blogger
Luck starts with a wish...Margot shares an project she created for Simply Beads last August.

Tuesday, July 15, 2008

Blogiversary: Christmas in July - Jingle Spiral Ornament

If you're an early Christmas shopper, here's an Ornament Project, The Jingle Spiral, I posted last December.


I'm all about instant gratification when it comes to crafts. If you're like me,today's Jingle Spiral Ornament will satisfy your need for craft speed! I used one of my handmade extra long (55mm or 2. 25 inches) flameworked Holiday Ornament Glass Spirals, 20 gauage silver wire and tiny oxidized silver metal bells. You'll need your flush cutters, round and flat nose pliers. (Pictures follow directions.)

Since measuring impedes instant gratification, I used the spiral to figure out how much wire to use. Unwind twice the length of the spiral or about 4.5 inches of wire. Cut using the flush cutters, it will give you a nice smooth end.


Use your round nose plies to make a loop at one end of the wire.

Straighten the remaining length of wire at the neck of the loop. You'll want the ornament to hang straight.

Add 3 tiny oxidized metal beads.

Add spiral.

Make small loop above the spiral.

Use your index finger to make the large loop for hanging the ornament.

Your Jingle Spiral is now ready to hang!


Other crafters and designers are making beautiful ornaments for Ornament Thursday. Hop on over to their blogs and snatch up more ornament projects!

Sara Naumann
Lynn Kvigne
Candie Cooper
Katie Hacker
Margot Potter
Linda Augsburg
Melanie Brooks Lukacs
Art Bead Scene
Suzanne
Humblebeads
Polymer Clay Craft Gossip
Alexa Westerfield
Debba Haupert
Elaine Luther
Melissa Lee
Rebecca Peck
Jean Yates
Michelle McGee
Jenny Harada
Jennifer Heynen
Hali Chambers
Kriss Kramer
Brandy Lung Gill


Sunday, July 06, 2008

A Tour in Pictures....

A typical early spring day in the studio of Cindy Gimbrone....

Rise early morning so I can get to work...


Hat and sweatshirt because the studio doesn't have heat...


Happily melting colored glass to create a Rainbow Spiral at the torch....


Placing hot Rainbow Spiral beads into the kiln to anneal....


Cleaned and annealed Rainbow Spiral Bead...


Spirit of Independence Windchine Ornament using the Rainbow Spiral.