Tuesday, December 30, 2008

If you don't flux, router!


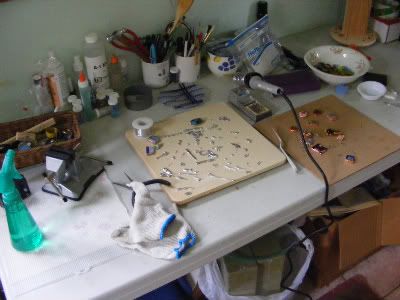
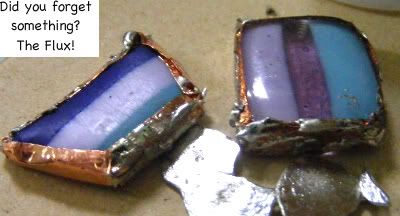
Yesterday I had fluxing success but if you're struggling with soldering, or you just don't want to create that look, you can try routering your glass cabachons. I like to use this technique when I want a "floating" look - where the frame that holds the glass cab is hidden.

The equipment you'll need is a glass grinder and a special jewelry bit. Yep, that's what it's called, a jewelry bit. I buy the Aanraku Twofers


There's a better picture on the Delphi Glass website if you're like me and want to see a close up picture - in fact, here it is from the site:


Once you have the bit, it's really easy to just run the edge of your fused cab around to create a groove in the glass like the one on my painted cab:


Delphi Glass has a quick step by step for adding a wire frame to create a pendant out of the routered glass cab.

Try it! If you don't solder, router!

Monday, December 29, 2008

It's Fluxing Success!


YAY! I finally successfully soldered a few of my cabs and added a little bit of wire "filigree." I made the cabs - one is a painted bead that had rough beadholes so I slumped it into a cab. The other cab is a made of glass "shorts" that was fused and ground into a square shape.

I must admit that adding the filigree was the hardest part - I think I need an extra hand to do it again! LOL! I used a bench clamp to hold the piece while I added the filigree.

If you solder jewelry, how do you hold the piece so you can solder on a jump ring or other decoration?

Sunday, December 28, 2008

Ooops - Forgot - Love Life

Love the journey that is your life

Yesterday, I put up a picture of a snowflake bowl bezel. I thought I had posted it earlier in the year but realized this morning, I hadn't. I wanted to tell you about this one. First, the back, since you didn't see it yesterday...

The bowl bezel is fabricated from brass, hand hammered into a slight bowl shape and stamped on the back: "Love Life." Sewn into the bezel is a handpainted snowflake glass cabachon. Is there no better color combination than cobalt blue and white? Love the clean, two color palette.


I stamped Love Life on the back to remind me to enjoy this journey and pay attention to it.

Saturday, December 27, 2008

Warm in the studio


It's "warm" today - 58 degrees here in New York State - so I've got to take advantage of the warmth to work in the studio. Maybe I'll do some fusing, or some torch work or some more bowl bezels or even get to the soldering I've been struggling with. Maybe today is the day I'll be able to solder decently!

Keep your fingers crossed for me!

Friday, December 26, 2008

What was under YOUR tree?

It's the day after, is there wrapping paper still on your living room floor. I think a few pieces have slipped under the couch. I'll get that cleaned up after work today but in the meantime thought I'd share what was under my tree yesterday.
Got my wished for Vegan cook book, Vegan Express

Since we've gone wireless in our house, we got a family gift, an HP wireless printer. Great family printer, with a separate paper tray for photo paper - we won't have to reload the tray to print The Teen's photos. Psst, Mac won the PC wars yesterday - it was easy peasy to connect the Mac while the PC was much more difficult.


What was under YOUR tree?

Thursday, December 25, 2008

Merry Christmas and Happy Ornament Thursday

Merry Christmas! Since many of us are busy today, myself included, I wanted to share my Jingle Spiral from last year with you. Enjoy your day!


I'm all about instant gratification when it comes to crafts. If you're like me,today's Jingle Spiral Ornament will satisfy your need for craft speed! I used one of my handmade extra long (55mm or 2. 25 inches) Glass Spirals, 20 gauage silver wire and tiny oxidized silver metal bells. You'll need your flush cutters, round and flat nose pliers. (Pictures follow directions.)

Since measuring impedes instant gratification, I used the spiral to figure out how much wire to use. Unwind twice the length of the spiral or about 4.5 inches of wire. Cut using the flush cutters, it will give you a nice smooth end.


Use your round nose plies to make a loop at one end of the wire.

Straighten the remaining length of wire at the neck of the loop. You'll want the ornament to hang straight.

Add 3 tiny oxidized metal beads.

Add spiral.

Make small loop above the spiral.

Use your index finger to make the large loop for hanging the ornament.

Your Jingle Spiral is now ready to hang!

Let's see what the Ornament Thursday Grlzzz are up to:


BeadStyle Magazine
A seed-beaded ornament for the holidays.

Strands of Beads
Melissa shows off a simple snowflake necklace for her final seasonal piece of the year.

Wednesday, December 24, 2008

Wish List


One of the things I want for Christmas is to go to the movies. I haven't gone since this past summer (I think - it may be longer than that). I tend to prefer the independent films, though not always. This Christmas, I want to go and see this film, Happy Go Lucky.

I giggled at the outfit and her gawkiness - I think we all have been there or at least feel like we've been there!

What's on your Christmas wish list?

Tuesday, December 23, 2008

No Boots but pretty accurate

Surfing blogs a few weeks ago, I found a link to a "discover your blog's personality" test. Admit it, you would have clicked on it too. So Lampwork Diva's blog personality is:

ESFP - The Performers (in my words, a "Practical Feel-er")

"The entertaining and friendly type. They are especially attuned to pleasure and beauty and like to fill their surroundings with soft fabrics, bright colors and sweet smells. They live in the present moment and don´t like to plan ahead - they are always in risk of exhausting themselves."


"The enjoy work that makes them able to help other people in a concrete and visible way. They tend to avoid conflicts and rarely initiate confrontation - qualities that can make it hard for them in management positions."

Yeah, gotta work on that confrontation thing - and I don't wear boots too Nancy Sinatra for me but I guess generally, it's accurate.

(Photo and Analysis Credit on Typealyzer)

Now, I was curious about what sort of personality Art Bead Scene has:

ESTP - The Doers

The active and play-ful type. They are especially attuned to people and things around them and often full of energy, talking, joking and engaging in physical out-door activities.


The Doers are happiest with action-filled work which craves their full attention and focus. They might be very impulsive and more keen on starting something new than following it through. They might have a problem with sitting still or remaining inactive for any period of time.

If you're interested, your blog can take the test too. Come back and tell me what blog personality your blog has!

Monday, December 22, 2008

"WIP'd" Snow


Snow continues this morning - apparently it's been 3 storms one right after another. I called off work yesterday due to weather and I called off this morning.

The studio is too cold to work in - and I'm really chomping at the bit to try a new glass color -so what to do?

I took out my WIP's.

What's a "whip" you ask?

It's a "Work In Progress" among the crochet and knit community.

In May, early June, I went to the Red Heart outlet store in Missasauga, Ontario (suburb of Toronto) and picked up a bag of Equinox Stripe in Fiesta by Nashua HandKnits. Yes, I said a bag - I think it was 12 skeins - for $25.00 US. Yep, $25!!!


I love the yummy colors! I wanted a thick stole I could throw on and have it be long enough that I didn't have to hold it on. But wide enough that I could sit with it over my lap if I wanted. Stitch Diva's Stash Buster Tunisian Crochet Pattern was just what I needed!


Above is the photo from the Stitch Diva website - I made my stole about half as wide and used just one yarn strand - the Equinox. Of course, I ordered one of the Jenkin's Wood Tunisian Hooks with Extensions to make it. It's a yummy thick soft stole. I'm wearing it as I type this morning.

So, a snow day isn't all that bad - I was able to finish my WIP.

Saturday, December 20, 2008

Interrupted by winter

I had a bout of teen-like invincibility yesterday that led me to be driving home in this


I decided to drive the hour from my home to the video relay center despite a predicted snowstorm. Four to six inches were predicted so it didn't seem as if it would be too bad. It wasn't on the way in to work. Once I got there, I realized quickly it was a bad idea. But I stayed for my six hour shift, you know, working for yourself, you don't get a day off or paid leave of any kind, so I figured I might as well stay - maybe it would clear up?

Wrong.

I had a similiar drive home as this guy except it was at 35mph. Instead of an hour to get home, it took be two and a half.


Ugh.

I drive a Honda Civic which isn't renown for it's ability to drive through the snow. Alot of the problem with it is that it's very low to the ground. If snow accumulates and the roads aren't plowed, I can get stuck in the middle of the road in 6 to 8 inches of snow. The same goes for my driveway.

The Bean Counter works with numbers, not a snow shovel and he drives a four wheel drive (which he did offer to me but I declined. I don't know how to drive it in an accident - almost killed myself in a spring rainshower once - will not drive it except on a dry summer day). So, we hire a truck to come to plow our driveway - but only at 4 am in the morning. He doesn't plow at night.

So you know where this is going. I got home to an unplowed driveway.

The rest isn't pretty. I spent another 40 minutes digging myself out of the driveway.

That's my last round of teen-like invicibility for awhile.

Thursday, December 18, 2008

Ornament Thursday: Bring in 2009 with Confetti!


Bring in the New Year with a confetti ring. This is easy easy easy to make.


Materials:

1 silver plated adjustable ring finding

4 feet of 28 gauge craft wire

handful size 6 glass seed beads


Wrap the wire around one of the rings on the ring finding.

String a bead at a time and thread the wire through the next ring.

String the beads on tightly so it looks like an explosion of beads - bead confetti!

Wear it to you next holiday party!


While you're in the crafting mood - check out the Ornament Thursday Projects for this week:

Holiday Sparkly Fan Pull
Lisa creates a dress up look for a ceiling fan

Linda's snowman
Some paper, beads, and fabric are transformed into an adorable snow guy.

Poinsettia Ornament
Polymer clay and glittery snow recreate a Christmas memory

Strands of Beads
Melissa has a quicker than quick snowball pendant for a perfect last minute gift.

Tuesday, December 16, 2008

Good Investments for Technique and Inspiration


I got good suggestions on copper foil yesterday from Lynn and Angie. Thanks, guys! (BTW, Angie, I too started in stained glass and couldn't cut glass very well so I decided I'd rather burn with hot glass than bleed with stained glass!)

I'm putting the twist tie on the roll as I write this (hmmm, how am I able to type and tie at the same time? wink!). I like the copper foil part, there's something meditative about burnishing it onto the glass and making sure that all the bubbles are out. But that's where my zen like state ends.

If I'm to be honest part of my problem is impatience.
Sally Jean Alexander's book Pretty Little Things has ruined me forever - I want to live in this book! N...O..W!


So I'm trying to solder round glass nuggets before I master the square and rectangular shapes.(Boy, do THEY look like crap - that is, the ones I'm able to actually solder!)

Damn that Sally Jean, why does she make it look so enticing and easy?!

If you need to back up a bit like me and slow down - buy Lisa Bluhm's Simple Soldered Jewelry and Accessories. It's THE book to teach you how to solder jewelry using stained glass technique.


Use Lisa's book in combination with Sally's and you'll have the perfect mix of how to and inspiration!

Monday, December 15, 2008

Curses Foiled Again!

Do you remember Dudley Do Right, the cartoon mountie a segment that originally aired on the Rocky and Bullwinkle Show in 1969? I've downloaded a picture of his arch nemesis, Snidely Whiplash whose signature line was "Curses, foiled again!" -


Well, that's how I felt this past weekend when I was tied up in the huge roll of copper foil. I continue to work on mastering the art of soldering - I'm still struggling with the tinning and soldering end of it all - hats off to those who make it look easy. In the meantime, I feel like Nell tied up on the tracks but Snidely's line fits how I feel when I find myself muttering....

"Curses! Foiled again!!"

Thursday, December 11, 2008

Ornament Thursday: Putting Up the Xmas Tree


I'm sure I'm not the only one who is looking at the calendar and saying,"How did this happen?" It's December! I barely have any decorations up and when am I going to be able to put up the tree?

Do you think the Ornament Thursday Grlzz have the same problem? Check out the Ornament Thursday Blog and see what they've cooked up this week!

Having Christmas Trees on a the brain, I created one in glass. It's a take on a tutorial using glass rods or glass "shorts" for the Glass Forum on WetCanvas!

So if I don't get the real tree up soon, I've got a substitute - a lovely glass Xmas tree ornament made of glass!

Bring it on, December, I'm ready!

Wednesday, December 10, 2008

Free Projects! Art Bead Scene's Twelve Days of Christmas


Art Bead Scene is hosting it's annual Twelve Days of Christmas where the editors post 12 free projects. I've added the button to my sidebar so you can find it easily!

Enjoy!

Tuesday, December 09, 2008

Frit-aytious Beads or it's better with Ocelot Spots

So Lynn asked yesterday if I was sure that she couldn't use frit for glass fusing. Frit is used in fusing all the time so yes, Lynn you can use it to fuse. Usually, frit is applied on larger pieces so if you want to swirl it like I did yesterday, you have to have a piece large enough to swirl when the glass is molten in your kiln. In fact, here's a picture of me doing just that with a large wall piece - I'm "dragging" the glass with a metal tool:


By the way, that was one AWEsome class I took with Dan Fenton one of the early artists in the stained glass/fused glass movement. I've used a couple of frits on fused cabs and I'll make recommendations at the end of post. You'll see why in a moment.

So, today I took out the tried and true frit mix Ocelot Spots


Ocelot Spots is a failsafe mix - it performs well for most beadmakers. I've used a base of transparent blue to highlight the occasional blues you can get from Ocelot Spots. Swirled it looks great and not swirled it looks great too!

If you're going to try fusing with frit, I'd suggest a frit that looks good unswirled. Ocelot Spots is a good choice - it'll give an animal print like look when unswirled. You may not get any of the blues that happen as a result of the flame but the ambers, browns and black will look lovely. I think the Wild Roses mix I used yesterday would look nice unswirled also.

If you've gone to the torch or the kiln because Val's book has inspired you, please share and let me know what you Fritsonality is!

Monday, December 08, 2008

Frit Experiments


Remember Val's Frit Book I reviewed? How I was re-energized to work with my stash of frit? I've taken the frit out and tried again.

I still need more practice but I'm finding my fritsonality - I like to swirl the frit. Swirling frit is good.


Not yet frit-tastic like my frit-ero, Val, but I'm working on it. My goal is Lickalicious beads!

Thursday, December 04, 2008

Ornament Thursday: Painted into a corner


It's Ornament Thursday! Since I'm currently overwhelmed with life in general so I've painted myself into a corner I can't get out of, I didn't have time yet to get the project up. I've done it, photographed it but haven't had time to actually write the post. YET. But that's no reason the OT Grlzz should suffer - Check out the OT page with all the great links!

Wednesday, December 03, 2008

Is a Show for You?


Shows are as varied as artists. There are wholesale shows, high end shows, arts and crafts shows, bead shows, glass art shows - the proliferation of shows means you have to do your homework.

Homework?

Yes, homework.

You're about to spend some serious time and effort to sell your goods on the road. You'll spend time preparing, creating product, designing a display, promoting your work, packing, traveling, unpacking, selling and promoting. You want to choose a venue worthy of all that work. So, research and start by reading up on all the information the promoters offer. Some questions you want answered is:

1. What is the expected attendance of the show? The more people who walk through a show, the more potential customers you'll have. Be aware, high foot traffic can mean a higher booth fee.


2. Where is the show hosted? Is it in an out of the way place? Is it in the center of town?

3. Does your work fit? If you're doing an arts and crafts show, if you have jewelry and the show is mostly home decor, you may not sell much. Or your work might not be in the price range of the most of the items for sale.

4. Talk to other artists who have worked the show you're researching. Be wary of comments made online about a show - read them but I find that most artists aren't willing to be too open simply because it's their business and they don't have to share openly. Besides, who wants to say they didn't do well?

5. If researching online, make sure the advice you follow applies to the show you're considering. For example, advice for a juried show may not apply to a small arts and crafts show for the local charity. Taking twice your inventory isn't necessary at a local show.

6. Go to the show before you buy a table. I can't stress this one enough - see what it offers you. Envision yourself at the show. Who are the customers? What kind of questions are they asking the artist? Are there other vendors like you? Is it busy? Do customers seem to be buying or are they looking? Are there imported products at the show?

I've completely ruled out some shows after researching them and deciding they were possible venues for me. Then, I went to them and realized they were not what they seemed.

Do you do research? If yes, then how has it gone for you? If no, then I'd ask the same question, how has it gone for you?

Tuesday, December 02, 2008

Beading on a Budget! Yes, Virginia, it really does only cost $10!!


I created "Meditation" for Art Bead Scene's $10 Tuesday. I must admit to being skeptical. I didn't really think I could make something nice for $10 or under. So I calculated the cost of all of the materials and it really does cost no more than $10 dollars to make! This definitely falls under my Beading On a Budget category.

Materials:

1 handmade glass link

36 inches 2.8mm gunmetal curb chain
1 gunmetal lobster clasp, 7 x 12mm
8 gunmetal jumprings, 4, 5 or 6mm
5 anodized 18 gauge colored jump rings, 7.9mm, in complementary colors
Charms - I used 1 buddha head, 1 flower, 1 "be" charm, use whatever you have left over or you can use colorful beads or crystals.

Tools Needed:

Pliers, chainnose and needlenose
Cutters, to cut the chain


Directions:

1. Cut two 16 inch lengths of the curb chain.
2. Attach one jump ring to each of one end of the curb chain. You'll end up with two pieces of chain with jump rings on one end of each chain.
3. Attach lobster clasp to one of the jump rings.
4. Choose one of the colored jump rings and attach the opposite ends of the chain (the ends without the clasp and jump ring.)
5. Choose another colored jump ring and attach the glass link and chain together.
6. Cut the remaining 4 inches of chain into 3 pieces, 1 piece 2 inches long, the other two pieces, 1 inch long.
7. Attach the gunmetal jump rings to one end of each of the pieces of chain.
8. Attach charms to the gunmetal jump rings.
9. Attach colored anodized jump rings to the charms and the glass link.

Voila! You've taken a few minutes to slow down and create a lovely necklace for you or for someone special - and for $10!

Monday, December 01, 2008

A Little Late but couldn't put it in gear!


Couldn't seem to get "into gear" fast enough to post this for Art Bead Scene's monthly challenge on Steampunk. But better late than never! I finally took apart some of the flea market watches I bought. They fit perfectly with my handmade glass bronze gear and my new favorite bowl bezel - hand forged by me in brass along with with copper ball headpins.

Please don't forget to get yourself into gear and stop by my website where I'm having a HUGE clearance sale!

Wednesday, November 26, 2008

Be Thankful the Secrets are Out!

"The way I got into frit was really quite simple-it was my search for an intense, hot pink transparent glass." Val Cox from Frit Secrets, 2008

Never has the search for the elusive vibrant pink glass yielded such a wonderful creation! I've been waiting patiently for Val Cox, the fritmaster who introduced the frit frenzy to the current glass beadmaking world, to write her book. She has unveiled it to the world on her website: Frit Secrets: A Flameworker's Guide to Using Reactive Glass Frits.


Since 1999, I've been making glass beads but I could never master frit and make it sing like Val. Always willing to share, Val opens the flood gates of her frit knowledge and shares her techniques. There are chapters on Furnance Blown Glass, Frit Manufacturers, Frit Grind Sizes, COE, Base Glass, Five Special Colors, Color Review, Applying Frit and more.


Each chapter is comprehensive and full of expert information and common sense tips. The bonus is Val's recommendations that come from her extensive frit testing. I particularly appreciated the chapter on color since I've been working on using color more effectively in my work.


Val does careful color studies of each frit then takes all of the pictures herself. Her photography is luscious - I just want to reach out, pick up her beads and lick each one of them! (Oops did I say that out loud?! wink!)


I've acquired a stash of Val's frit. Although I've been unable to create a lovely frit bead, I never parted with the frit hoping that somehow the frit goddess would visit. She's finally come to visit in the form of Val's book. I'm re-energized to get the frit back out and try again. I'm thankful Val has shared her secrets and every beadmaker should be too!

(All Photos courtesy of Val Cox, talented glass beadmaker and phenomenal photographer!)

Tuesday, November 25, 2008

Thanksgiving....


A number of years ago, my father's niece appeared at the family farm with a bag of old pictures. She deposited them on the kitchen table and said she thought my parents would want them. My mother passed them along to me saying they were my father's family. Since my mother and father's mother never liked one another, my mother hasn't shown much interest in researching my father's side the family. So somehow, I ended up with the pictures.

I went through them, mostly old tin types, photos of people I didn't know but within the bag, I found these familiar pictures. Two are of the front of the family farmhouse and only one is of my father's sisters and brothers. It's not even all of them and my father isn't in them. I can only figure out that he was too young to sit on his own for the picture.


I knew they were Dad's siblings because some of the kids look like I did or my brothers and sisters did when they were little. Only one of the girls is old enough for me to see her grown face and recognize her.

My father is gone now as are all of these children except one. I can't say which one is still alive based on looking at this picture. The farm and the front steps where this generation and my generation had their pictures taken belongs to someone else now. I miss it. I'm lucky Dad's niece dropped off the bag of pictures because I'm very thankful I have these photos from my father's family.

Wednesday, November 19, 2008

Soldering an art....


Soldering, whether in stained glass work or in metalsmithing is a fine art. I've been working in metals during the last few weeks but the creative muse in me wanted to change directions - but still using the cabachons I've made. So, it's on to stained glass style soldering. It's not as high temperature as soldering silver and I can do it with a soldering iron. But it's still an art, one you have to practice.

Yeah, you say, I saw those lumpy pieces yesterday.

Ok, so they were lumpy - what did I tell you?

It's an art.

Tuesday, November 18, 2008

Flux it!


Lesson learned.

What you ask?

Flux it! I say!

You say, "excuse me?"

Flux it!

Flux it!

Flux it!

No, I'm not swearing in another language. I was swearing though when I was soldering a few cabachons and the solder wouldn't stick.

I thought I was just lousy at soldering. But that wasn't the problem. I needed flux.

DUH!

So now when something doesn't seem to stick - Flux it!

Lesson learned.

Monday, November 17, 2008

So, where was I?

Whew! It's been a busy weekend and it's Monday already.

Where was I?

Oh yes, cold connections!

Today, it's the venerable staple. I really like the look of a staple holding a cab or a special tiny object.

One of my favorite Glyph beads had a rough beadhole so I slumped it into a cab. I chose it to be my first stapled cab:


Yet another technique that allows the purist in me not to glue or alter any of my sentimental junk!

Saturday, November 15, 2008

A Weekend of Shakespeare


I'm sign interpreting a production of Twelfth Night this weekend. I've been working on it since the last week in September. It's taken alot of preparation, listening to it daily on my iPod and attending rehearsals to be ready. I knew I was understanding the 400 year old version of English when I started to laugh at the jokes. The most work I've ever done for a joke! But my family is ready for me to stop greeting them with, "What ho!" and I think I am too!

Enjoy your weekend, fair readers, I'll be back Anon!


(Photo Credits: Twelfth Night and First Folio .)