Showing posts with label ornament thursday project. Show all posts

Thursday, December 25, 2008

Merry Christmas and Happy Ornament Thursday

Merry Christmas! Since many of us are busy today, myself included, I wanted to share my Jingle Spiral from last year with you. Enjoy your day!


I'm all about instant gratification when it comes to crafts. If you're like me,today's Jingle Spiral Ornament will satisfy your need for craft speed! I used one of my handmade extra long (55mm or 2. 25 inches) Glass Spirals, 20 gauage silver wire and tiny oxidized silver metal bells. You'll need your flush cutters, round and flat nose pliers. (Pictures follow directions.)

Since measuring impedes instant gratification, I used the spiral to figure out how much wire to use. Unwind twice the length of the spiral or about 4.5 inches of wire. Cut using the flush cutters, it will give you a nice smooth end.


Use your round nose plies to make a loop at one end of the wire.

Straighten the remaining length of wire at the neck of the loop. You'll want the ornament to hang straight.

Add 3 tiny oxidized metal beads.

Add spiral.

Make small loop above the spiral.

Use your index finger to make the large loop for hanging the ornament.

Your Jingle Spiral is now ready to hang!

Let's see what the Ornament Thursday Grlzzz are up to:


BeadStyle Magazine
A seed-beaded ornament for the holidays.

Strands of Beads
Melissa shows off a simple snowflake necklace for her final seasonal piece of the year.

Thursday, December 18, 2008

Ornament Thursday: Bring in 2009 with Confetti!


Bring in the New Year with a confetti ring. This is easy easy easy to make.


Materials:

1 silver plated adjustable ring finding

4 feet of 28 gauge craft wire

handful size 6 glass seed beads


Wrap the wire around one of the rings on the ring finding.

String a bead at a time and thread the wire through the next ring.

String the beads on tightly so it looks like an explosion of beads - bead confetti!

Wear it to you next holiday party!


While you're in the crafting mood - check out the Ornament Thursday Projects for this week:

Holiday Sparkly Fan Pull
Lisa creates a dress up look for a ceiling fan

Linda's snowman
Some paper, beads, and fabric are transformed into an adorable snow guy.

Poinsettia Ornament
Polymer clay and glittery snow recreate a Christmas memory

Strands of Beads
Melissa has a quicker than quick snowball pendant for a perfect last minute gift.

Thursday, September 25, 2008

Brewing up Glass and Sugar Calaveras


I've been brewing up new a new addition to the Heartz n Skullz series - Calaveraz. Inspired by the sugar skulls or Calaveras of Day of the Dead, my glass Calaveraz are made of pale ivory glass with a millefiore on her forehead and flames in red and yellow creating a halo around her head.


But glass sugar skulls aren't edible so today's OT project shares a
recipe for Sugar Skulls. Have fun making them!(Photo credit: Make.)

Check out what the other OT Grlzzz have brewed up over on the Ornament Thursday Blog!

Thursday, July 31, 2008

Red Hot Ornament Thursday


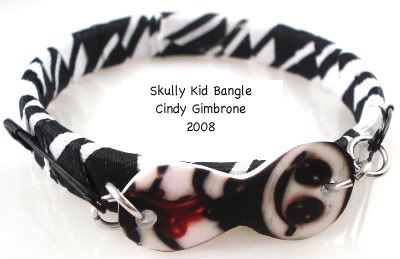
Trendy, popular - red hot! Wrapped bracelets are hot on the craft scene and I'm hot off of Color Week so using tutorials from the internet, I've combined the two into this Punk Skully Kid Bangle Bracelet. Instead of using an actual Skully Kid, I created a flat version in Shrink plastic and attached it to the bangle using black safety pins for true Punk style. It's just perfect for The Teens who hang out at my house.


So as Emily the Strange would say, "Get lost!" and go see what the other Ornament Thursday Grllzzz are up to!


Art Bead Scene
ABS Editor Cindy Gimbrone Goes Red Hot Crazy!

Beading Help Web is RED HOT!
Lynn Kvigne takes up the torch and shows you how to make a toe ring using fine silver.

Cindy Gimbrone aka Lampwork Diva
Trendy, Popular and Red Hot!

It's Red Hot July in Arizona!
Lisa finally finishes a project from over a year ago. Check out this "hot" take on a changeable necklace.

Katie's Bead Blog
Check out Katie's Red Hot faux coral necklace! It's a punch of color with a summery feel.

Linda Ausburg at BeadStyle Magazine
Linda shares a red-hot card she created.

Michelle is RED HOT!
Well, really, Margot is...

Savvy Crafter
Hotsie Totsie Plexi-glass Flower pendant over on Candie's blog!

Strands of Beads
The heat is rising, and Melissa is making a Red Hot Firecracker necklace!

Swell Designer a.k.a. Alexa Westerfield
The Swelldesigner gets red hot with a Hunka Hunka Burner Necklace!

Too Red Hot
Our own Michelle Zimmerman has been hard at work this month sculpting a devil of a project for your enjoyment.

Thursday, June 26, 2008

Ornament Thursday's Independence Day

It's almost the 4th of July. Red, white and blue, fireworks and picnics all in celebration of the independence of the United States. So, you're thinking, this Ornament Thursday is about red, white and blue and U.S. patriotism. That's the obvious path, right?

You should know by now, I don't take the obvious path.

So today isn't about red, white and blue but it is about the beads - afterall, I am an INDEPENDENT business woman - and it is about the independent spirit.

So, I've chosen to represent the independent spirit with a rainbow spiral. Crafted into a wind chime-like ornament, it reminds me of the glass wind chimes I collect. I have 10 - 15 artist made wind chimes made of glass, ceramic, metal and wood. Every summer growing up on the farm, my mother hung a set of wind chimes on our porch. There was always a strong breeze blowing across the pasture and the chimes made lovely wind-music.


The obvious metaphor is blowing in the wind, free and independent but do I need to remind you, I don't do obvious either. My Independence Day is about the spirit represented by chakra colors the rainbow represents, the life force in each of us.

I've added a simple word-charm "BE" - to remind us to let our spirits just be.

Let's see what the rest of the INDEPENDENT business women of Ornament Thursday are up to this month....

Alexa Westerfield aka Swell Designer
Craft some red, white, and blue drink charms from vintage wartime posters. They'll make a big bang at your 4th of July cookout!

Art Bead Scene
Field of Poppies bracelet project from Heather.

Cindy Gimbrone aka Lampwork Diva
Celebrate the Independent Spirit

Joolz by Lisa
Lisa takes a shot at teeny tiny beads for a change

Linda at BeadStyle Magazine
Childhood memories of Independence Day's past inspired this necklace.

Michelle's Take on Independence
Over at http design, Michelle has scuplted a piece which gives a different perspective on independence.

Strands of Beads
Melissa sees stars this month while considering the meaning of independence

What is America to Me?
Michelle's favorite words on our country...

Wednesday, April 23, 2008

Modern Glass Link Earrings for the Classic Mom

Today is my contribution for Ornament Thursday. If you're out of ideas on what to make Mom for Mother's Day, here's a quick and easy beginner project! Modern Glass Link Earrings for the Classic Mom!


Materials:

2 Organic Glass Links in Black

6 inches silver wire

2 Anodized Aluminum 1/2 inch jump rings in silver

2 Antiqued Silver coated clay beads

Form ear wires. String Organic Glass Links onto Silver colored jump rings. Attach to ear wires. String Silver coated clay beads onto ear wires. Voila! A modern set of earrings in a classic color combination and goes with everything you own.

Wednesday, February 27, 2008

Knot with Cindy, Finish with ABS!


Wondering what the Ornament Thursday gals have been up to? If you have, I'm posting my Lucky project. Above, is the full picture of the Ornament Thursday Teaser - Lucky Knots and Lampwork Spirals. If you wonder what I'm talking about - I'm posting the Lucky Knots and Lampwork tutorial in two parts today. The Lucky Knots how to is posted here while the finishing is posted on Art Bead Scene where I'm one of the editors. The tutorial is for a bracelet using a large bead as the center/clasp. (Shown below)


You might be wondering why "Lucky Knots." For the design I had in mind, Chinese knotting would give me a "ropey feel" with a strong punch of color. To create the satin cord rope, I used the Snake Knot. I wanted more symbolism in the design so I researched the meaning of the snake in Chinese culture. A snake is a sign of luck. Perfect - now I had alliteration to add to the design - Lucky Knots and Lampwork.


Making the Lucky Knots for a Large Bead Bracelet:


1. Wrap some tape around the ends of the satin cording. Find the middle of the 12 feet of cording.

2. String the sterling silver 6mm large holed bead to the middle of the cording. (Note: To make a necklace like the Lucky Knots and Lampwork Spirals, skip steps 2-4 and make a loop instead of stringing on a large disk bead.)

3. Grab the opposite end of the cord and string through the lampwork bead. Pull all the way through until the sterling silver bead is wedged into the hole of the lampwork bead. Pull tightly and adjust so you can see little or no cording showing through (See Figure 1).


4. Hold the lampwork bead with your non-dominant hand and the sterling bead facing up.

5. Use your dominant hand to pull both ends of the cording out straight away from the bead. You will start the knot where the cording meets the edge of the bead. This leaves you enough room later for your loop to go around the lampwork bead.

6. Figure 2 shows the first knot of the bracelet so you can see where the knot will lie in your work. The directions and figures below will show two different colored cording because it is easier to see how the knots are made. You will be working with one color cording.

Note: At this point you can pin down the cords for the bracelet on the macramé board or if you prefer hold it in your hands while you knot.


7. Holding the bead in your non-dominant hand or pinning the cording to your macramé board, take the “top” cord (blue in the picture) and loop it first under and then over the “bottom” cord (red cord in the picture) (See Figure 3).


8. Hold the loop with your non-dominant hand or pin the first loop to the macramé board.

9. Take the “bottom” cord (red) and loop it over the top cord (blue) and under and through the top cord loop(See Figure 4).


10. Pull evenly on both sides of the knot (See Figure 5).


11. When you have pulled evenly and snugly on the knot, it will look like Figure 6.


12. Continue holding the bead and knotting with your non-dominant hand or pinned down on the board. Loosen the top knot (red) by pulling on the back of the knot.

13. Pull the end of the “bottom” (blue) cording through the top (red) knot (See Figure 7). Pull evenly and snugly to get the second knot (See Figure 8).


14. Turn the knotting over (in the Figure the red cording is on the top and the blue cording is on the bottom).

15. Loosen the top (blue) knot from the back (See Figure 9).


16. Pull the bottom (red) cord through the loosened top (blue) knot. (See Figure 10).


17. Pull evenly and snugly to tighten the knot (See Figure 11).


Repeat steps 14 – 17 until the knots measure 6.5-7 inches long or the length to go around your wrist. You should have extra cording. The finished clasp will add between 3/4 to 1 inch to your bracelet. You will need at least 10 –12 inches of cording left over to make the clasp and finish the bracelet.

Congratulations on knotting this far! Now, to finish the bracelet, surf over to Art Bead Scene

Don't forget the OT Girls Links:

Art Bead Scene
Lucky ABS! We're part 2 of Lucky Knots!

Cindy Gimbrone
Luck is knotted up in Part 1 of this tutorial!

Earthenwood Studio Chronicles
Melanie is inspired by a lucky Leprechaun to make a fairy tale, treasure filled necklace

Jennifer Heynen of Jangles
Lucky Charms Bracelet...The name says it all. This bracelet has everything to bring you good luck.

Joolz by Lisa
As Luck Would Have It...Lucky Earrings

Katie's Beading Blog
Make your own luck with these fun, swingy earrings!

Labyrinth O' Luck
Hali has created a finger labyrinth journal designed after a 4-leaf clover.

Linda Augsburg at Make It Mine magazine
Lucky doesn't begin to describe the adventure I had making this T-shirt...

Lucky
Lucky to be... based on a coin holder a friend made for me...

http://art-interrupted.blogspot.com"/>Lucky to be Me
Mirror, mirror on the wall, who's the fairest of them all? Well, YOU, of course. No matter who you are when you look into this magical mirror, you'll be reminded you're lucky to be you!

Lynn Kvigne - Beading Help Web
Irish Proverb Window Ornament - step by step instructions for making this year-round ornament that may bring luck right through your window!

Melissa J. Lee - Strands of Beads
Good fortune is yours with this cookie-inspired necklace.

Snap out of it, Jean! There's beading to be done!
You'll "make Jean's day " if you check out her lucky Pendant with a Clint Eastwood eighties twist

Swell Designer
Swelldesigner gets lucky this month with some super colorful, sparkly painted bangles

The Impatient Blogger
Luck starts with a wish...Margot shares an project she created for Simply Beads last August.