Thursday, July 31, 2008
Red Hot Ornament Thursday
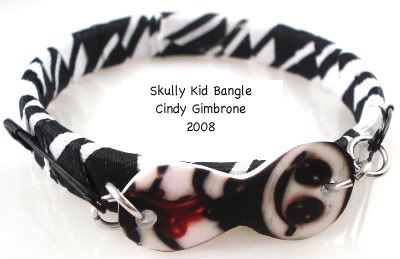
Trendy, popular - red hot! Wrapped bracelets are hot on the craft scene and I'm hot off of Color Week so using tutorials from the internet, I've combined the two into this Punk Skully Kid Bangle Bracelet. Instead of using an actual Skully Kid, I created a flat version in Shrink plastic and attached it to the bangle using black safety pins for true Punk style. It's just perfect for The Teens who hang out at my house.
So as Emily the Strange would say, "Get lost!" and go see what the other Ornament Thursday Grllzzz are up to!
Art Bead Scene
ABS Editor Cindy Gimbrone Goes Red Hot Crazy!
Beading Help Web is RED HOT!
Lynn Kvigne takes up the torch and shows you how to make a toe ring using fine silver.
Cindy Gimbrone aka Lampwork Diva
Trendy, Popular and Red Hot!
It's Red Hot July in Arizona!
Lisa finally finishes a project from over a year ago. Check out this "hot" take on a changeable necklace.
Katie's Bead Blog
Check out Katie's Red Hot faux coral necklace! It's a punch of color with a summery feel.
Linda Ausburg at BeadStyle Magazine
Linda shares a red-hot card she created.
Michelle is RED HOT!
Well, really, Margot is...
Savvy Crafter
Hotsie Totsie Plexi-glass Flower pendant over on Candie's blog!
Strands of Beads
The heat is rising, and Melissa is making a Red Hot Firecracker necklace!
Swell Designer a.k.a. Alexa Westerfield
The Swelldesigner gets red hot with a Hunka Hunka Burner Necklace!
Too Red Hot
Our own Michelle Zimmerman has been hard at work this month sculpting a devil of a project for your enjoyment.
Tuesday, July 29, 2008
WireHead Makes Jewelry
Made this anklet after my first wire wrapping class in 1997. Done in 20 gauge copper and Czech pressed glass beads, druks. See? I'm loving greens and teals! Nicely done if I do say so myself, good wraps on the beads and look at those loops!
Wire got me into melting glass because one addiction leads to another. Books are another obsession and I started buying jewelry related books the moment I touched a piece of wire. I'm BeadLit-ing on my first book but here's what it looks like - I'm always taking the road not taken so it's a bit off the beaten path - found object jewelry before it was called that.
I didn't intend to keep these but somehow I did. I got tooo busy raising my son so they were saved only because I neglected to give them away. It makes me wonder - Have you kept the firsts of your work?
Monday, July 28, 2008
Confessions of a WireHead
Challenging myself to approach color differently made me think about the beginning. What brought me to glass as a medium? How did it all start?
It was a piece of wire. Yup that's right, wire.
That lead to making headpins, clasps, and chains. I started to haunt the local bead shop and take all their classes in wire - not bead stringing as most people did, it was wire.
I was becoming a WireHead.
Not the science fiction kind of Wirehead but an avid wire bender. But I wasn't alone, most of the bead shop employees were Wire-Heads too. They taught the classes, I took them. We looked at the pretty colors of the seed beads and said it was one step from cross stitch, we were too edgy for that! (But I spoke too soon because they caught me in their colorful spell later on.)
We made the trip to the glass studio and all agreed we had to stay away from it, it was an addiction waiting to happen.(How little did I know!!)
I bought copper wire in all gauges for practice, then I bought sterling wire and twisted my way into the beginnings of carpal tunnel. I couldn't put it down, it was a compulsion - just one more link!
So, I show you my very very very first piece of jewelry, an earring. I bought the pressed glass beads and made the loop in the headpin. I attached it to the purchased french wire.
Wow.
Not.
But I had to start somewhere and this is what I started with.
Wire.
How did you get started in your crafty endeavors?
Labels:
first earring,
pressed glass,
Roots week,
Wire
Sunday, July 27, 2008
Sunday's Color Mix...
Saturday, July 26, 2008
Plug Ur Budz: Studio Saturday
I love to plug my budz over at Art Bead Scene - see which commenter won from my post on color last week and see what one of the ABS Editors is up to this week! In the meantime, I'll be out in my studio.....
Friday, July 25, 2008
Color Makes Me Wanna Dance!
Well, after a full week of color, I feel happy! Here's a video you may or may not have seen but I hope you all feel this way about your life and work - lots of color inspiration in here and it just might make you feeling like dancin' - go ahead, no one's lookin!
Where the Hell is Matt? (2008) from Matthew Harding on Vimeo.
Thursday, July 24, 2008
Color is Magnetic!
Magnetic Movie from Semiconductor on Vimeo.
Here's quirky thought for Color Week: Humans are always swimming in a pool of air and magnetic fields that we don't see. I always wonder what would happen if we could see what we were swimming in - here's a video that does just that. Magnetic Fields in Living, Moving Color!
Wednesday, July 23, 2008
It's Red Hot at Ornament Thursday Next Week!
The heat has gotten to me! Why do you ask? Because I've created TWO projects for this month's Ornament Thursday! It's not the first time I've gone a little OT nuts. Maybe that was the cold? This time, it's the heat?
It's Color Week so I've paid particular attention to how I use color in the projects. Let's see how I do with next week's Ornament Thursday. Can't wait to show you!
Tuesday, July 22, 2008
Color Applied!
Here's a book y'all gotta get! Margie Deeb has outdone herself with The Beader's Color Palette. The book includes 220 palettes inspired by five diverse themes - a great companion text to Margie's podcasts.
To give you an idea of how the book works, with the inspiration and color palettes, a blog post from Margie's blog shows an inspiration photo:
A color palette based on the inspiration photo:
A close up of a bracelet made in the color palette:
(above photos from Margie's blog)
Color Applied! Cool!
Labels:
Beader's Color Palette,
Color Week,
Margie Deeb
Monday, July 21, 2008
Color Take-Out
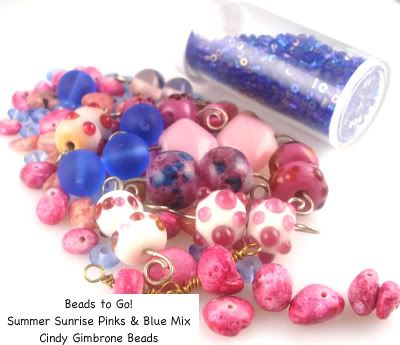
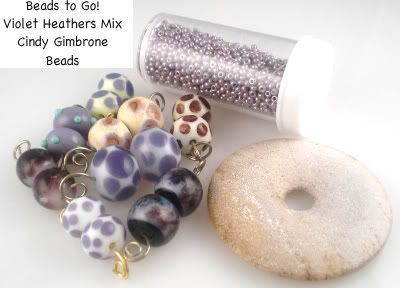
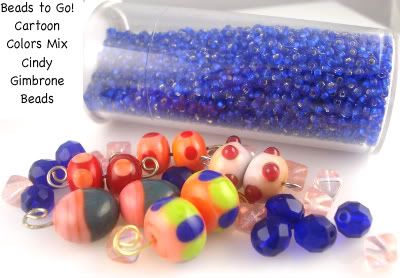
Today is our play date. I'm playing with color in a different way, trying to think like beaders and jewelry designers rather than a glass beadmaker. I hoard beads like beaders do and am drawn to beads I don't know how I'll use them so you can imagine I have a HUGE stash of beads. For awhile now, I've had an idea of selling a grouping like you order take out, you know when you order, "I'll take a number 1 and a number 6" and it comes to your table all together. I've finally decided how to go about it, with my mind set on color and what a beader wants to "order." I've started putting together mixes with this in mind and selecting from my personal stash of beads. It's called...
Beads to Go! Bead Mixes and are available only in my Etsy Shop.
Yeah, I know, I over-use the "!" I'm trying to convey emotion through the internet, almost impossible to do, but I try with "!" The jury is out whether it works or not. But anyways....I've put together some Beads to Go! Mixes based on my color work. Here's your chance to see how I'm doing.
A high contrast combinaton of colors, red and my beloved yellow. I've combined reds in the same saturation and hue as accent beads and have a smaller percentage of yellow for an accent. It's a bright and happy combination:
A mustard yellow or one with more black in it is combined with red again, it reminds me of Tibetan Prayer Flags:
How'm doin' so far? What do you think?
I make beads based on a color palette. I set out the glass rods in specific colors and then all my beads are made of those colors that day. One day, I set out black, ivory and amber. I was developing the Glyph Series so I selected the colors based on how I could "draw" with them instead of the selecting based on the pleasing color combination. It works as a color palette even though I didn't intend it.
I combined various orphan beads into this Beads to Go Mix called Sahara. I mixed in some ocher yellow and brown. It's interesting to look at the glass in a completely different way. I'm moving outside my own box, and is a challenge I haven't taken consciously before. How do think I've done?
Sunday, July 20, 2008
Keeping Your Color Work on Track: Blogs
I read alot of blogs. My reader is full and now I've added color blogs. Here are a few that I found helpful for the color study done for Color Week. For general color theory here is the Queen of Color, Margie Deeb's Color for Bead Artists
If you want your color study in a social networking site, there's the Color Lovers Blog
For the glass beadmaker, Kandice Seeber writes a wonderful blog called Color Addiction. What I love most about Kandice's blog is the glass "swatches." When a new glass color comes out, I like to wait to see what Kandice has to say about it. Kandice thoroughly tests each glass color and her blog is well written, not to mention the cute phrases thrown in on occasion, "oh my freaking YUM" stands out.
(Above Photos from Color Addiction.)
Some flameworkers aren't chatty, they just show you the glass like Seraphim FlameWorks: Double Helix Color Tests
(Above Photo from Seaphimflameworks Blog.)
I'll take it either way. Choose what you like and add it to your reader. It will keep your color work on track!
Saturday, July 19, 2008
Color on Studio Saturday
We're going into my studio today for Color Week. So hop on over to Studio Saturday on Art Bead Scene to see what's up!
Friday, July 18, 2008
Ok, I've spun the color wheel now what? Color Celebration!
Get thee to iTunes and download some episodes of Margie Deeb's Podcast, Celebration of Color. A few episodes I recommend are "Balancing Act," "Triadic & True" and Why C-M-Y?
Margie is a "color zealot" to use her own words so she's got lots to say on color. She's been podcasting since January 2006 so there are alot of episodes to pick and choose from - choose a few that interest you.
I'll come back to Margie and her books again later on in color week but in the meantime, Color Celebration will get your color wheel turning!
(Photo of Margie Deeb teaching from her website.)
Thursday, July 17, 2008
Wheeeee! I got crazy with scissors!
Take a Spin with Color: Color Week Starts Now!
Color
–noun
1. the quality of an object or substance with respect to light reflected by the object, usually determined visually by measurement of hue, saturation, and brightness of the reflected light; saturation or chroma; hue.
HUH? Ok, you didn't come to my blog to read the dictionary for pete's sake! I know, I know,I know...I'm not going to launch into a dry explanation of color. Remember this is Color Week and I'm challenging myself to use color in unexpected ways. So, I need to point out that color is tied into vision for us bipeds.
80% of what we learn, understand and react to is visual. We require visual stimulation and that includes color.
We need color.
We want color.
It keeps us sane.
Color keeps us alive.
That's serious business, right? So maybe I should take an organized approach, right?
If you read my blog, I don't tread the well trodden path, I like to do things intuitively - mix it up and see what comes out. Now where might I find that in my quest for color?
Ooo - remember theSpin Art at the Fair?
Here's a Spin the Color Wheel that's fun and unexpected. After you've spun the wheel a few times, you can click around the site - it's full of awesome color tools.
Explore Color and see where it takes you.
(Credits: General facts about sensory input and human beings from Color Matters website; Spin Art Photo)
Wednesday, July 16, 2008
Lucky Knots ties up Blogiversary
Today is officially 3 years of blogging! YAY! So, I'm going to "tie up loose ends" with the Lucky Knots and Lampwork project I posted this past February for Ornament Thursday. All you early Christmas present buyers and crafters can get started on this necklace for your friends and family!
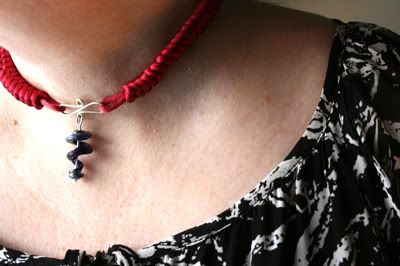
Wondering what the Ornament Thursday gals have been up to? If you have, I'm posting my Lucky project. Above, is the full picture of the Ornament Thursday Teaser - Lucky Knots and Lampwork Spirals. If you wonder what I'm talking about - I'm posting the Lucky Knots and Lampwork tutorial in two parts today. The Lucky Knots how to is posted here while the finishing is posted on Art Bead Scene where I'm one of the editors. The tutorial is for a bracelet using a large bead as the center/clasp. (Shown below)
You might be wondering why "Lucky Knots." For the design I had in mind, Chinese knotting would give me a "ropey feel" with a strong punch of color. To create the satin cord rope, I used the Snake Knot. I wanted more symbolism in the design so I researched the meaning of the snake in Chinese culture. A snake is a sign of luck. Perfect - now I had alliteration to add to the design - Lucky Knots and Lampwork.
Making the Lucky Knots for a Large Bead Bracelet:
1. Wrap some tape around the ends of the satin cording. Find the middle of the 12 feet of cording.
2. String the sterling silver 6mm large holed bead to the middle of the cording. (Note: To make a necklace like the Lucky Knots and Lampwork Spirals, skip steps 2-4 and make a loop instead of stringing on a large disk bead.)
3. Grab the opposite end of the cord and string through the lampwork bead. Pull all the way through until the sterling silver bead is wedged into the hole of the lampwork bead. Pull tightly and adjust so you can see little or no cording showing through (See Figure 1).
4. Hold the lampwork bead with your non-dominant hand and the sterling bead facing up.
5. Use your dominant hand to pull both ends of the cording out straight away from the bead. You will start the knot where the cording meets the edge of the bead. This leaves you enough room later for your loop to go around the lampwork bead.
6. Figure 2 shows the first knot of the bracelet so you can see where the knot will lie in your work. The directions and figures below will show two different colored cording because it is easier to see how the knots are made. You will be working with one color cording.
Note: At this point you can pin down the cords for the bracelet on the macramé board or if you prefer hold it in your hands while you knot.
7. Holding the bead in your non-dominant hand or pinning the cording to your macramé board, take the “top” cord (blue in the picture) and loop it first under and then over the “bottom” cord (red cord in the picture) (See Figure 3).
8. Hold the loop with your non-dominant hand or pin the first loop to the macramé board.
9. Take the “bottom” cord (red) and loop it over the top cord (blue) and under and through the top cord loop(See Figure 4).
10. Pull evenly on both sides of the knot (See Figure 5).
11. When you have pulled evenly and snugly on the knot, it will look like Figure 6.
12. Continue holding the bead and knotting with your non-dominant hand or pinned down on the board. Loosen the top knot (red) by pulling on the back of the knot.
13. Pull the end of the “bottom” (blue) cording through the top (red) knot (See Figure 7). Pull evenly and snugly to get the second knot (See Figure 8).
14. Turn the knotting over (in the Figure the red cording is on the top and the blue cording is on the bottom).
15. Loosen the top (blue) knot from the back (See Figure 9).
16. Pull the bottom (red) cord through the loosened top (blue) knot. (See Figure 10).
17. Pull evenly and snugly to tighten the knot (See Figure 11).
Repeat steps 14 – 17 until the knots measure 6.5-7 inches long or the length to go around your wrist. You should have extra cording. The finished clasp will add between 3/4 to 1 inch to your bracelet. You will need at least 10 –12 inches of cording left over to make the clasp and finish the bracelet.
Congratulations on knotting this far! Now, to finish the bracelet, surf over to Art Bead Scene
Don't forget the OT Girls Links:
Art Bead Scene
Lucky ABS! We're part 2 of Lucky Knots!
Cindy Gimbrone
Luck is knotted up in Part 1 of this tutorial!
Earthenwood Studio Chronicles
Melanie is inspired by a lucky Leprechaun to make a fairy tale, treasure filled necklace
Jennifer Heynen of Jangles
Lucky Charms Bracelet...The name says it all. This bracelet has everything to bring you good luck.
Joolz by Lisa
As Luck Would Have It...Lucky Earrings
Katie's Beading Blog
Make your own luck with these fun, swingy earrings!
Labyrinth O' Luck
Hali has created a finger labyrinth journal designed after a 4-leaf clover.
Linda Augsburg at Make It Mine magazine
Lucky doesn't begin to describe the adventure I had making this T-shirt...
Lucky
Lucky to be... based on a coin holder a friend made for me...
http://art-interrupted.blogspot.com"/>Lucky to be Me
Mirror, mirror on the wall, who's the fairest of them all? Well, YOU, of course. No matter who you are when you look into this magical mirror, you'll be reminded you're lucky to be you!
Lynn Kvigne - Beading Help Web
Irish Proverb Window Ornament - step by step instructions for making this year-round ornament that may bring luck right through your window!
Melissa J. Lee - Strands of Beads
Good fortune is yours with this cookie-inspired necklace.
Snap out of it, Jean! There's beading to be done!
You'll "make Jean's day " if you check out her lucky Pendant with a Clint Eastwood eighties twist
Swell Designer
Swelldesigner gets lucky this month with some super colorful, sparkly painted bangles
The Impatient Blogger
Luck starts with a wish...Margot shares an project she created for Simply Beads last August.
Wondering what the Ornament Thursday gals have been up to? If you have, I'm posting my Lucky project. Above, is the full picture of the Ornament Thursday Teaser - Lucky Knots and Lampwork Spirals. If you wonder what I'm talking about - I'm posting the Lucky Knots and Lampwork tutorial in two parts today. The Lucky Knots how to is posted here while the finishing is posted on Art Bead Scene where I'm one of the editors. The tutorial is for a bracelet using a large bead as the center/clasp. (Shown below)
You might be wondering why "Lucky Knots." For the design I had in mind, Chinese knotting would give me a "ropey feel" with a strong punch of color. To create the satin cord rope, I used the Snake Knot. I wanted more symbolism in the design so I researched the meaning of the snake in Chinese culture. A snake is a sign of luck. Perfect - now I had alliteration to add to the design - Lucky Knots and Lampwork.
Making the Lucky Knots for a Large Bead Bracelet:
1. Wrap some tape around the ends of the satin cording. Find the middle of the 12 feet of cording.
2. String the sterling silver 6mm large holed bead to the middle of the cording. (Note: To make a necklace like the Lucky Knots and Lampwork Spirals, skip steps 2-4 and make a loop instead of stringing on a large disk bead.)
3. Grab the opposite end of the cord and string through the lampwork bead. Pull all the way through until the sterling silver bead is wedged into the hole of the lampwork bead. Pull tightly and adjust so you can see little or no cording showing through (See Figure 1).
4. Hold the lampwork bead with your non-dominant hand and the sterling bead facing up.
5. Use your dominant hand to pull both ends of the cording out straight away from the bead. You will start the knot where the cording meets the edge of the bead. This leaves you enough room later for your loop to go around the lampwork bead.
6. Figure 2 shows the first knot of the bracelet so you can see where the knot will lie in your work. The directions and figures below will show two different colored cording because it is easier to see how the knots are made. You will be working with one color cording.
Note: At this point you can pin down the cords for the bracelet on the macramé board or if you prefer hold it in your hands while you knot.
7. Holding the bead in your non-dominant hand or pinning the cording to your macramé board, take the “top” cord (blue in the picture) and loop it first under and then over the “bottom” cord (red cord in the picture) (See Figure 3).
8. Hold the loop with your non-dominant hand or pin the first loop to the macramé board.
9. Take the “bottom” cord (red) and loop it over the top cord (blue) and under and through the top cord loop(See Figure 4).
10. Pull evenly on both sides of the knot (See Figure 5).
11. When you have pulled evenly and snugly on the knot, it will look like Figure 6.
12. Continue holding the bead and knotting with your non-dominant hand or pinned down on the board. Loosen the top knot (red) by pulling on the back of the knot.
13. Pull the end of the “bottom” (blue) cording through the top (red) knot (See Figure 7). Pull evenly and snugly to get the second knot (See Figure 8).
14. Turn the knotting over (in the Figure the red cording is on the top and the blue cording is on the bottom).
15. Loosen the top (blue) knot from the back (See Figure 9).
16. Pull the bottom (red) cord through the loosened top (blue) knot. (See Figure 10).
17. Pull evenly and snugly to tighten the knot (See Figure 11).
Repeat steps 14 – 17 until the knots measure 6.5-7 inches long or the length to go around your wrist. You should have extra cording. The finished clasp will add between 3/4 to 1 inch to your bracelet. You will need at least 10 –12 inches of cording left over to make the clasp and finish the bracelet.
Congratulations on knotting this far! Now, to finish the bracelet, surf over to Art Bead Scene
Don't forget the OT Girls Links:
Art Bead Scene
Lucky ABS! We're part 2 of Lucky Knots!
Cindy Gimbrone
Luck is knotted up in Part 1 of this tutorial!
Earthenwood Studio Chronicles
Melanie is inspired by a lucky Leprechaun to make a fairy tale, treasure filled necklace
Jennifer Heynen of Jangles
Lucky Charms Bracelet...The name says it all. This bracelet has everything to bring you good luck.
Joolz by Lisa
As Luck Would Have It...Lucky Earrings
Katie's Beading Blog
Make your own luck with these fun, swingy earrings!
Labyrinth O' Luck
Hali has created a finger labyrinth journal designed after a 4-leaf clover.
Linda Augsburg at Make It Mine magazine
Lucky doesn't begin to describe the adventure I had making this T-shirt...
Lucky
Lucky to be... based on a coin holder a friend made for me...
http://art-interrupted.blogspot.com"/>Lucky to be Me
Mirror, mirror on the wall, who's the fairest of them all? Well, YOU, of course. No matter who you are when you look into this magical mirror, you'll be reminded you're lucky to be you!
Lynn Kvigne - Beading Help Web
Irish Proverb Window Ornament - step by step instructions for making this year-round ornament that may bring luck right through your window!
Melissa J. Lee - Strands of Beads
Good fortune is yours with this cookie-inspired necklace.
Snap out of it, Jean! There's beading to be done!
You'll "make Jean's day " if you check out her lucky Pendant with a Clint Eastwood eighties twist
Swell Designer
Swelldesigner gets lucky this month with some super colorful, sparkly painted bangles
The Impatient Blogger
Luck starts with a wish...Margot shares an project she created for Simply Beads last August.
Labels:
Blogiversary,
Lucky Knots,
Ornament Thursday,
Spirals
Tuesday, July 15, 2008
Blogiversary: Christmas in July - Jingle Spiral Ornament
If you're an early Christmas shopper, here's an Ornament Project, The Jingle Spiral, I posted last December.
I'm all about instant gratification when it comes to crafts. If you're like me,today's Jingle Spiral Ornament will satisfy your need for craft speed! I used one of my handmade extra long (55mm or 2. 25 inches) flameworked Holiday Ornament Glass Spirals, 20 gauage silver wire and tiny oxidized silver metal bells. You'll need your flush cutters, round and flat nose pliers. (Pictures follow directions.)
Since measuring impedes instant gratification, I used the spiral to figure out how much wire to use. Unwind twice the length of the spiral or about 4.5 inches of wire. Cut using the flush cutters, it will give you a nice smooth end.
Use your round nose plies to make a loop at one end of the wire.
Straighten the remaining length of wire at the neck of the loop. You'll want the ornament to hang straight.
Add 3 tiny oxidized metal beads.
Add spiral.
Make small loop above the spiral.
Use your index finger to make the large loop for hanging the ornament.
Your Jingle Spiral is now ready to hang!
Other crafters and designers are making beautiful ornaments for Ornament Thursday. Hop on over to their blogs and snatch up more ornament projects!
Sara Naumann
Lynn Kvigne
Candie Cooper
Katie Hacker
Margot Potter
Linda Augsburg
Melanie Brooks Lukacs
Art Bead Scene
Suzanne
Humblebeads
Polymer Clay Craft Gossip
Alexa Westerfield
Debba Haupert
Elaine Luther
Melissa Lee
Rebecca Peck
Jean Yates
Michelle McGee
Jenny Harada
Jennifer Heynen
Hali Chambers
Kriss Kramer
Brandy Lung Gill
Labels:
Blogiversary,
how-to,
Jingle Spiral,
Ornament Thursday
Monday, July 14, 2008
Blogiversary: Punk
I'm an old punk rocker at heart - so this post brought back alot of memories. Seems like it did for some of my blog readers too!
Photo by Dijiddle
Alternative style - punk style is what today is about. Sunday I blogged about the tail end of the baby boom generation as a separate group - The Jones Generation. I think the Jones Generation had a particular attitude that fed into the emerging punk style of the late 1970's ala the Ramones and The Clash. It was pre-spiked hair and dog collars although Vivienne Westwood was making that popular in the UK. Punk was designed to shock. The style and music was stripped down - with a heavy dose of DIY. Chains, slogan t-shirts and customized blazers.
A straight A student in high school, I had an artsy side that came out in what I wore. I loved the rebellious nature of punk. I wasn't willing to drop out of school but I was willing to shock by wearing the style and listen to the music! I latched onto the customized blazer - I borrowed old pinstriped blazers from the back of my father's closet and customized it with vintage rhinestone pins, shoe clips and whatever else I could find. I could change it the look by changing the pins and buttons on it. Cool!
So the current trend in DIY and punk style is just as fun now as it was then. Punk style now is full of skulls, dyed hair, black with a punch of color, chains, hearts and plaid. Some call it punk, pop punk, hardcore punk, and there is even something called "Steampunk". There's lots of overlap with Goth style but I'm going to hold off on Goth until tomorrow. When I think of Millenium Punk, I think of this Blythe Doll from Etsy.
All of this is where the Heartz n Skullz and Industry series of beads come from. Slightly different in feel, they are inspired by the same punk aesthetic.
So, when designing with Punk inspired beads, you might want to turn up your old record player and listen to the Ramones. Here are the Ramones in Rock and Roll High School - Enjoy!
Subscribe to:
Posts (Atom)