Showing posts with label Spirals. Show all posts

Wednesday, July 16, 2008

Lucky Knots ties up Blogiversary

Today is officially 3 years of blogging! YAY! So, I'm going to "tie up loose ends" with the Lucky Knots and Lampwork project I posted this past February for Ornament Thursday. All you early Christmas present buyers and crafters can get started on this necklace for your friends and family!


Wondering what the Ornament Thursday gals have been up to? If you have, I'm posting my Lucky project. Above, is the full picture of the Ornament Thursday Teaser - Lucky Knots and Lampwork Spirals. If you wonder what I'm talking about - I'm posting the Lucky Knots and Lampwork tutorial in two parts today. The Lucky Knots how to is posted here while the finishing is posted on Art Bead Scene where I'm one of the editors. The tutorial is for a bracelet using a large bead as the center/clasp. (Shown below)


You might be wondering why "Lucky Knots." For the design I had in mind, Chinese knotting would give me a "ropey feel" with a strong punch of color. To create the satin cord rope, I used the Snake Knot. I wanted more symbolism in the design so I researched the meaning of the snake in Chinese culture. A snake is a sign of luck. Perfect - now I had alliteration to add to the design - Lucky Knots and Lampwork.


Making the Lucky Knots for a Large Bead Bracelet:


1. Wrap some tape around the ends of the satin cording. Find the middle of the 12 feet of cording.

2. String the sterling silver 6mm large holed bead to the middle of the cording. (Note: To make a necklace like the Lucky Knots and Lampwork Spirals, skip steps 2-4 and make a loop instead of stringing on a large disk bead.)

3. Grab the opposite end of the cord and string through the lampwork bead. Pull all the way through until the sterling silver bead is wedged into the hole of the lampwork bead. Pull tightly and adjust so you can see little or no cording showing through (See Figure 1).


4. Hold the lampwork bead with your non-dominant hand and the sterling bead facing up.

5. Use your dominant hand to pull both ends of the cording out straight away from the bead. You will start the knot where the cording meets the edge of the bead. This leaves you enough room later for your loop to go around the lampwork bead.

6. Figure 2 shows the first knot of the bracelet so you can see where the knot will lie in your work. The directions and figures below will show two different colored cording because it is easier to see how the knots are made. You will be working with one color cording.

Note: At this point you can pin down the cords for the bracelet on the macramé board or if you prefer hold it in your hands while you knot.


7. Holding the bead in your non-dominant hand or pinning the cording to your macramé board, take the “top” cord (blue in the picture) and loop it first under and then over the “bottom” cord (red cord in the picture) (See Figure 3).


8. Hold the loop with your non-dominant hand or pin the first loop to the macramé board.

9. Take the “bottom” cord (red) and loop it over the top cord (blue) and under and through the top cord loop(See Figure 4).


10. Pull evenly on both sides of the knot (See Figure 5).


11. When you have pulled evenly and snugly on the knot, it will look like Figure 6.


12. Continue holding the bead and knotting with your non-dominant hand or pinned down on the board. Loosen the top knot (red) by pulling on the back of the knot.

13. Pull the end of the “bottom” (blue) cording through the top (red) knot (See Figure 7). Pull evenly and snugly to get the second knot (See Figure 8).


14. Turn the knotting over (in the Figure the red cording is on the top and the blue cording is on the bottom).

15. Loosen the top (blue) knot from the back (See Figure 9).


16. Pull the bottom (red) cord through the loosened top (blue) knot. (See Figure 10).


17. Pull evenly and snugly to tighten the knot (See Figure 11).


Repeat steps 14 – 17 until the knots measure 6.5-7 inches long or the length to go around your wrist. You should have extra cording. The finished clasp will add between 3/4 to 1 inch to your bracelet. You will need at least 10 –12 inches of cording left over to make the clasp and finish the bracelet.

Congratulations on knotting this far! Now, to finish the bracelet, surf over to Art Bead Scene

Don't forget the OT Girls Links:

Art Bead Scene
Lucky ABS! We're part 2 of Lucky Knots!

Cindy Gimbrone
Luck is knotted up in Part 1 of this tutorial!

Earthenwood Studio Chronicles
Melanie is inspired by a lucky Leprechaun to make a fairy tale, treasure filled necklace

Jennifer Heynen of Jangles
Lucky Charms Bracelet...The name says it all. This bracelet has everything to bring you good luck.

Joolz by Lisa
As Luck Would Have It...Lucky Earrings

Katie's Beading Blog
Make your own luck with these fun, swingy earrings!

Labyrinth O' Luck
Hali has created a finger labyrinth journal designed after a 4-leaf clover.

Linda Augsburg at Make It Mine magazine
Lucky doesn't begin to describe the adventure I had making this T-shirt...

Lucky
Lucky to be... based on a coin holder a friend made for me...

http://art-interrupted.blogspot.com"/>Lucky to be Me
Mirror, mirror on the wall, who's the fairest of them all? Well, YOU, of course. No matter who you are when you look into this magical mirror, you'll be reminded you're lucky to be you!

Lynn Kvigne - Beading Help Web
Irish Proverb Window Ornament - step by step instructions for making this year-round ornament that may bring luck right through your window!

Melissa J. Lee - Strands of Beads
Good fortune is yours with this cookie-inspired necklace.

Snap out of it, Jean! There's beading to be done!
You'll "make Jean's day " if you check out her lucky Pendant with a Clint Eastwood eighties twist

Swell Designer
Swelldesigner gets lucky this month with some super colorful, sparkly painted bangles

The Impatient Blogger
Luck starts with a wish...Margot shares an project she created for Simply Beads last August.

Thursday, April 10, 2008

Beading on a Budget: Beginner Project

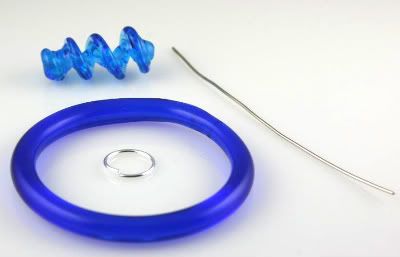
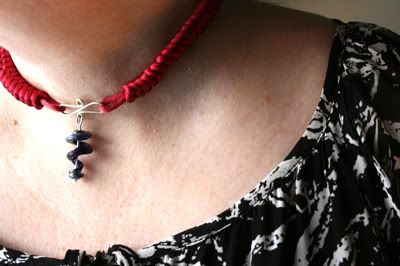
Here's a quick and easy pendant made from the supplies and spiral bead you've purchased this week. It's called "Encircled Spiral."

Beadmaker Tip ALERT: Beadmakers often have a story about the beads s/he creates. It's a cost free way to lend special significance to the jewelry you make.


Supplies I used:

1 Glass Spiral

Largest blue glass circle

3 round silver jump rings

3.5 inches silver 20 gauge wire

I show only 1 jump ring in the picture but after I started to make the pendant, I thought it would be more stylish and secure with 3 jump rings. You can use 1 - 3 according to your own preference.


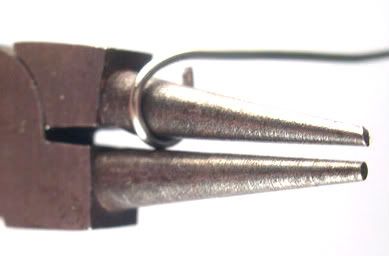
Using your round nose pliers, or your stepped jaw pliers to make a loop at the one end of the wire. This will be the top loop.


String the spiral onto the looped wire with the loop at the top of the spiral.

From the bottom, wind the wire around the spiral moving toward the top.

Use the round nose plies to make a loop at the end of the wire.

Nestle the bottom loop into the spiral.

Open purchased jump rings with your fingers.

Attach 1 to 3 jump rings to the spiral and the glass circle.

Voila! You've completed the Encircled Spiral Pendant!


Wondering what to string the Encircled Pendant on? Yep, you guessed it, that's tomorrow's blog post! :-)

Monday, March 31, 2008

Suggest a Name and Win FREE Glass Links

Are you feeling literary today? I hope so because my jewelry designing colleague, Cyndi Lavin and I need your help. Remember the Collaboration I did with Elaine Ray and Beverly Herman? I loved the color combination so much, I sent a few to Cyndi along with a Glyph Series bead to see what a different designer would do with them.

Cyndi has designed a lovely necklace using the glass spirals and petroglyph beads but since we're like Kandinsky, neither she nor I know what to name it!


Do you?

I know my readers are happy to suggest names, you've done it before with the rings I post.

I'm upping the ante today - post a comment suggesting a name and you'll be entered into a drawing to win two aqua glass links!

You can post a name either here or on Cyndi Lavin's blog. Comments made from today, March 31st until Sunday, April 6th will be eligible. Winner will be announced on here and on Cyndi's blog on Monday, April 7th, 2008.

I look forward to seeing the suggested names! Good luck!

Cindy

Saturday, March 22, 2008

A Mix...


The kiln is warming up and it's about time for me to head out to the studio. I'll be making more doodles/glass links today. Along with those I make a few spirals playing around with different color combinations and shapes - an "even" spiral and one that peaks toward the center rather than the top.

Transparent amber is another good color to work with - it holds the heat of the flame, preventing the glass from cracking and doesn't blob out of shape. And it reminds me of maple syrup!

Time to make the beads! Enjoy your day! :-)

Tuesday, October 30, 2007

Variation on a spiral


Here's a variation of the spiral I've been working on. Iridescent blue with unpredictable opal yellow. Abstract and fun!

Tuesday, October 09, 2007

Variation on a theme: Spirals


I toyed with the idea of a spiral-on-a-bead in the bead set I made for last week's Collaboration Exploration (see below). Laura Bracken included the blue/green spiral in her art necklace, Flight of Man and Bridgitte Tucker created her Del Mar series with them. Yet I made this little beauty first. As a prototype bead, I wore it everywhere to make sure the design could hold up to wear before I offered it to my customers. It passed the wear and tear test and I made the spirals for the Collaboration. Now it's time for this one to step into the spotlight!

Thursday, August 30, 2007

Today's Treat


Today marks the beginning of a repeating blog series called, "Today's Treat." I'll showcase a piece of jewelry or a special bead with a story behind it. The art beads and jewelry I create has a story behind it, a reason it was created and I'll share those stories with you.

Today's Treat showcases pendants I created with Earthenwood Moon face and Green Girls Studio Dryad head . I have a personal stash of Earthenwood beads - Melanie imbues her beads with her personality, sensitive, earth conscious with attention to detail. Each Earthenwood bead is finely crafted. I sense the same feeling from Green Girl Studios work - each bead has significance - when you create with a Green Girl bead, you're making a statement about the natural environment. Both of these face beads carry their own message so I wanted to create pendants that would stand alone on a single rubber cord.

I paired the face beads with my Glass Spirals and sterling silver. While the moon face and the dryad head speak to the natural world, they're also whimsical. They needn't be too serious. I wanted to create a fantasy pendant and in order to achieve that, I needed wings. Glass wings were created at the torch using silver foil and dichroic glass to make them shimmer. The "wing" beads are versatile and look like wings or tail fins depending on how they're strung. A sterling silver crown completes the fantasy.

Artbeadscene hosts a monthly design challenge with fabulous themes - so hats off to ABS for inspiring me with their August Challenge - Midsummer Night's Dream. This is my midsummer night's dream, what is your midsummer night dream like?

Tuesday, May 22, 2007

Hair Spirals


Here's the hair spiral I made from the customer suggestion. The customer, Amber, was nice enough to send me an email directing me to a picture. The picture is a bit small so here's a link to Amber's etsy shop where she sells really cool one of a kinds!

Monday, April 30, 2007

Design Flexibility = hair bling!


A good design is flexible - take the spirals for instance. I posted a few in my etsy shop and got an inquiry about altering them just slightly. The customer wears her hair in dreadlocks and she liked the spirals but wanted them open at the top and bottom in order to twist around her dreads. What a great suggestion! To wear them as jewelry, it's best to have the ends closed so the spirals will stay on a stringing material - but as hair bling - the ends need to be open!

Another great customer suggestion - and it's about wearing the beads in your hair! Hmm, do I sense a trend?

Thursday, March 22, 2007

Spiral sets, NYC and while I'm gone see Artbeadscene!


I'm offering the set of Beadwork Challenge beads on my website. I had a request for a Water Spiral set, so I've created one!

Well, the intrepid beadmaker is off to the Big Apple to sell some art beads at the Urban Glass Bead Expo! Hope to see old customers, meet some new ones and talk to jewelry designers! I'll tell you all about it when I get back on Tuesday!

While I'm away, pop on over to a terrific new blog on art beads - Art Bead Scene - a new blog just started by an awesome group of beadmakers of all media who I am fortunate enough to be associated with! Great content and very talented beadmakers!

Saturday, March 17, 2007

April/May issue of Beadwork!

YIPPPEEEE!! The April/May issue of Beadwork is out! I'm on pages 88-89!! I've been talking about the Challenge coming up and now it's here! I love the fresh unexpected way the editors of Beadwork used the spirals!

Speaking of spirals, they're on my website. I'll be adding more color options later but in the meantime, if you don't see a color you'd like, feel free to email me your request!

Wednesday, March 14, 2007

What to do with a Spiral? Instant fashion!


I've made spirals with the high twist in different places on the bead, middle, end or even all the way around - that lends itself to being worn horizontally rather than vertically. These spirals are made on a 3mm mandrel so you can run a purchased necklace through it. Voila! Instant fashion! You can interchange the spirals to suit your mood!

Sunday, March 11, 2007

Spirals


I'm happily locked away in my studio winding spirals for Urban Glass, Beadfiesta and my website. If this is the first time you're reading my blog - welcome! And you might be wondering, "why spirals?" I've taken this from my website:

What is the significance of the spirals?
In the drive to express ideas through my glass, I wanted to express the never-ending cycle of life. How events will happen at one time in your life and then circle back to them again. We have our own life-spirals and we travel around on them and come back to events although maybe not in exactly the same way. A spiral can bring you peace too, the assurance that everything WILL circle back around. In that sense, it serves as a rudimentary mandala for us to meditate upon.


So, I chose to make spirals in glass to express that idea - glass is a perfect medium because of it's potentially fragile quality. A glass spiral can be beautiful, colorful, reflective yet if you don't treat it with some care, it could shatter.

Tuesday, March 06, 2007

Urban Glass Bead Expo March 23-25, 2007


Here's the picture of me at the Guggenheim Museum in NYC. My good friend Molly drove me up to the museum before the Urban Glass Bead Expo last year. The Bead Expo is coming up in two weeks - so I'm frantically trying to get ready!

New this year at Urban Glass! I've made Spirals that will be in the April 2007 issue of Beadwork. These are really fun beads! They'll be making their first public appearance at the Urban Glass Bead Expo!