Friday, February 29, 2008

Plug Ur Bud: Art Bead Scene Studio Saturday


Today on Leap Day, I'm going to plug my bud, Tari Sasser. She's the featured artist on tomorrow's Art Bead Scene Studio Saturday. See you at the 'Scene tomorrow!

Thursday, February 28, 2008

Lucky it's Ornament Thursday!


It's Ornament Thursday whose February theme is Lucky. Lucky for me I designed the versatile Lucky Knots and Lampwork necklace! My own flameworked glass beads are the foundation and the Chinese "lucky" or snake knots add texture. The design can be used to create different looks with the same basic technique - here are a few:


OR combine the knotting with wire work - handmade ball headpins and a hand formed "S" clasp to create a unique pendant with a flameworked reactive blue spiral. A punch of contrasting color and zing - a modern necklace full of personality!


Want to create a Lucky Knot and Lampwork Necklace for yourself? I wrote a tutorial in two parts, Part One here and Part Two on Art Bead Scene! Now for the OT Girls Fabulous Link list!

Art Bead Scene
Lucky ABS! We're part 2 of Lucky Knots!

Cindy Gimbrone
Luck is knotted up in Part 1 of this tutorial!

Earthenwood Studio Chronicles
Melanie is inspired by a lucky Leprechaun to make a fairy tale, treasure filled necklace

Jennifer Heynen of Jangles
Lucky Charms Bracelet...The name says it all. This bracelet has everything to bring you good luck.

Joolz by Lisa
As Luck Would Have It...Lucky Earrings

Katie's Beading Blog
Make your own luck with these fun, swingy earrings!

Labyrinth O' Luck
Hali has created a finger labyrinth journal designed after a 4-leaf clover.

Linda Augsburg at Make It Mine magazine
Lucky doesn't begin to describe the adventure I had making this T-shirt...

Lucky
Lucky to be... based on a coin holder a friend made for me...

http://art-interrupted.blogspot.com"/>Lucky to be Me
Mirror, mirror on the wall, who's the fairest of them all? Well, YOU, of course. No matter who you are when you look into this magical mirror, you'll be reminded you're lucky to be you!

Lynn Kvigne - Beading Help Web
Irish Proverb Window Ornament - step by step instructions for making this year-round ornament that may bring luck right through your window!

Melissa J. Lee - Strands of Beads
Good fortune is yours with this cookie-inspired necklace.

Snap out of it, Jean! There's beading to be done!
You'll "make Jean's day " if you check out her lucky Pendant with a Clint Eastwood eighties twist

Swell Designer
Swelldesigner gets lucky this month with some super colorful, sparkly painted bangles

The Impatient Blogger
Luck starts with a wish...Margot shares an project she created for Simply Beads last August.

Wednesday, February 27, 2008

Knot with Cindy, Finish with ABS!


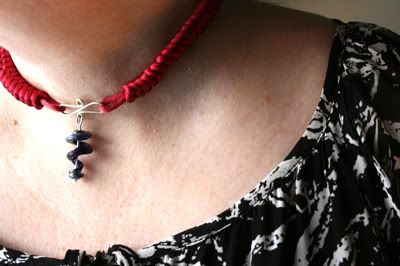
Wondering what the Ornament Thursday gals have been up to? If you have, I'm posting my Lucky project. Above, is the full picture of the Ornament Thursday Teaser - Lucky Knots and Lampwork Spirals. If you wonder what I'm talking about - I'm posting the Lucky Knots and Lampwork tutorial in two parts today. The Lucky Knots how to is posted here while the finishing is posted on Art Bead Scene where I'm one of the editors. The tutorial is for a bracelet using a large bead as the center/clasp. (Shown below)


You might be wondering why "Lucky Knots." For the design I had in mind, Chinese knotting would give me a "ropey feel" with a strong punch of color. To create the satin cord rope, I used the Snake Knot. I wanted more symbolism in the design so I researched the meaning of the snake in Chinese culture. A snake is a sign of luck. Perfect - now I had alliteration to add to the design - Lucky Knots and Lampwork.


Making the Lucky Knots for a Large Bead Bracelet:


1. Wrap some tape around the ends of the satin cording. Find the middle of the 12 feet of cording.

2. String the sterling silver 6mm large holed bead to the middle of the cording. (Note: To make a necklace like the Lucky Knots and Lampwork Spirals, skip steps 2-4 and make a loop instead of stringing on a large disk bead.)

3. Grab the opposite end of the cord and string through the lampwork bead. Pull all the way through until the sterling silver bead is wedged into the hole of the lampwork bead. Pull tightly and adjust so you can see little or no cording showing through (See Figure 1).


4. Hold the lampwork bead with your non-dominant hand and the sterling bead facing up.

5. Use your dominant hand to pull both ends of the cording out straight away from the bead. You will start the knot where the cording meets the edge of the bead. This leaves you enough room later for your loop to go around the lampwork bead.

6. Figure 2 shows the first knot of the bracelet so you can see where the knot will lie in your work. The directions and figures below will show two different colored cording because it is easier to see how the knots are made. You will be working with one color cording.

Note: At this point you can pin down the cords for the bracelet on the macramé board or if you prefer hold it in your hands while you knot.


7. Holding the bead in your non-dominant hand or pinning the cording to your macramé board, take the “top” cord (blue in the picture) and loop it first under and then over the “bottom” cord (red cord in the picture) (See Figure 3).


8. Hold the loop with your non-dominant hand or pin the first loop to the macramé board.

9. Take the “bottom” cord (red) and loop it over the top cord (blue) and under and through the top cord loop(See Figure 4).


10. Pull evenly on both sides of the knot (See Figure 5).


11. When you have pulled evenly and snugly on the knot, it will look like Figure 6.


12. Continue holding the bead and knotting with your non-dominant hand or pinned down on the board. Loosen the top knot (red) by pulling on the back of the knot.

13. Pull the end of the “bottom” (blue) cording through the top (red) knot (See Figure 7). Pull evenly and snugly to get the second knot (See Figure 8).


14. Turn the knotting over (in the Figure the red cording is on the top and the blue cording is on the bottom).

15. Loosen the top (blue) knot from the back (See Figure 9).


16. Pull the bottom (red) cord through the loosened top (blue) knot. (See Figure 10).


17. Pull evenly and snugly to tighten the knot (See Figure 11).


Repeat steps 14 – 17 until the knots measure 6.5-7 inches long or the length to go around your wrist. You should have extra cording. The finished clasp will add between 3/4 to 1 inch to your bracelet. You will need at least 10 –12 inches of cording left over to make the clasp and finish the bracelet.

Congratulations on knotting this far! Now, to finish the bracelet, surf over to Art Bead Scene

Don't forget the OT Girls Links:

Art Bead Scene
Lucky ABS! We're part 2 of Lucky Knots!

Cindy Gimbrone
Luck is knotted up in Part 1 of this tutorial!

Earthenwood Studio Chronicles
Melanie is inspired by a lucky Leprechaun to make a fairy tale, treasure filled necklace

Jennifer Heynen of Jangles
Lucky Charms Bracelet...The name says it all. This bracelet has everything to bring you good luck.

Joolz by Lisa
As Luck Would Have It...Lucky Earrings

Katie's Beading Blog
Make your own luck with these fun, swingy earrings!

Labyrinth O' Luck
Hali has created a finger labyrinth journal designed after a 4-leaf clover.

Linda Augsburg at Make It Mine magazine
Lucky doesn't begin to describe the adventure I had making this T-shirt...

Lucky
Lucky to be... based on a coin holder a friend made for me...

http://art-interrupted.blogspot.com"/>Lucky to be Me
Mirror, mirror on the wall, who's the fairest of them all? Well, YOU, of course. No matter who you are when you look into this magical mirror, you'll be reminded you're lucky to be you!

Lynn Kvigne - Beading Help Web
Irish Proverb Window Ornament - step by step instructions for making this year-round ornament that may bring luck right through your window!

Melissa J. Lee - Strands of Beads
Good fortune is yours with this cookie-inspired necklace.

Snap out of it, Jean! There's beading to be done!
You'll "make Jean's day " if you check out her lucky Pendant with a Clint Eastwood eighties twist

Swell Designer
Swelldesigner gets lucky this month with some super colorful, sparkly painted bangles

The Impatient Blogger
Luck starts with a wish...Margot shares an project she created for Simply Beads last August.

Tuesday, February 26, 2008

Lucky - Let's Get Knotted!


Ornament Thursday's February Theme is "Lucky." What a perfect time to post the Lucky Knots and Lampwork tutorial! I've taught Lucky Knots and Lampwork at Beadfest . You can create a bracelet or knot a little longer and create a necklace!

In anticipation of putting up the tutorial on Wednesday, I'm posting the materials portion of the tutorial Tuesday night. If you've seen the Lucky Knots and Lampwork before, in one of my classes or on the web, tomorrow I'll post a new version of Lucky Knots using my spirals.

As a teaser, tonight's post will list the supplies you'll need to make a Lucky Knot and Lampwork Bracelet. Knotting steps will follow in the next two posts.

Lucky Knots and Lampwork Bracelet Tutorial
By Cindy Gimbrone, 2006 (reprinted with permission from the author)

Materials and Tools Needed:

12 feet of 2mm satin cording
1 lampwork large-holed donut or disk bead with a (1/4 inch or 7mm) bead hole
1 6-7mm sterling silver or metal round bead with a 3 – 3.5mm bead hole

Scissors
Scotch tape (to wind around the ends of the satin cording)
Tapestry Needle or Child’s needle

Optional
Macramé Board
T-pins
Fabric glue
Fray check

Lucky Knot Tips

Take some time to practice making the knots before you begin making your bracelet.

It can be helpful to pin down the cord on a macramé board the first few times you make the knot. Once you are confident making the knots, hold the knotting in your hand.

Chinese knotting is different than macramé – both knots are pulled evenly and not as tightly as macramé. This is especially important with the first knot – do not pull one side tightly. Doing so will create an entirely different looking knot. Pull both sides firmly and evenly throughout the piece. Keep in mind, the tighter you pull, the more the knotting will twist.

New from the torch......Gears


I have glass that will become bronze-gold in the right flame and reminds me of metal. I thought I'd try to see if I could make industrial looking beads. This is a first go around but I like how they turned out - they look a bit like gears. They're made with a larger than normal hole (3.5mm) so the gear can face outward.

I made more that I'll show on Friday. Wednesday and Thursday is Ornament Thursday - I'll have a tutorial up here and on Art Bead Scene.

Sunday, February 24, 2008

Working outside my color wheel


I'm working with some "autumn" colors not in my usual repetoire. Plum and Steel blue. The colors are for an upcoming collaboration exploration.

Likey?

Friday, February 22, 2008

Names and Next Thursday....

Thanks to those who commented yesterday on what to name the ring. A wide variety from sea urchin to lizard eye to seed pods! My favorite is from CapitolaGirl who said it reminded her of melty ice cream on a hot afternoon - so she suggested "Afternoon Delight." Loved her description and loved the name! Thank you! So, the ring is now called Afternoon Delight!


In coming attractions, Ornament Thursday is a collection of awesome bead designer projects that are posted once a month for the entire year. This month's theme is Lucky. I'm the teaser on the site so pop on over there and take a look. Next week at this time, fabulous projects will nr posted on all of our blogs!

Wednesday, February 20, 2008

What would you name....

....this ring? I've made this style of bead especially for the ring but can't think of what to call it! Bon-bons? What would you call it?

Tuesday, February 19, 2008

Wizard Rock


Wizard Rock rules! Yep,The Chocolate Frogs played at the Gimbrone house this past weekend. Nice boys and good music. Originally, they were going to play for the teen's birthday party but the timing didn't work out. The Chocolate Frogs are two young men who play lots of different instruments - the trombone is one of them.


Being the Mom, I was, of course, banned from actually sitting in on the concert but could hear them in the other room. Great Wizard Rock and an excellent cover of the theme to "Juno" too! They gave out free CD's to the kids and autographed them. A great time!


All pictures taken by my budding photographer son and here's his self-portrait:


Saturday, February 16, 2008

Free Water Spiral


I've got a Flickr group up for jewelry made with Cindy Gimbrone glass beads. If you've used one of my beads in a piece, jewelry or non jewelry, take a picture and post it. The group is open so anyone can post. The first 5 people to post a picture using my beads will receive a free water spiral.

Wednesday, February 13, 2008

15 minutes at a time.....

I read a great tip for those of us with a creative mess in our studios - clean for 15 minutes a day. Taking small bits at a time keeps you from getting overwhelmed. Cool. So that's what I'm doing in my bead inventory. Taking 15 minutes to clean out and put the beads up on Etsy. Here's today's beads - I love the lime-y green with the cherry red - Whee!


Tuesday, February 12, 2008

Cindy Gimbrone Beads in Jewelry!


I survived the teen party - it was fun actually. I've made a few pieces of jewelry - necklaces with the Heartz n Skullz and put them in the Etsy shop.

Friday, February 08, 2008

Spring Cleaning, The Honorary Title, cell charms and zipper pulls

I'm spring cleaning out the studio and my traveling show boxes. Cleaning isn't my favorite thing so I need something to get me going - like a good tune. That means I'm playing alot of music - doesn't always help but I'm discovering alot of bands that I didn't know about before. Yeah, I'm not 16, 18, 20 or even 30 - I spent the '90's listening to Kids Bop so I missed alot of good music. I'm catching up now, though! This is one of my "discoveries" and one of my favorite bands right now - The Honorary Title - Bridge and Tunnel - (their new release Stay Away is fabulous too!)


While I'm listening to this awesome band, I'm using the bead inventory to make affordable and wearable pieces - zipper pulls with the OOAK beads and necklaces with the Heartz n Skullz and put them in the Etsy shop.


Thursday, February 07, 2008

Bob's House

I talk every so often about being a sign language interpreter. I rarely have an opportunity to share my other language with the readers of this blog. Football has given me an opportunity. Last week during the SuperBowl, one of the commericals was Bob's House by Pepsi. If you didn't see it, I'm posting it. It's an old joke in the Deaf Community but it always gets a laugh. Nice to see it shared with a broader audience. Enjoy! It's a good joke!

Wednesday, February 06, 2008

Musings on beads, being a Mom and 16.....

Normally, I talk about beadmaking on this blog. But I have another life as a Mom. Some of my best beads have been inspired by being a Mom - like the Heartz n Skullz series. Inspiration to make beads is awesome but this morning I'm having an attack that goes like this - OMG! What happened?!?


I know it's cliche and all that but really, the time has gone so fast! I think because I enjoy him. He's got a good heart and is growing into a really cool person. Not to mention his great sense of humor. He's not so good at school and doesn't like it much which worries me alot! He loves photography,


manga and writes and creates techno music (when he should be studying). We're having a huge 16th birthday party for him and an in-house wizard rock band. Oh yeah, he's mad at me right now because I took the internet away for the 3 detentions he got yesterday. Wonder what kind of bead THAT will inspire?!?


(All photos by my son! :-)and a link to his techno music on SnoCap which has samples from his favorite teen movies - so parents with little ones the language on a couple tracks are too strong for them. )

Tuesday, February 05, 2008

Did you design with my beads?


Then please post a picture in my new Flickr group. As a beadmaker, I rarely am able to see what designers make with the beads they buy. I'd love to see what you've made! C'mon! Show me what you've got!

To encourage you to post a picture using my beads, the first 5 people to post a picture will win a free spiral bead! It's easy to see if you're one of the five, just count how many are already there! I'll send an email to let you know too and get your address to send you the spiral.

Can't wait to see what you've made!

Monday, February 04, 2008

Pushing me outside of my box....


I'm working in the studio again today - YAY! But wanted to post a short note about being pushed outside of my own box. I'm collaborating next month with another beadmaker and jewelry designer so I'm in the midst of creating beads for us to work with. We all put in our color requests - "earth tones" won. I groaned. Earth tones mean orange, brown and avocado green to me - the colors of my childhood. Ugh. One pair of brown corduroys and orange zigzag shirt too many! Well, I diplomatically asked how earth tones was defined. I was sent a color swatch of lovely violets, steel blues, moss greens and bronzy browns. Pushed outside of my own box! I would have never thought of those colors - it's great to be shoved out of your box sometimes! I'm in the studio working with the "earth tones" and I'm loving what's coming out of the torch!

Sunday, February 03, 2008

Working and Clearing Out.....


I'm lighting the flame and melting some glass today. I'm also clearing out the flocked bead displays from last fall's bead shows and putting the beads up on etsy. Or into the sale available to newsletter subscribers. Lots to do, so no chatting today!

Saturday, February 02, 2008

Where I'm At: Today at the Scene!


It's Studio Saturday at Art Bead Scene and I'm the featured studio! Go one over there and have a peek into my studio. While you're over there, make a comment and you could win one of my Water Spiral focal beads!