Thursday, March 13, 2008

Red, White and Black the Modern Punk Palate


Mix up the styles I've talked about today and you'll get a Punk-Goth counterculture attitutude in red, white and black. The Ramones with a dash of red - but it's a style all to itself. Not quite Victorian or Modern Goth, not quite punk but a bit of both. A category all it's own. Emily the Strange was created in the skater culture by Rob Reger - who is Emily? From her website:

Emily is anti-cool, a subculture of one, and a follower of no one but herself. She’s the anti-hero for the Do it Yourself movement. Her favorite phrase is “Get Lost!” - both an invitation to travel to unknown places and an instruction to “Take a hike!”


(Photo Credit: Emily the Strange by Buzz Parker published by Dark Horse

I like a girl with attitude.

Emily the Strange uses a single color combination red, white and black. A punk with attitude and a splash of color.

The red white and black theme is used most effectively by The White Stripes a two person band who hail from Detroit Michigan. I'm always amazed what they can come up with using such a limited palate of colors.

The Punk - Alternative red, white and black palate is reflected in the Heartz n Skullz series. When creating the series, the Pinz in my Heart beads led to the Goth Kidz beads and Goth Kidz were the jumping off point for the Skully Kidz - in the same way as my posts have gone this week - punk to goth to punk-goth red, white and black.


(Photo Credit: MTV website)


The White Stripes not only have surprising clothes in red, white an black but use it to stunning visual effect in their videos. Here's a perfect example in their video Seven Nation Army. Turn it up! Meg is awesome on the drums!

Wednesday, March 12, 2008

Alternative Style: Japanese Goth

Of all the alternative styles I've been researching for this series, there are the most stereotypes related to Goth. I was a little reluctant to write about Goth because of those stereotypes and because I'm a protective parent. My son and his friends are the local "Otaku" - enthusiastic Japanese Animation Fans or Anime. The girls in the Otaku are heavily into Gothic Lolita which is part of the Lolita fashion.


Above is the Gothic Lolita look and below is the Lolita fashion. The Gothic Lolita has lots of black with a punch of red, plaid, white.


(Photos above from Wikipedia)

Japanese Lolita fashion has its roots in the U.S. Victorian styles - during the 1800's the Victorian Gothic novel full of ghosts, mystery and monsters such as Mary Shelley's Frankenstein was popular fiction.


(Photo Credit: From Wikipedia Boris Karloff as Frankenstein)

The look of silent films starts influence the look of Victorian Goth - below is a picture of early Hollywood star Theda Bara.


So the teenagers who practically live in my house (I think they only come because I'll feed them! :-) wear the creepy cute fashion. They are the inspiration for the Goth Kid series - like the real kids, they're sweet with big hearts - and an edge that not everyone understands.

What was the edgiest style you ever wore?


Tuesday, March 11, 2008

Alternative Design Inspiration: Punk


Photo by Dijiddle

Alternative style - punk style is what today is about. Sunday I blogged about the tail end of the baby boom generation as a separate group - The Jones Generation. I think the Jones Generation had a particular attitude that fed into the emerging punk style of the late 1970's ala the Ramones and The Clash. It was pre-spiked hair and dog collars although Vivienne Westwood was making that popular in the UK. Punk was designed to shock. The style and music was stripped down - with a heavy dose of DIY. Chains, slogan t-shirts and customized blazers.

A straight A student in high school, I had an artsy side that came out in what I wore. I loved the rebellious nature of punk. I wasn't willing to drop out of school but I was willing to shock by wearing the style and listen to the music! I latched onto the customized blazer - I borrowed old pinstriped blazers from the back of my father's closet and customized it with vintage rhinestone pins, shoe clips and whatever else I could find. I could change it the look by changing the pins and buttons on it. Cool!

So the current trend in DIY and punk style is just as fun now as it was then. Punk style now is full of skulls, dyed hair, black with a punch of color, chains, hearts and plaid. Some call it punk, pop punk, hardcore punk, and there is even something called "Steampunk". There's lots of overlap with Goth style but I'm going to hold off on Goth until tomorrow. When I think of Millenium Punk, I think of this Blythe Doll from Etsy.


All of this is where the Heartz n Skullz and Industry series of beads come from. Slightly different in feel, they are inspired by the same punk aesthetic.


So, when designing with Punk inspired beads, you might want to turn up your old record player and listen to the Ramones. Here are the Ramones in Rock and Roll High School - Enjoy!

Sunday, March 09, 2008

Let the Alternative Begin: Generation Jones

Today is the start of alternate styles week. You might wonder why I of all people would be into alternative style like punk and/or goth. All of us are effected by our place in time and generation. I'm from the baby boom generation - that long stretch of time when there was a huge increase in the birth rate. But the span of time is too long to be one distinct generation - I never felt like a boomer I was too young to be a hippie. I was barely in elementary school during the "summer of love." I never protested Viet Nam or knew anyone who dodged the draft and went to Canada. I've never belonged to the baby boomers. I had Spirograph and Gnip Gnop not Howdy Doody.

I've always known I wasn't the only one who felt like I was a Gen X-er instead but the media told me I wasn't. My website bio expresses some of my "not fitting my generation" feeling so what's a "I'm not a boomer to do?" Change your generation's moniker! Well, I didn't but someone had the brains to do just that! I'm not a boomer at all, I'm from Generation Jones. Cool - here's what Wikipedia says Generation Jones is:

In demographic terms, Generation Jones was part of the baby boom which ended in the early 1960s. However, the events stereotypically associated with generational discussion of Boomers, including protests over civil rights and the Vietnam war and the emergence of rock music took place while the members of Generation Jones were still children or early teenagers. Thus the early life experience of this group was more similar, in many respects, to that commonly imputed to Generation X.

THANK YOU!!

Thank you for validating my instincts. I can now say I'm part of Generation Jones rather than I'm a boomer and quantifying it.

Instead of the Mamas and the Papas, I love The Clash and punk subculture with a DIY attitude. Yes, it's my generation that sets the stage for the work I create but it's not a boomer aesthetic, it's Generation Jones!

Let's begin Alternative Week with one of my favorite bands and songs, The Clash singing London Calling! Whoot!

Saturday, March 08, 2008

Transparent Yellow Tips


Today is Studio Saturday over on Art Bead Scene. I'm the featured beadmaker and I always have waaayyyyyy tooo much to say! So I'm going to have a two parter - the general beadmaking insights over on ABS and the glass insights over here.

My tips on the glass color today won't be as detailed as Color Addiction, sorry no swatches (maybe add later) but a few tips for working with the glass in the Rainbow Spiral. Making the spiral shape wasn't going to be a problem, my concern was the transparent yellow. Yes, I've talked about loving the opaque yellow on my blog but the transparent yellow is another story! It's very finicky and if you get it too hot, it will go all cloudy on you.

Transparent yellow in the rod form is faintly yellow because it's a striking color, i.e., you bring out the yellow color in the flame. Therein lies the rub - if you strike it too hot, it goes cloudy. It will still be yellow, but it won't be transparent. Here are a few tips to keep it transparent:

Never heat the glass to a white hot. Heat it to an orange-red glow.

Avoid reheating as much as possible.

Encase the yellow in clear transparent as quickly as possible.

Once encased, you can re-heat and re-shape without cloudiness.


Transparent yellow is a great color as long as you treat it well. Just remember to "keep it cool" baby!

Friday, March 07, 2008

Unchain My Heart


I think I'm up before Margot is this morning so I'm probably unveiling this before she does. But I'm so excited that I have to show it now! The necklace is entitled, "Unchain My Heart." Margot has a run down on how she created it so check it out on her blog. If you missed last night's post, the necklace features one of my Pinz in my Heart focal beads. Squee!!

Thursday, March 06, 2008

Fierce!


I'm late in posting today. Wednesday night I had to stay up and watch the finale of Project Runway - especially since in a finale teaser I heard Christian say that his collection was "Romantic Goth." Perfect for my theme - alternative jewelry styles and segues nicely from my last post! So I just had to stay up past my bedtime to watch it! Even though Christian was the fan favorite, I didn't find him "fierce" until last night. His collection was one piece of art after another! Tim Gunn didn't love the ruffles at the neck, but I sure did!


I wouldn't be able to wear any of his clothes because I'm a real life sized girl - but it doesn't mean I don't love how it looks or how well these young ladies are wearing the clothes. Gorgeous! I think the "Romantic Goth" wasn't quite as edgey as Chris March but I'm sure Victoria Beckham will wear Christian's clothes well. Bravo, Christian, you WERE FIERCE!(Photos above from the Elle magazine website.)

I know another designer who is FIERCE - Margot Potter! She's created a new necklace entitled, "Unchain My Heart" that features a Pinz in my Heart focal bead made by moi! I'm posting a teaser tonight but tomorrow Margot will post the full necklace on her blog. Make sure you take a look - it's fierce!

Tuesday, March 04, 2008

Coming attractions....Alternative week


Do you watch Project Runway? Did you see Chris March's collection last week? It was soooo coool! He's made Goth fashion haute couture! Bravo, Chris! I feel like the timing is right to post more about the Heartz n Skullz series - specifically the Pinz in my Heart beadz. So, this week, I'll share with you the creative process for developing the series and what I'm doing to get them out there - including a post about the jewelry designer I'm working with.

Because I loved the skill it took to make this dress - I'm going to risk showing it to you here - it's Chris March's "black safety pin dress" check out the necklace! I'm enthralled with the skill - how cool is that?!? Photo credit from the Elle Magazine website

Monday, March 03, 2008

It was a good day...


...at the torch yesterday. Made several new Rainbow Spirals to have at the ready for orders, a bead made specifically for Ornament Thursday's March theme, "Sprout" and got in touch with an awesome young designer who I'll be collaborating with on the Heartz n Skullz series.

The March Studio Newsletter is almost ready to go out! I'll have a special sale in the newsletters for subscribers only. Don't forget to sign up. I've lowered the wholesale minimums on my website.

A little preview - Art Bead Scene will be 1 year old in March. YAY! There will be a month long celebration with giveaways every 5 days because there are 5 editors at the 'Scene! I'll be the first bead giveaway - so look for my post on Wednesday over at ABS.

Photo Credit: Daniel Gimbrone, son and budding photographer

Sunday, March 02, 2008

New Spiral: Chakra or Rainbow?


In my Etsy shop, I have an announcement that custom orders are accepted. A couple of weeks ago, I had a potential customer contact me and ask if I could make a rainbow colored spiral. This is a good opportunity to do a brief FAQ on custom orders.

Most custom orders are requests for variations on a bead style I'm already making. So, I don't have to master a new technique to do them. That's good for the customer because it keeps the cost down.

At the torch, I give myself 3 times or 3 tries at making the custom order. I don't usually like the first but generally by the 2nd try, I've made the customers bead. I make one more to allow for the unforseen accident where I may drop or crack a bead.

So, I made this bead for a customer who was a little apprehensive - a yogini who wasn't aware how the bead was made. When she received it, she was thrilled! So was I! I love how this has turned out. So much so, I'm adding the Rainbow Spiral to my regular line of spirals.

Saturday, March 01, 2008

New Beads Part 2: Gears


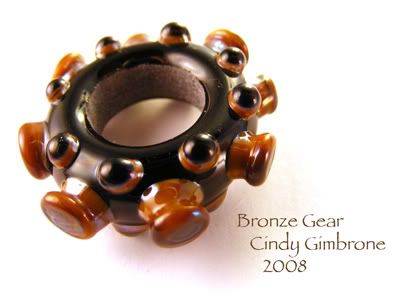
Tuesday, I promised I would show the other industrial type beads I made - I've named them gears. These are a bronze-y caramel and black and made on a 1/2 inch mandrel. I really like it and it goes well with the other "gears." The bronze color is cool!

Originally, I wanted glass that would turn a silvery color but I didn't have any. AND I didn't think I could get any. Well, the internet has yielded just the color - a black glass by Reichenbach available through Olympic Color Rods. I ordered it and can't wait to play with it. It should take about a week to get here from the Pacific Northwest US.

While you're web-surfing today, make sure you stop by Art Bead Scene's Studio Saturday - today is Tari Sasser.

Friday, February 29, 2008

Plug Ur Bud: Art Bead Scene Studio Saturday


Today on Leap Day, I'm going to plug my bud, Tari Sasser. She's the featured artist on tomorrow's Art Bead Scene Studio Saturday. See you at the 'Scene tomorrow!

Thursday, February 28, 2008

Lucky it's Ornament Thursday!


It's Ornament Thursday whose February theme is Lucky. Lucky for me I designed the versatile Lucky Knots and Lampwork necklace! My own flameworked glass beads are the foundation and the Chinese "lucky" or snake knots add texture. The design can be used to create different looks with the same basic technique - here are a few:


OR combine the knotting with wire work - handmade ball headpins and a hand formed "S" clasp to create a unique pendant with a flameworked reactive blue spiral. A punch of contrasting color and zing - a modern necklace full of personality!


Want to create a Lucky Knot and Lampwork Necklace for yourself? I wrote a tutorial in two parts, Part One here and Part Two on Art Bead Scene! Now for the OT Girls Fabulous Link list!

Art Bead Scene
Lucky ABS! We're part 2 of Lucky Knots!

Cindy Gimbrone
Luck is knotted up in Part 1 of this tutorial!

Earthenwood Studio Chronicles
Melanie is inspired by a lucky Leprechaun to make a fairy tale, treasure filled necklace

Jennifer Heynen of Jangles
Lucky Charms Bracelet...The name says it all. This bracelet has everything to bring you good luck.

Joolz by Lisa
As Luck Would Have It...Lucky Earrings

Katie's Beading Blog
Make your own luck with these fun, swingy earrings!

Labyrinth O' Luck
Hali has created a finger labyrinth journal designed after a 4-leaf clover.

Linda Augsburg at Make It Mine magazine
Lucky doesn't begin to describe the adventure I had making this T-shirt...

Lucky
Lucky to be... based on a coin holder a friend made for me...

http://art-interrupted.blogspot.com"/>Lucky to be Me
Mirror, mirror on the wall, who's the fairest of them all? Well, YOU, of course. No matter who you are when you look into this magical mirror, you'll be reminded you're lucky to be you!

Lynn Kvigne - Beading Help Web
Irish Proverb Window Ornament - step by step instructions for making this year-round ornament that may bring luck right through your window!

Melissa J. Lee - Strands of Beads
Good fortune is yours with this cookie-inspired necklace.

Snap out of it, Jean! There's beading to be done!
You'll "make Jean's day " if you check out her lucky Pendant with a Clint Eastwood eighties twist

Swell Designer
Swelldesigner gets lucky this month with some super colorful, sparkly painted bangles

The Impatient Blogger
Luck starts with a wish...Margot shares an project she created for Simply Beads last August.

Wednesday, February 27, 2008

Knot with Cindy, Finish with ABS!


Wondering what the Ornament Thursday gals have been up to? If you have, I'm posting my Lucky project. Above, is the full picture of the Ornament Thursday Teaser - Lucky Knots and Lampwork Spirals. If you wonder what I'm talking about - I'm posting the Lucky Knots and Lampwork tutorial in two parts today. The Lucky Knots how to is posted here while the finishing is posted on Art Bead Scene where I'm one of the editors. The tutorial is for a bracelet using a large bead as the center/clasp. (Shown below)


You might be wondering why "Lucky Knots." For the design I had in mind, Chinese knotting would give me a "ropey feel" with a strong punch of color. To create the satin cord rope, I used the Snake Knot. I wanted more symbolism in the design so I researched the meaning of the snake in Chinese culture. A snake is a sign of luck. Perfect - now I had alliteration to add to the design - Lucky Knots and Lampwork.


Making the Lucky Knots for a Large Bead Bracelet:


1. Wrap some tape around the ends of the satin cording. Find the middle of the 12 feet of cording.

2. String the sterling silver 6mm large holed bead to the middle of the cording. (Note: To make a necklace like the Lucky Knots and Lampwork Spirals, skip steps 2-4 and make a loop instead of stringing on a large disk bead.)

3. Grab the opposite end of the cord and string through the lampwork bead. Pull all the way through until the sterling silver bead is wedged into the hole of the lampwork bead. Pull tightly and adjust so you can see little or no cording showing through (See Figure 1).


4. Hold the lampwork bead with your non-dominant hand and the sterling bead facing up.

5. Use your dominant hand to pull both ends of the cording out straight away from the bead. You will start the knot where the cording meets the edge of the bead. This leaves you enough room later for your loop to go around the lampwork bead.

6. Figure 2 shows the first knot of the bracelet so you can see where the knot will lie in your work. The directions and figures below will show two different colored cording because it is easier to see how the knots are made. You will be working with one color cording.

Note: At this point you can pin down the cords for the bracelet on the macramé board or if you prefer hold it in your hands while you knot.


7. Holding the bead in your non-dominant hand or pinning the cording to your macramé board, take the “top” cord (blue in the picture) and loop it first under and then over the “bottom” cord (red cord in the picture) (See Figure 3).


8. Hold the loop with your non-dominant hand or pin the first loop to the macramé board.

9. Take the “bottom” cord (red) and loop it over the top cord (blue) and under and through the top cord loop(See Figure 4).


10. Pull evenly on both sides of the knot (See Figure 5).


11. When you have pulled evenly and snugly on the knot, it will look like Figure 6.


12. Continue holding the bead and knotting with your non-dominant hand or pinned down on the board. Loosen the top knot (red) by pulling on the back of the knot.

13. Pull the end of the “bottom” (blue) cording through the top (red) knot (See Figure 7). Pull evenly and snugly to get the second knot (See Figure 8).


14. Turn the knotting over (in the Figure the red cording is on the top and the blue cording is on the bottom).

15. Loosen the top (blue) knot from the back (See Figure 9).


16. Pull the bottom (red) cord through the loosened top (blue) knot. (See Figure 10).


17. Pull evenly and snugly to tighten the knot (See Figure 11).


Repeat steps 14 – 17 until the knots measure 6.5-7 inches long or the length to go around your wrist. You should have extra cording. The finished clasp will add between 3/4 to 1 inch to your bracelet. You will need at least 10 –12 inches of cording left over to make the clasp and finish the bracelet.

Congratulations on knotting this far! Now, to finish the bracelet, surf over to Art Bead Scene

Don't forget the OT Girls Links:

Art Bead Scene
Lucky ABS! We're part 2 of Lucky Knots!

Cindy Gimbrone
Luck is knotted up in Part 1 of this tutorial!

Earthenwood Studio Chronicles
Melanie is inspired by a lucky Leprechaun to make a fairy tale, treasure filled necklace

Jennifer Heynen of Jangles
Lucky Charms Bracelet...The name says it all. This bracelet has everything to bring you good luck.

Joolz by Lisa
As Luck Would Have It...Lucky Earrings

Katie's Beading Blog
Make your own luck with these fun, swingy earrings!

Labyrinth O' Luck
Hali has created a finger labyrinth journal designed after a 4-leaf clover.

Linda Augsburg at Make It Mine magazine
Lucky doesn't begin to describe the adventure I had making this T-shirt...

Lucky
Lucky to be... based on a coin holder a friend made for me...

http://art-interrupted.blogspot.com"/>Lucky to be Me
Mirror, mirror on the wall, who's the fairest of them all? Well, YOU, of course. No matter who you are when you look into this magical mirror, you'll be reminded you're lucky to be you!

Lynn Kvigne - Beading Help Web
Irish Proverb Window Ornament - step by step instructions for making this year-round ornament that may bring luck right through your window!

Melissa J. Lee - Strands of Beads
Good fortune is yours with this cookie-inspired necklace.

Snap out of it, Jean! There's beading to be done!
You'll "make Jean's day " if you check out her lucky Pendant with a Clint Eastwood eighties twist

Swell Designer
Swelldesigner gets lucky this month with some super colorful, sparkly painted bangles

The Impatient Blogger
Luck starts with a wish...Margot shares an project she created for Simply Beads last August.

Tuesday, February 26, 2008

Lucky - Let's Get Knotted!


Ornament Thursday's February Theme is "Lucky." What a perfect time to post the Lucky Knots and Lampwork tutorial! I've taught Lucky Knots and Lampwork at Beadfest . You can create a bracelet or knot a little longer and create a necklace!

In anticipation of putting up the tutorial on Wednesday, I'm posting the materials portion of the tutorial Tuesday night. If you've seen the Lucky Knots and Lampwork before, in one of my classes or on the web, tomorrow I'll post a new version of Lucky Knots using my spirals.

As a teaser, tonight's post will list the supplies you'll need to make a Lucky Knot and Lampwork Bracelet. Knotting steps will follow in the next two posts.

Lucky Knots and Lampwork Bracelet Tutorial
By Cindy Gimbrone, 2006 (reprinted with permission from the author)

Materials and Tools Needed:

12 feet of 2mm satin cording
1 lampwork large-holed donut or disk bead with a (1/4 inch or 7mm) bead hole
1 6-7mm sterling silver or metal round bead with a 3 – 3.5mm bead hole

Scissors
Scotch tape (to wind around the ends of the satin cording)
Tapestry Needle or Child’s needle

Optional
Macramé Board
T-pins
Fabric glue
Fray check

Lucky Knot Tips

Take some time to practice making the knots before you begin making your bracelet.

It can be helpful to pin down the cord on a macramé board the first few times you make the knot. Once you are confident making the knots, hold the knotting in your hand.

Chinese knotting is different than macramé – both knots are pulled evenly and not as tightly as macramé. This is especially important with the first knot – do not pull one side tightly. Doing so will create an entirely different looking knot. Pull both sides firmly and evenly throughout the piece. Keep in mind, the tighter you pull, the more the knotting will twist.

New from the torch......Gears


I have glass that will become bronze-gold in the right flame and reminds me of metal. I thought I'd try to see if I could make industrial looking beads. This is a first go around but I like how they turned out - they look a bit like gears. They're made with a larger than normal hole (3.5mm) so the gear can face outward.

I made more that I'll show on Friday. Wednesday and Thursday is Ornament Thursday - I'll have a tutorial up here and on Art Bead Scene.

Sunday, February 24, 2008

Working outside my color wheel


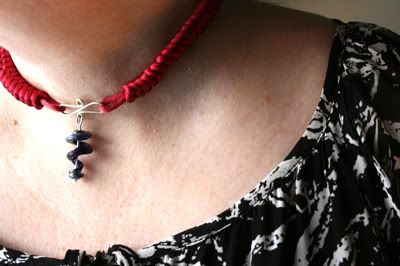
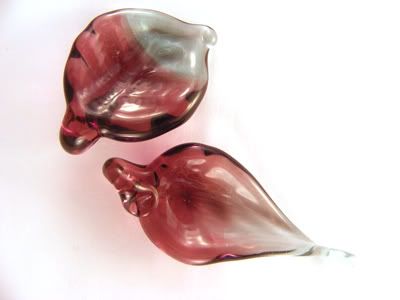
I'm working with some "autumn" colors not in my usual repetoire. Plum and Steel blue. The colors are for an upcoming collaboration exploration.

Likey?

Friday, February 22, 2008

Names and Next Thursday....

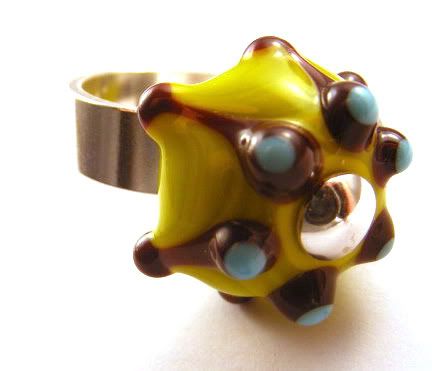
Thanks to those who commented yesterday on what to name the ring. A wide variety from sea urchin to lizard eye to seed pods! My favorite is from CapitolaGirl who said it reminded her of melty ice cream on a hot afternoon - so she suggested "Afternoon Delight." Loved her description and loved the name! Thank you! So, the ring is now called Afternoon Delight!


In coming attractions, Ornament Thursday is a collection of awesome bead designer projects that are posted once a month for the entire year. This month's theme is Lucky. I'm the teaser on the site so pop on over there and take a look. Next week at this time, fabulous projects will nr posted on all of our blogs!

Wednesday, February 20, 2008

What would you name....

....this ring? I've made this style of bead especially for the ring but can't think of what to call it! Bon-bons? What would you call it?