Showing posts with label free project. Show all posts

Thursday, January 31, 2013

Earring Partnership: Nina Designs and me

So far, the new year has brought me luck. One of my good luck events has been partnering with Nina Designs. Their representative, DeAnna, sent me a package of goodies that included the bronze three tear drop links and bronze hook earring finding


The minute I saw the tear drop links, I imagined a set of earrings combining the beautiful golden bronze with silver accents. Mixing metal colors would make the earrings go with any outfit. I had just finished taking an online jewelry class where we had re-used vintage rhinestone jewelry. My jewelry supply stash was overflowing with bits of rhinestones which were the perfect accent to the warm bronze color.


Showing off my quirkiness - one of the links is upside down!


What's even better about these earrings is they're quick and easy to make. You need four silver plated 6mm jump rings along with two vintage rhinestone drops, two teardrop links and two earring findings. Attach the teardrop links to the earring finding using the 6mm silverplated jumprings. Use the other jumprings to attach the vintage rhinestone findings to the smallest drop.

Quick, easy and beautiful. That's how I like it. What a beautiful partnership!

Wednesday, December 22, 2010

Wednesday Wire: The Closet Project and Free Project at Art Bead Scene

Monday I showed the in-progress closet make-over that TBC had dragged me into. Once the foundation was up, we tested how we wanted the shelving arranged....

...once it was decided, we were ready to put all our things back into the closet.


Whew so now that project is done and here's another project I completed...


...a free Bead Bravely Ornament project over at Art Bead Scene! Check it out!

Wednesday, August 18, 2010

Wednesday Wire: Double Dip Charms

While I'm working on the fall free projects, let's take a look at the free projects I have available on the blog. Here's one of the fastest and easiest ways to use the Double Dips.


Materials:

1 Double Dip in Coral

Tools:

Round nose pliers
Flush cutters that will cut up to 18 ga wire
Chainnose pliers
Optional: steel bench block and chasing/planishing hammer


Directions:

1. Cut the Double Dip in the middle so you have equal length.

2. Make a wrapped loop using the round nose pliers. Please note the 18 gauge wire is dead so it's easy to wrap.

3. Optional: Hammer the loop a couple of times on each side to work harden.

The 18 gauge copper wire gives these charms an ethnic feel. Enjoy!

Wednesday, May 26, 2010

Wednesday Wire: Herringbone Weave

Jewelrylessons.com by Eni Oken and Friends is a well known website. But have you taken the time to visit and check out all the amazing tutorials?

One of my favorite tutorials is Eni's Herringbone Weave Tutorial and it's free! (photo credit: Eni Oken.


Do you have a favorite free tutorial you'd like to share?

Wednesday, May 19, 2010

Wednesday Wire: Free Tutorial Matching by Wrapping

I make all my Double Dips with copper wire. If you are creating a design in a different metal then how might you go about matching the metal?

Today's Wednesday Wire will show you how with a simple wrapping technique. I'm partial to the deep brown color of the Vintaj brass. Since it's impossible for a manufacturer to create all of the findings I could want, I often need to match the metals in my jewelry designs.

When using the Double Dips, I need the exposed wire to match the Vintaj bronze color. I buy fine gauge wire from Parawire to wrap around the copper wire of the Double Dip. Simple enough but there's a bit of a trick to it.


Gather up your tools and supplies:

Begin by wrapping a couple of winds around the wire leaving a 4 inch tail of wire at the end toward the glass bulb of the Double Dip:

Push the few wraps down toward the glass bulb. Now, wind in the opposite direction towards the other end keeping the wire nice and tight next to each other. I use my fingers to hold the wire in place as I wind but you can use your chainnose pliers to hold the wire in place as you wind.

When you reach the end, you can create a small "beadcap" by winding down onto the glass.

Cut the small gauge wire with your flush cutters.

Now you're done! Go to the opposite end and create a beadcap by winding and cutting the wire in the same way as you just did above.

Now I've got a double dip that will match the Vintaj brass perfectly!

Monday, July 27, 2009

Secrets Revealed: Stamped Glass Nuggets


I'm revealing all my secrets with the Black Bird Reflections necklace. Last Friday, I showed you how to make the glass nuggets charms. You can use the same technique on larger sized nuggets and make a pendant. But to add interest to a pendant sized nugget, I stamped the blackbird design onto it using Pebo Markers from Markers Supply.

The simple steps to making the pendant are:

1. Choose a favorite rubber stamp.

2. Cover the stamp with enamel using the Pebo marker.

3. Stamp onto the flat part of the glass nugget.

4. Bake at recommended temperature in a kiln or oven as directed on the Pebo marker.

Tip: Grind the groove into the glass nugget before you do the enamel stamping.

Friday, July 24, 2009

How to Make Glass Nugget Charms- Free Tutorial

Here are a few of the glass nuggets charms I made using a bag of glass nuggets for flower vases I picked up at a craft store going out of business. I bought the clear with an iridescent finish on them but you can pick up a variety of colors at Delphi. The clear nuggets are like small magnifying glasses and can be added here and there to just about any piece of jewelry.


You'll need a glass grinder and a special router bit for grinding a groove into the side of the glass nugget.


Make sure you wear your safety glasses while grinding the glass nuggets - they're not very big and they can slip out of your hand or the glass can chip. You don't want anything to fly into your eyes!

Plan on doing a few test nuggets to make sure you've got your grinder bit adjusted to the right height. If you've never worked with a glass grinder before, take a moment to look at thestorefinder's tips.

Here's one of the nuggets with the groove. I don't try to polish this down to a mirror finish because I'm putting wire into the groove.


Here's my new favorite wire color for wire wrapping - bronze colored Vintaj 20 gauge wire!


Pretty isn't it?!

I used my trusty tools, the shears to cut the wire and the stepped pliers to get consistent loops. I always have the chainnose pliers around because I usually need them for something. I don't think I did this time around but had them at the ready!


The actual steps to making the charms are quick:

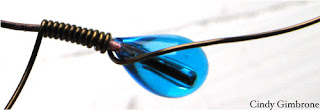
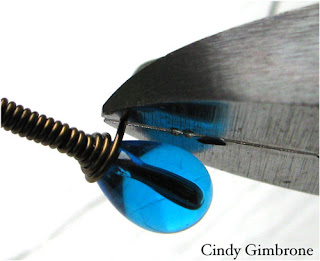
I made the loop first and then wrapped around the nugget in the groove. I wound the wire around the loop to secure it onto the nugget. I made a pretty spiral at the top and then cut the wire with the shears.

Done!


You can add these to your Steampunk style jewelry, victorian style jewelry or just about anything! What would you add a few glass nugget charms to?

Thursday, July 16, 2009

Earrings Rings n Things Style (Free Project!)

I got a little package from Dave of Rings n Things showing off some Swarovski cubes. Ooooo! What kind of quick earrings could I make? Since I'm stuck on gunmetal lately, I used R&T gunmetal findings and leverbacks, paired them with bali silver beadcaps and had a quick pair of pretty summer earrings.


Easy enough but if you'd like to make them yourself, here's the materials list:

Two 8mm Swarovski crystal cubes in any color you love

Two, 1.5 inch gunmetal headpins

Two 3mm or 4mm crystals in accenting color to the cube crystal

Two bali or bali style sterling beadcaps (here are some very similar to mine from ArtBeads.com)

Optional - two 3mm or 4mm crystals in accenting color to the cube and other crystals listed above.


Tools Needed:

round nose pliers

chainnose pliers

flush cutters


Directions:

String onto the headpin in this order, small crystal, beadcap, crystal cube and if you want, another small crystal.

Make loop at top using the round nose pliers (trim length if necessary with flush cutters).

Use chainnose pliers to open the loop you just made and attach to the leverback earring finding.

Done!

I like these quick projects. It uses up my stash and it can add to a summer outfit. Have you made a quick fashion project lately? Something to accent your wardrobe or update your jewelry?

Wednesday, March 18, 2009

Copper Kisses for $4.00


It's the second installment of the Rings & Things goodie bag. Today it's my favorite - the antique copper plated bracelet. Here are the stats on it from the Rings & Things website:

Stock#: 40-337-7
7.2" disk-and-loop bracelet forms for gluing. Hammered oval loops.
1-11 cost $4.00


Today's "Copper Kisses" grew out of my new work with metal, glass and cold connections which is inspired by one of my favorite books.

I made the pads more bead like by doming them. I removed the pads and textured the surface by hammering a stamp several times. I created domed links between the ovals using a ball peen hammer and a doming block. The domed links were then re-attached.


It took about an hour to do each of the pads. The cost to make this is $4.00 assuming you have to tools to do it already.

Monday, March 16, 2009

Glue is not my BFF and free project

Ok, so last week, I posted about a new goodie bag I got from Rings & Things. Dave describes them as "glue-ables."

I don't like to glue glass because I don't trust the glue will hold. Glass is so smooth, there's never much for a glue to grab onto. And yes, I've tried every glue that people have recommended. Half of the findings fall off, pop off or any other kind of off you can think of. So glue is not my BFF.

So I took it as a challenge. I would do anything BUT glue.

I must have been struck by the inspiration fairy or something because I had a flood of ideas. Here is the first of three and the easiest to do - Color Explosion.


Whoa! Get a pair of sunglasses, Mabel!!! I'm loving on that color!

So ya wanna know how to do it? Start with a bracelet blank, this is the one I used:


On the Rings & Things Website it is Stock#: 40-377-1
7.5" disk-and-loop bracelet forms for gluing. Oval loops.

The silver rounds for gluing looked like beads to me. They seemed to ask me to put a punch of color between the lovely long ovals and make them into beads.

So, I took out my stock of Ranger Inks, the Tim Holtz Adirondack Alcohol Inks, and a small paint brush and brushed the glue blanks with the inks.

There ya go!


If you buy all the things new, this project is about $15.00 but if you use a 40% off coupon at Michael's like I did for the inks, it's about $10.00 to make. So a goodie bag makes good and fits Beading on a Budget!