Wednesday, July 16, 2008

Lucky Knots ties up Blogiversary

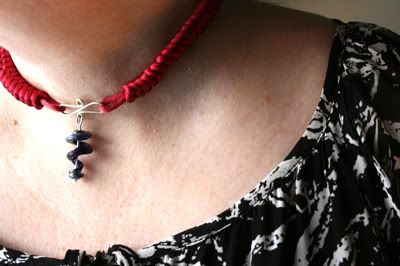
Today is officially 3 years of blogging! YAY! So, I'm going to "tie up loose ends" with the Lucky Knots and Lampwork project I posted this past February for Ornament Thursday. All you early Christmas present buyers and crafters can get started on this necklace for your friends and family!


Wondering what the Ornament Thursday gals have been up to? If you have, I'm posting my Lucky project. Above, is the full picture of the Ornament Thursday Teaser - Lucky Knots and Lampwork Spirals. If you wonder what I'm talking about - I'm posting the Lucky Knots and Lampwork tutorial in two parts today. The Lucky Knots how to is posted here while the finishing is posted on Art Bead Scene where I'm one of the editors. The tutorial is for a bracelet using a large bead as the center/clasp. (Shown below)


You might be wondering why "Lucky Knots." For the design I had in mind, Chinese knotting would give me a "ropey feel" with a strong punch of color. To create the satin cord rope, I used the Snake Knot. I wanted more symbolism in the design so I researched the meaning of the snake in Chinese culture. A snake is a sign of luck. Perfect - now I had alliteration to add to the design - Lucky Knots and Lampwork.


Making the Lucky Knots for a Large Bead Bracelet:


1. Wrap some tape around the ends of the satin cording. Find the middle of the 12 feet of cording.

2. String the sterling silver 6mm large holed bead to the middle of the cording. (Note: To make a necklace like the Lucky Knots and Lampwork Spirals, skip steps 2-4 and make a loop instead of stringing on a large disk bead.)

3. Grab the opposite end of the cord and string through the lampwork bead. Pull all the way through until the sterling silver bead is wedged into the hole of the lampwork bead. Pull tightly and adjust so you can see little or no cording showing through (See Figure 1).


4. Hold the lampwork bead with your non-dominant hand and the sterling bead facing up.

5. Use your dominant hand to pull both ends of the cording out straight away from the bead. You will start the knot where the cording meets the edge of the bead. This leaves you enough room later for your loop to go around the lampwork bead.

6. Figure 2 shows the first knot of the bracelet so you can see where the knot will lie in your work. The directions and figures below will show two different colored cording because it is easier to see how the knots are made. You will be working with one color cording.

Note: At this point you can pin down the cords for the bracelet on the macramé board or if you prefer hold it in your hands while you knot.


7. Holding the bead in your non-dominant hand or pinning the cording to your macramé board, take the “top” cord (blue in the picture) and loop it first under and then over the “bottom” cord (red cord in the picture) (See Figure 3).


8. Hold the loop with your non-dominant hand or pin the first loop to the macramé board.

9. Take the “bottom” cord (red) and loop it over the top cord (blue) and under and through the top cord loop(See Figure 4).


10. Pull evenly on both sides of the knot (See Figure 5).


11. When you have pulled evenly and snugly on the knot, it will look like Figure 6.


12. Continue holding the bead and knotting with your non-dominant hand or pinned down on the board. Loosen the top knot (red) by pulling on the back of the knot.

13. Pull the end of the “bottom” (blue) cording through the top (red) knot (See Figure 7). Pull evenly and snugly to get the second knot (See Figure 8).


14. Turn the knotting over (in the Figure the red cording is on the top and the blue cording is on the bottom).

15. Loosen the top (blue) knot from the back (See Figure 9).


16. Pull the bottom (red) cord through the loosened top (blue) knot. (See Figure 10).


17. Pull evenly and snugly to tighten the knot (See Figure 11).


Repeat steps 14 – 17 until the knots measure 6.5-7 inches long or the length to go around your wrist. You should have extra cording. The finished clasp will add between 3/4 to 1 inch to your bracelet. You will need at least 10 –12 inches of cording left over to make the clasp and finish the bracelet.

Congratulations on knotting this far! Now, to finish the bracelet, surf over to Art Bead Scene

Don't forget the OT Girls Links:

Art Bead Scene
Lucky ABS! We're part 2 of Lucky Knots!

Cindy Gimbrone
Luck is knotted up in Part 1 of this tutorial!

Earthenwood Studio Chronicles
Melanie is inspired by a lucky Leprechaun to make a fairy tale, treasure filled necklace

Jennifer Heynen of Jangles
Lucky Charms Bracelet...The name says it all. This bracelet has everything to bring you good luck.

Joolz by Lisa
As Luck Would Have It...Lucky Earrings

Katie's Beading Blog
Make your own luck with these fun, swingy earrings!

Labyrinth O' Luck
Hali has created a finger labyrinth journal designed after a 4-leaf clover.

Linda Augsburg at Make It Mine magazine
Lucky doesn't begin to describe the adventure I had making this T-shirt...

Lucky
Lucky to be... based on a coin holder a friend made for me...

http://art-interrupted.blogspot.com"/>Lucky to be Me
Mirror, mirror on the wall, who's the fairest of them all? Well, YOU, of course. No matter who you are when you look into this magical mirror, you'll be reminded you're lucky to be you!

Lynn Kvigne - Beading Help Web
Irish Proverb Window Ornament - step by step instructions for making this year-round ornament that may bring luck right through your window!

Melissa J. Lee - Strands of Beads
Good fortune is yours with this cookie-inspired necklace.

Snap out of it, Jean! There's beading to be done!
You'll "make Jean's day " if you check out her lucky Pendant with a Clint Eastwood eighties twist

Swell Designer
Swelldesigner gets lucky this month with some super colorful, sparkly painted bangles

The Impatient Blogger
Luck starts with a wish...Margot shares an project she created for Simply Beads last August.

Tuesday, July 15, 2008

Blogiversary: Christmas in July - Jingle Spiral Ornament

If you're an early Christmas shopper, here's an Ornament Project, The Jingle Spiral, I posted last December.


I'm all about instant gratification when it comes to crafts. If you're like me,today's Jingle Spiral Ornament will satisfy your need for craft speed! I used one of my handmade extra long (55mm or 2. 25 inches) flameworked Holiday Ornament Glass Spirals, 20 gauage silver wire and tiny oxidized silver metal bells. You'll need your flush cutters, round and flat nose pliers. (Pictures follow directions.)

Since measuring impedes instant gratification, I used the spiral to figure out how much wire to use. Unwind twice the length of the spiral or about 4.5 inches of wire. Cut using the flush cutters, it will give you a nice smooth end.


Use your round nose plies to make a loop at one end of the wire.

Straighten the remaining length of wire at the neck of the loop. You'll want the ornament to hang straight.

Add 3 tiny oxidized metal beads.

Add spiral.

Make small loop above the spiral.

Use your index finger to make the large loop for hanging the ornament.

Your Jingle Spiral is now ready to hang!


Other crafters and designers are making beautiful ornaments for Ornament Thursday. Hop on over to their blogs and snatch up more ornament projects!

Sara Naumann
Lynn Kvigne
Candie Cooper
Katie Hacker
Margot Potter
Linda Augsburg
Melanie Brooks Lukacs
Art Bead Scene
Suzanne
Humblebeads
Polymer Clay Craft Gossip
Alexa Westerfield
Debba Haupert
Elaine Luther
Melissa Lee
Rebecca Peck
Jean Yates
Michelle McGee
Jenny Harada
Jennifer Heynen
Hali Chambers
Kriss Kramer
Brandy Lung Gill


Monday, July 14, 2008

Blogiversary: Punk

I'm an old punk rocker at heart - so this post brought back alot of memories. Seems like it did for some of my blog readers too!


Photo by Dijiddle

Alternative style - punk style is what today is about. Sunday I blogged about the tail end of the baby boom generation as a separate group - The Jones Generation. I think the Jones Generation had a particular attitude that fed into the emerging punk style of the late 1970's ala the Ramones and The Clash. It was pre-spiked hair and dog collars although Vivienne Westwood was making that popular in the UK. Punk was designed to shock. The style and music was stripped down - with a heavy dose of DIY. Chains, slogan t-shirts and customized blazers.

A straight A student in high school, I had an artsy side that came out in what I wore. I loved the rebellious nature of punk. I wasn't willing to drop out of school but I was willing to shock by wearing the style and listen to the music! I latched onto the customized blazer - I borrowed old pinstriped blazers from the back of my father's closet and customized it with vintage rhinestone pins, shoe clips and whatever else I could find. I could change it the look by changing the pins and buttons on it. Cool!

So the current trend in DIY and punk style is just as fun now as it was then. Punk style now is full of skulls, dyed hair, black with a punch of color, chains, hearts and plaid. Some call it punk, pop punk, hardcore punk, and there is even something called "Steampunk". There's lots of overlap with Goth style but I'm going to hold off on Goth until tomorrow. When I think of Millenium Punk, I think of this Blythe Doll from Etsy.


All of this is where the Heartz n Skullz and Industry series of beads come from. Slightly different in feel, they are inspired by the same punk aesthetic.


So, when designing with Punk inspired beads, you might want to turn up your old record player and listen to the Ramones. Here are the Ramones in Rock and Roll High School - Enjoy!

Sunday, July 13, 2008

Blogiversary: Japanese Goth

March 12, 2008:

Of all the alternative styles I've been researching for this series, there are the most stereotypes related to Goth. I was a little reluctant to write about Goth because of those stereotypes and because I'm a protective parent. My son and his friends are the local "Otaku" - enthusiastic Japanese Animation Fans or Anime. The girls in the Otaku are heavily into Gothic Lolita which is part of the Lolita fashion.


Above is the Gothic Lolita look and below is the Lolita fashion. The Gothic Lolita has lots of black with a punch of red, plaid, white.


(Photos above from Wikipedia)

Japanese Lolita fashion has its roots in the U.S. Victorian styles - during the 1800's the Victorian Gothic novel full of ghosts, mystery and monsters such as Mary Shelley's Frankenstein was popular fiction.


(Photo Credit: From Wikipedia Boris Karloff as Frankenstein)

The look of silent films starts influence the look of Victorian Goth - below is a picture of early Hollywood star Theda Bara.


So the teenagers who practically live in my house (I think they only come because I'll feed them! :-) wear the creepy cute fashion. They are the inspiration for the Goth Kid series - like the real kids, they're sweet with big hearts - and an edge that not everyone understands.

What was the edgiest style you ever wore?


Saturday, July 12, 2008

Blogiversary: Alternative Week Inspiration

In March, I did an Alternative Styles week. It was fun with lots of inspiration!


Mix up the styles I've talked about today and you'll get a Punk-Goth counterculture attitutude in red, white and black. The Ramones with a dash of red - but it's a style all to itself. Not quite Victorian or Modern Goth, not quite punk but a bit of both. A category all it's own. Emily the Strange was created in the skater culture by Rob Reger - who is Emily? From her website:

Emily is anti-cool, a subculture of one, and a follower of no one but herself. She’s the anti-hero for the Do it Yourself movement. Her favorite phrase is “Get Lost!” - both an invitation to travel to unknown places and an instruction to “Take a hike!”


(Photo Credit: Emily the Strange by Buzz Parker published by Dark Horse

I like a girl with attitude.

Emily the Strange uses a single color combination red, white and black. A punk with attitude and a splash of color.

The red white and black theme is used most effectively by The White Stripes a two person band who hail from Detroit Michigan. I'm always amazed what they can come up with using such a limited palate of colors.

The Punk - Alternative red, white and black palate is reflected in the Heartz n Skullz series. When creating the series, the Pinz in my Heart beads led to the Goth Kidz beads and Goth Kidz were the jumping off point for the Skully Kidz - in the same way as my posts have gone this week - punk to goth to punk-goth red, white and black.


(Photo Credit: MTV website)


The White Stripes not only have surprising clothes in red, white an black but use it to stunning visual effect in their videos. Here's a perfect example in their video Seven Nation Army. Turn it up! Meg is awesome on the drums!

Friday, July 11, 2008

Blogiversary: Collaboration Part Deux

From October 2, 2007:

A couple of months ago, I coordinated a collaboration between another beadmaker, Melanie Lukacs, a designer, Jean Yates and myself. I had so much fun with that one, that I've been working on another collaboration. Swapping beads with other beadmakers has its perks, you get to work with new beads that always inspire and create wearable art. Can't get much better than that! I swapped a set of spirals with beadmaker/designer, Bridgitte Tucker. Bridgitte sent me a lovely set of her enameled copper stations and links in deep blues and greens. Bridgitte and I teamed up with designer, Laura Bracken, who creates stunning jewelry pieces made with art beads.


Bridgitte and I decided on a color palate and then made a set of beads to send to each other and the Laura. I was so excited when I opened the package of beads that Bridgitte had sent. I haven't had the chance to work with enamel pieces and I was thrilled to receive them. In the package was a set of enameled stations, one large rectangle with holes on each corner and two round stations with a hole on opposite sides. They were a lovely hue of blue on copper with a weathered patina.

I was immediately taken with the patina on the copper that accented the blue enamel.I had made a set of copper double head pins earlier - I like the patina on the copper head pins - a red/purple color that accented the blues in Bridgitte's pieces perfectly. Setting aside the large rectangle enamel for another exciting project, I decided to use one of the round enameled stations.

I strive to create pieces that are symbolic - the glass spirals I create reflect the cycle of one's life - with this collaboration, I wanted to create a pendant that included fundamental symbols so that it had an underlying universality. Inspired by Mary Hettmansperger's Fabulous Woven Jewelry I used the double head pins to create a woven copper station of my own to incorporate and tie the enamel station to a iridescent spiral of green and blue. I repeated the spiral by creating a coil copper bail to hang the pendant from to finish the look and not mix metals.

Without further adieu, today's collaboration is entitled, "Universal Truth."

Thank you, Bridgitte and Laura for joining in on the collaboration! It has been an honor and a pleasure working with you!

Thursday, July 10, 2008

Blogiversary: Collaboration Exploration

From July 25, 2007:

Today I unveil my creation from the jewelry exploration I embarked on with Jean Yates and Earthenwood's Melanie Luckacs.I talked about the Collaboration Exploration on Monday. Yesterday, Jean showcased her lovely "Little Sprite Earrings" and Melanie introduced her Sunken Treasure necklace. I've been enthused about this collaboration since Melanie and Jean said yes to it!


So, with that in mind, I named this necklace, "Exuberance!"

Exuberance includes my spirals in topaz and seafoam green, Melanie's seashell charms. gunmetal chain, gunmetal headpins and Bali-style sterling silver beadcaps. A petite gunmetal lobster clasp is accented with a starfish charm. The topaz and earth tones of the seashell charms are punctuated with the unexpected color of the seafoam green.

I like fluidity in my necklaces so the chain and the spirals placed end to end create a movement to the piece. The gunmetal chain finish gives the piece a vintage look. The spirals lay in the front of the necklace right where you can see them! I've been wearing the necklace around town with my capris and have gotten nothing but compliments! The seafoam color against the earthy topaz fits the summer and yet can be worn right into the fall in winter.

Thank you to Melanie and Jean for joining in this Collaboration Exploration!


Wednesday, July 09, 2008

Blogiversary and Color Week Coming!


I mentioned my 3 year blogiversary is offically July 16th So, in celebration, I'm going to be posting some of my favorite posts from the last 3 years. Some oldies and goodies. I LOVED Alternative Week so look for some of those posts - if you love punk rock like I do, you'll have fun reading those posts.

Color Week will follow blogiversary. It will be full week of COLOR! I've mentioned before that I tend to focus on what the glass can do - when all my peers are focused on color. So, I've challenged myself to study color and be more aware of how to use it along with the physical capabilities of the glass.

So let the Blogiversary week begin....


(above photo from: FotoSearch)

Tuesday, July 08, 2008

Buy it! Glass Bead Workshop by Jeri Warhaftig

"Welcome to my studio and to my series of workshops in intermediate glass beadmaking."


So begins the first line of Jeri Warfhatig's new book entitled, Glass Bead Workshop. I've met Jeri and talked to her a few times at bead shows. She's a friendly supportive colleague and has written a beautiful and informative book on glass beadmaking.


The table of contents includes: Welcome to my studio; The Basics; Session one - Falling Leaves Bead; Session two - Beach Bead; Session Three - Geode Bead; Session Four - Off Mandrel Galaxy Pendant; Session Five - Blown Hollow Bead; Session Six - Twistie Pendant; Session Seven - Hollow Vessel Bead; Session Eight - Wreath Bead; Session Nine - Rune Bead; Session Ten - Rose Bead; Appendix A - Sandblasting; Appendix B - Gridning and Polishing; Appendix C - Near Misses.

Jeri explains all of the "basics" such as studio set up, torches, safety, ventilation, etc. Hopefully, there's nothing new here for an intermediate beadmaker but if the beginner picks up the book, it's all important information. Once the studio set up and safety is discussed, it's on to the projects or sessions.

I really like the set up of the sessions. The header,"What Will This Session Teach?" begins each one and gives you a quick overview of the bead you'll be making. For the experienced beadmaker, it allows you to skim and look for particular techniques. The header is followed by a section listing tools, material and any special tools or materials used. Good photos of the tools, materials and finished bead.

Throughout the book, there are good, clear, close up photos of the techniques and steps. I feel as though I'm standing next to Jeri as she conducts her class. The section on making the bead is followed by "Further Explorations" where variations on the technique is described with a photo or two. Each session ends with a "Gallery" comprised of various glass art beads made with the same technique.

As an experienced beadmaker I'm sometimes jaded wondering what a new book will have to offer me. The tips and further exploration were worth the price of the book alone. The photographs are lovely and enhance the instructions.

Jeri has written a classic for the modern intermediate beadmaker. A lovely book from a fabulous beadmaker!


(Photo credit: All photos from JeriBeads.com

Monday, July 07, 2008

Attention! Announcement!


Great news! A series of fabulous designers have agreed to special interviews for my newsletters! The interviews will start appearing in July's newsletter which is scheduled to go out TOMORROW! Sign up if you haven't already. The line up of designers so far (I hope to get more!):

July: Margot Potter
August: Heather Powers
September: Tammy Powley
October: Candie Cooper

Sunday, July 06, 2008

A Tour in Pictures....

A typical early spring day in the studio of Cindy Gimbrone....

Rise early morning so I can get to work...


Hat and sweatshirt because the studio doesn't have heat...


Happily melting colored glass to create a Rainbow Spiral at the torch....


Placing hot Rainbow Spiral beads into the kiln to anneal....


Cleaned and annealed Rainbow Spiral Bead...


Spirit of Independence Windchine Ornament using the Rainbow Spiral.

Saturday, July 05, 2008

Minding The Business: Online Business Groups


I'm a small business owner. Yep, and probably if you're reading this, you are too. Small business is hard, it has a high rate of failure so how can you manage your business and make it successful?

I started a business group in the winter of 2005-2006. I wanted to talk marketing marketing marketing, or in other words, how to get myself out there. It's the hardest part of small business for me, and is one of the most important. I assumed I wasn't alone.

I contacted a few cyber friends and started a closed business group. Not to be elitist but to create an atmosphere where we all knew one another and could feel comfortable. That just doesn't happen on an open board. So I created a "think tank" for beadmakers of all media, glass, clay, poly clay, etc. I set up a Yahoo group, but you can set up a group in Google or any other way that's easiest for you. I kept the group closed so we could discuss any issue we wanted without worrying about starting a flame war.

I'd recommend a business group to any female small business owner. As a woman, I have a different style than a man and find it difficult to promote myself. It's been a change in the way I think about myself and my work.

A group can go stale and start to die out, though. It's important to re-invigorate a group and invite new members periodically to keep it alive and growing. A virtual conference table can help you mind your business well.

Friday, July 04, 2008

How Appropriate


Frankly, I hate the word "appropriate." It's usually used against someone - as in "your behavior is NOT appropriate!"

But today, I'm going to use the word I hate the most because being out in the studio is appropriate.

Reading Guest editor, Gaea's post on the Art Bead Scene is appropriate.

Grilling, hanging out with friends like my friend Heather is doing today, is appropriate.

Taking it easy and recuperating from surgery like my other friend, Tari is doing is appropriate.

Saying happy 4th is completely appropriate!


(Photos from Big Foto.)

Thursday, July 03, 2008

The Domino Effect


Everything that happens is like a domino effect, ya know? Seems like whenever I have plans to do something, a million things get in the way. One thing leads to another and I never get to what I had planned to do.

Tell me it happens to you too - purdy ppplllleeeaassseee!

Well, here's how the dominoes fell yesterday. I was so excited to have a whole day at the torch. I'd worked two weeks straight without a break and was looking forward to making some glass links and experimenting with some ideas. Got to the studio and my minor torch whimped out on me - I couldn't get more than 1/4 inch long flame. I cleaned and checked for leaks and nothing. Still don't know what was wrong with it - but I decided to switch out the minor for my midrange torch. It has a premix top burner so I can melt boro.

Switching out the torches meant a trip to the welding supply to get flashback arrestors and quick disconnects. What are those you ask? You don't really need to know except they're safety features so I don't burn down my house and the neighborhood. But back to the welding supply - I had to find one first. I'd used one a few years back but seems it went out of business. Found one fairly close to me and made a quick trip over there. But I didn't haven't anything to cut the hosing with - so another trip to Home Depot to get some cutters. Back home to take down the minor - but have you seen my workbench?

Forget it! I'm not showing it to you! Anyways, it's a mess so I had to clean off the bench a bit before I could put the midrange on it.


Then to run the hosing and make sure it's the right length - you know how it goes - this didn't fit right, there was a leak here, I couldn't get the torch to light- yada yada yada.

Then it was 6 pm. Poof! The whole day gone - I felt like the Witch of West melting - all my lovely time at the torch, gone, gone, gone!

Arghhh....

It's 6:19am - I'm going to get torch time in before I have to sign interpret. Goal is to be melting glass at 7:15 am.

Ignore those dominos stacking up....I'm going to!

Wednesday, July 02, 2008

Raspberry, blogiversary and before or after?


Raspberry Links with antiqued brass chain. These are the off mandrel glass links I make and hit the jackpot when I found a gorgeous fabric that coordinates with the raspberry links beautifully.


July 16th is my blogiversary - it will be 3 years of blogging bliss! Well, probably not bliss but blogging anyway. I've got to do something special - but I haven't figured out what yet.

Newsletter almost complete. I need to proofread and add some finishing touches and then it'll go out. Should I hold it until after the holiday or go ahead and send it right before? Tell me what you think.

Tuesday, July 01, 2008

What's Up in the Studio - Pulling Points

Ahhh, I've got a whole day to myself! I can't wait to get into the studio and start working on some new things. What are the new things you ask? I mentioned on Studio Saturday I have a half case of glass tubing ready to play with.


There are lots of techniques I can play with when I use tubing. The most basic application is to "pull points" to create a blowpipe. But before I go into a lot of technical glassy vocabulary which will put you to sleep immediately - the best way to tell you about what I'm playing with in the studio is to show you. Here's a master of flameworking, Hans Godo Frabel using tubing to make a hollow glass clown. I'm only just beginning so I'm learning all the techniques he's demonstrating - but I'm learning! I sooo want to go bigger than beads - sculpture and goblets, YAY!