I've been on a earrings kick lately - whipping up earrings as fast as I can. Artbeads is carrying Swarovski Crystallized Cosmic Ovals that pair nicely with my Bling and Glass Links. I chose colors from the Volcano Cosmic Oval, pink, blue, orange, silver. I wanted the oval to hang in an usual way so I wove 26 gauge Artistic Wire in Rose to hold the Silvered Sky Bling Link to the Volcano Cosmic Oval. The weaving was a variation on the technique I used with the Lava and Ivory Links earrings. The gauge was smaller so I wove more wire in order to hold the oval. The pink echoes the color in the oval as does the golden jump ring and sterling silver hand formed ear wire. The lovely colors of the Volcano didn't show through in my photograph so I've borrowed one from Artbeads.com where I got the oval from:
Pretty, huh? I've got a couple other Cosmic Ovals I'm working into another project. The ovals work very well with all of my Bling, Frost and Glass Links. I love them and Artbeads.com!
Oh, and by the way, the white ceramic coffee cup makes a nice canvas don't you think?
I got a little package from Dave of Rings n Things showing off some Swarovski cubes. Ooooo! What kind of quick earrings could I make? Since I'm stuck on gunmetal lately, I used R&T gunmetal findings and leverbacks, paired them with bali silver beadcaps and had a quick pair of pretty summer earrings.
Easy enough but if you'd like to make them yourself, here's the materials list:
Two 8mm Swarovski crystal cubes in any color you love
Two, 1.5 inch gunmetal headpins
Two 3mm or 4mm crystals in accenting color to the cube crystal
Two bali or bali style sterling beadcaps (here are some very similar to mine from ArtBeads.com)
Optional - two 3mm or 4mm crystals in accenting color to the cube and other crystals listed above.
Tools Needed:
round nose pliers
chainnose pliers
flush cutters
Directions:
String onto the headpin in this order, small crystal, beadcap, crystal cube and if you want, another small crystal.
Make loop at top using the round nose pliers (trim length if necessary with flush cutters).
Use chainnose pliers to open the loop you just made and attach to the leverback earring finding.
Done!
I like these quick projects. It uses up my stash and it can add to a summer outfit. Have you made a quick fashion project lately? Something to accent your wardrobe or update your jewelry?
Yup, I was one of the millions at the midnight showing of Harry Potter and the Half Blood Prince. The Teen and I have gone to see all the movies and we went to all the midnight releases of all the books. How could I miss it? I'm a geek!
I'm trying to get some extra sleep this morning since the movie ended at 3 am. So, you'll forgive my short post. I admit to being an Alan Rickman, errr Snape fan (what a tortured soul!) He's so over the top evil and campy in the movies - check out the Wizard Rock song, Snape vs Snape by the Ministry of Magic.
...Erin of TesoriTrovati! Congratulations, Erin! You've the winner of the bronze metal flower charm. Send me an email with your address and I'll send it right out to you!
In keeping with the theme on Art Bead Scene this month and due to the fact that I make alot of beads with this kind of flavor, I'm offering up another set of giveaway beads this week. This week's beads feature two goddess beads. I've complemented the goddesses with my "rice" beads, African beads, furnace glass beads and some pewter accent beads.
You know how to enter - make a comment between now and Friday, July 17. I'll draw a random name and announce the winner on Saturday.
I've finally gotten to the patina stage and used the awesome new Patina Gel from Cool Tools. Before using any chemical, I always check to see how to dispose of it. These days, I'm concerned about the impact on the environment. The Patina Gel is "eco-friendly" that is, easy to dispose of. If you leave it on your bench until it become white, it becomes a commonly used fertilizer for your garden! Love it when the chemicals you use in your studio are not harmful to the environment.
Back to the process of patina-ing. Before I could dip the bronze charms into the patina solution, I had to rid them of any oils and fingerprints. So, the biggest pain was cleaning each small piece with a toothbrush. Remember I said these were charms and every piece is pretty small, about 12mm. A baby sized toothbrush is about 25mm so you can get the piece lost in the brush making it difficult to clean. I needed a smaller brush but didn't have one.
After I scrubbed each piece, I strung it on a piece of wire so I could lay the pieces all at once in the patina solution. I followed the directions on how to use the Patina Gel on the Cool Tools website and made just enough solution to cover the charms.
I left them in just long enough to get a chocolate brown patina. Polished each one with a micro mesh sanding pad. I picked up wth micro mesh locally at a woodworkers store. It was the same place I picked up Renaissance Wax. I used Renaissance Wax as a final polish to seal the patina.
I love the way the pendant below came out. The patina on it is really nice - just what I was looking for. This pendant is a "salvaged" piece. When it was in the leather hard stage, the corner broke while sanding. I thought it looked like an old artifact one would find on an archeological dig so I sanded the edges to make it look more worn and went with it. I like how it turned out. Pretty good for a first go.
Here are a couple of the small (12mm) charms. I like this little rose, I think it will make a nice little addition to a bracelet or a pair of earrings or even hanging from the end of a pendant.
I wanted to show you how I worked with the bronze metal clay from beginning to end. The very end - to the final polish. I have to work on improving parts of the process but I'm satisfied how this first complete run went.
Here's an important tip I learned the hard way - Remember to coat your hands with olive oil or Gloves in a Bottle before you start to sand off the patina to highlight the relief in your piece. I have black fingernails and cuticles from forgetting to do it!
So, I'm going to take my black fingernails off the keyboard and go to my studio but before I go for today, tell me how you liked the series on bronze clay and or how you think the pieces turned out.
I'll select a random comment from today's comments to receive one (1) of the bronze rose flower charms. I'll announce the winner tomorrow.
Look forward to your comments. I'm off to try to clean my black fingernails now!
I forget where I saw this originally but it made me spit out my coffee laughing when I watched it. It mocks Twitter - which I love BTW - I was an early adopter :-) I have to laugh because Steven Colbert can barely take himself seriously most of the time when he's spouting whatever satire he's spouting. Makes me laugh out loud. A nice laugh to take you through the sensational links I'm sharing after it.
A Bead A Day Lisa’s “Swarovski Summer Picnic” project is progressing. The only thing missing are the crystally butterflies!!
About.com Jewelry Making School's out for summer, but is it really? Nope, not when you can take one of these free jewelry making e-courses.
Art Bead Scene Art Bead Scene's monthly challenge painting for July is the Lascaux Cave Paintings. Get your stash of beads out in ivory, red and brown to match the color palette of these ancient drawings.
Beading Arts Wonderful wonderful wonderful new CopprClay! Cyndi is so excited about this new material that she can't stop playing with it!
Carmi's Art/Life World Carmi attempts to create a necklace after a resin pouring disaster.
Cindy Gimbrone aka Lampwork Diva Cindy shows off some new chain and realizes one should never shop for jeans on her lunch hour.
Humblebeads Check out the 2009 Bead Cruise design contest winners!
Jean Campbell Ink: Eureka! Jean Campbell finished off her new LeTemps Necklace design which marries bling to grunge. Hurray!
Lorelei's Blog: Inside the Studio Lorelei has busted out of the studio and into the Museum of Art for a trunk show.
Snap out of it, Jean! There's beading to be done! Jean reviews a different, colorful, and inspiring book called Glass, by Marlene Blessing and Jamie Hogsett
Strands of Beads Melissa talks about where to find reliable information on copyrights - the U.S. Copyright Office, of course!
The Writing and Art of Andrew Thornton Challenging himself with a smaller scale, Andrew tackles doll jewelry. Check out five new designs with dolls in mind!
The bronze metal clay journey continues. Today I'm posting a picture of the bronze charms after they've been tumble polished.
I just put them into a Lortone tumbler with some plastic pony beads (to bring the container up to at least a 1/4 full), stainless steel shot, a 1/2 cap of Woolite and water. The liquid should just be touching the bottom of the contents of the container - if it goes over, the contents won't polish.
If I want to finish the bronze now, it's alot harder than before it's been fired (sintered). So it's really really really important to take the time to clean and smooth your pieces before you fire them. I took alot of time smoothing these with a nail file. They're ready for a patina to highlight the stamp.
A few comments have said the readers might be trying out the bronze metal clay. Here are a few of the resources I read/watched before I put my hands in the mud so to speak:
I read Laura Bracken's exploits on bronze and copper metal clay. Go to her archives and read May's postings. I found her comments honest and open. Many of the blogs only show pieces after the blogger has perfected the techniques and say how much fun they've had. Bronze clay wasn't fun at first, it was frustrating and Laura's blog is a nice journey from frustration to success.
Laura took classes from Hadar. Although I had the already mixed bronze metal clay, I ended up kneading and wedging my clay wrapped in plastic wrap similiar to how she shows to mix her dry clay. After I use up the supply I have, I think I'm going to try Hadar's clay.
One thing I wanted but didn't find was a video I could play and follow along while I was first preparing the clay and working with it. There are videos but there is so much talking (sorry, no insult intended to anyone) and pausing that you can't work along with any of them.
So, I'm off to work on patina today and a few other things. Leave me a comment about the tips and/or your own experience with the bronze metal clay.
I'm going to be honest - working with the bronze metal clay was frustrating! Right out of the packaging, you have to work and "wedge it" to get it to a consistency where you can make something from it. If you've worked with poly clay or with pmc, and/or ceramic clay, you'll be more familiar with this than I am.
Remember I told you I wasn't good at clay.
I tried to work it in my hands like in the videos available on YouTube. It was an absolute mess! I needed more moisture and adding distilled water and lavendar oil created mud in my hands. It was frustrating. But I stuck with it and eventually worked out a solution for me.
I put it between plastic wrap. Yup, that's it. I could feel it and keep the muddy mess in check. I did the final "wedging" in my palm. Once that trauma was over, I rolled it out and cut out some very basic shapes. I didn't want the first try to be anything too complicated.
So here are some of the basic shapes I rolled out and stamped. I mentioned my favorite tool yesterday when working with the bronze metal clay. In the picture above, the clay is at the "leather hard" stage and I'm learning how important this stage really is. The pieces above are pretty rough, unclean edges, backs - they need to be smoothed out. More about that later. Right now, I want to talk about the designs.
A couple of years ago, I went to a flea market where a vendor was selling vintage metal stamps used in newspaper ads. Many of them were very large and had "sale!" on them. I managed to find a couple small graphics without any type and bought them. I knew they would be perfect to use with the metal clay. So away I went, stamping out a couple of pendant sized pieces. Not too many since this was a test run. The little nails holding the metal stamp to the wood block create small circles I didn't really pay attention to until after the pieces were fired. More about those later too.
Below is a leather hard (pre-fired) piece on the right and on the left is the fired pendant right from the kiln without any finishing or polishing. Bronze clay is supposed to shrink approximately 20%, so this gives you a good idea of what that looks like.
Here is the entire run right out of the kiln....
All of the pieces are pretty small and not over 5mm thick. I ran the basic recommended firing schedule and buried the pieces in the charcoal. I've got three glass kilns and I just put the stainless container on kiln posts. I wasn't really fazed by the firing schedule - it felt like glass fusing with the ramp and hold and slow cool down.
So everything came out intact. I expected failure after reading how so many other people would get broken pieces. Beginner's luck? Or is it because the pieces are very small?
I'm glad nothing fell apart and the metal sintered together fully. Will I continue working with the bronze metal clay?
Yes.
If you're thinking about working with bronze metal clay, here are tips that worked for me:
1. Knead the clay in plastic wrap
2. Use up the entire lump of metal clay, don't store it.
3. Cut up an old shower curtain to use as the surface for rolling and working with the clay. You can write on it, oil it, whatever and you've recycled and re-used!
Stay tuned tomorrow - the bronze clay adventure isn't over yet! :-)
Several months back, I ordered some Bronze metal clay - BronzClay. I love the look of bronze metal and I was in the middle of trying out the metalworking techniques of Susan Lenart-Kazmer. The BronzClay was brand new and I wanted to try it out.
I finally got around to working with it. I've got a bunch of used clay tools - but this one is my favorite. I'm sure there's a technical name for it, but I've got no idea since I rescued the tools from the trash.
I don't consider myself to be very good at working with clay. I've tried making some ceramic beads (a disaster) and some polyclay handles for crochet hooks (ugly) and I just can't seem to get the hang of it. But I really want to make some charms to go with the wire and glass I'm making soooo I wanted to have a go with the bronze metal clay.
Have you tried something new lately? What prompted you to try it out?
You make it into a necklace! Remember I showed you the ceramic components I got from awesome Nancy of The Rabbit Muse? I used the gunmental chain I got from the R&T Bead Tour to make this quick necklace. I use a grass jump ring to pull out the green in the blue-green oval. I've hung a pewter charm with my favorite mantra "be" in the middle. It reminds me to to let go and just "be."
Do you have jewelry that reminds you of something or someone?
I've got a easy wire project in the summer 2009 edition of Wire Jewelry - "Easy Loop Post Earrings." I was working on the pictures for this issue back in January. Six months later, the finished product! It's a quick project on the back page.
Album cover for The Teen's new CD. The Teen as an anime musician - I love the name he's using "Sleepyhead" - it's sooooo him!
I have to admit to a brain malfunction. Yup. Sunday's Photo will now include a bunch of linky love from my other bead blogger colleagues.
It's time to add the links.
I write a Sunday column for Art Bead Scene and for today only, I'm going to cross post it here (hmmmm maybe I need to re-think that?) - I've spent alot of time writing a nice interesting post around the links so if you haven't read them yet over on ABS, you can read them here....
Melissa Lee gets the prize this week for the most outrageous beads - check out her blog to see what they are:
Strands of Beads Melissa wants to know what outrageous materials are in your beading stash?
Well, was it "ewww?" or "cool?" Let us know by leaving a comment :-)
The alchemist is coming out in several of our beady bloggers - Copper metal clay is all the rage for Cyndi and Tammy. Andrew is pressing coins in Bronze metal clay. Beading Arts Cyndi reports on her experiences with firing and finishing CopprClay pieces. This stuff rocks!
About.com Jewelry Making Heard about copper clay or coppr clay? Find out more about this great new metal clay product and check out some new metal clay projects too.
The Writing and Art of Andrew Thornton Stop by and say hello to Andrew in Charlotte, NC this weekend. Check out his new designs and some delicious new metal clay coins! (Andrew's coins are pictured below - picture courtesy of his blog)
Carmi, Cindy and Lorelei are trying out something new:
Carmi's Art/Life World Carmi tries Ice Resin and upcycles a greeting card into a necklace.
Cindy Gimbrone aka Lampwork Diva Cindy learns to make murrini and deals with mud. (Russ likes the murrini - photo courtesy of Cindy's blog)
Lorelei's Blog: Inside the Studio Instead of continuing on with the tried and true techniques of jewelry design, Lorelei is finally ready to take the leap and try something new.
New designs and projects.... A Bead A Day Do you love Swarovski Crystals? Inspired by talented jewelry designer, Lillian Chen, Lisa creates a Swarovski “sculpture” ring.
Barbe Saint John - New Jewelry from Forgotten Artifacts Sometimes you need to have a jewelry makeover.
Earthenwood Studio Chronicles Even without a lot of time on her hands, Melanie finishes a clockwork themed bracelet using Swarovski faceted rings from ArtBeads.com.
Jean Campbell Ink: Eureka! Jean gives a sneak peek of her next Beadwork magazine piece.
Katie's Beading Blog Check out Katie's wire-wrapped dragonfly!
Heather of Humblebeads shares her Bead and Button buys.... Humblebeads Bead & Button stash and Heather's inspired creations.
Jean and ABS get creative... Snap out of it, Jean! There's beading to be done! Jean gets her cool stash from Use the Muse II, and muses about it.
Art Bead Scene Art Bead Scene gets creative with the "Best of ABS."
Read any good beady news? Leave us a comment and tell us about it!
Today is the last day I'm taking comments for this week's giveaway. Any comment made on any blogpost since Tuesday will be entered for the drawing of the Glyph Inspired Beads.
Which reminds me, there's more giveaways to be had. I'm one of the sponsors for this month's Art Bead Scene Challenge - The Lascaux Horses.
The Glyph Series is inspired by cave paintings and petroglyhs. I'm working on new Glyph beads this summer so I'm clearing out my inventory to make room. I'm offering up these to the winner of the ABS July Challenge:
I'm intrigued by the symbolism and meaning of the cave paintings. They could mean nothing other than what they represent or they could have been an expression of something deeper. So use your imagination to come up with something that expresses your thoughts, straightforward or cryptic. You could win more free beads!
I've experiemented with the Glyph Series before. A couple of years ago, I was working on a sgraffito technique using enamels. According to dictionary.com, the word sgraffito comes from the Italian word which means "to scratch." More widely done in ceramics, I created a prototype bead where I painted enamel onto glass and scratched out a glyph design. I'm adverse to sifting enamels and releasing the fine glass particles into the air where I could potentially inhale them. (To the safety experts - yes I have good ventilation but no powder booth). When the enamels are suspended in a binder or liquid, I don't need to worry about shaking them. But after painting, I wasn't able to get a fine line with the tool I was using and the enamel came off in clumps rather than the fine line you see in the link.
Not satisfied with how this looked and after several other failed attempts, I turned to another technique which you see in the ABS July Challenge beads.
Do you think I should revisit the sgraffito style Glyph bead?
I'm about to show you a Top Secret Project I'm working on - Use the Muse II. I'm not allowed to show any part of "the Muse" but I can show you the components I've chosen from my kit that includes beautiful beads from Artbeads and my Frost Links in Kelp and Blue Gray that I've chosen to go along with the Muse. I'm using some of the beautiful chain I got from the R&T Bead Tour last week. The only problem I have with the chain is that I don't have some in gunmental! Mums the word on this project until the big reveal on Scarlett Lanson's The Beader's Muse. So that's all I can show you for now. The necklace is shaping up very nicely - I love it and intend to wear it! But you're not to breathe a word of this until the big reveal probably sometime around the first of August.
Good thing I've got Guard Cat watching over the studio. I have a cat who thinks he's a dog. He follows me around the house wherever I go and sits at my feet when I sit down to my workbench. Around here, he's known as "Kitty-Dog" and he sits at the front door standing guard.
Lesson Learned: Never shop and find the perfect pair of jeans on your lunch hour.
So here's what happened: Last Saturday, as I was pulling a 10 hour shift at work, I decided I would go out during my lunch hour and look for a pair of jeans.
Why I don't know. I just felt I'd had enough of The Teen making fun of my "Mom Pants." I want to explain the "Mom Pants." Moms wear "Mom pants" because as women we all know that whether you're a size 0 or a size 28, trying to find a pair of jeans that fit well is a journey to frustration. Once you find that perfect pair of jeans, you buy as many pairs as you can afford because you're likely never to find them again. So "Mom pants" are the perfect pair of jeans that have gone out of style.
Problem is, they've gone out of style. So it doesn't matter they fit, it's time to update. Otherwise, I look "old."
But, how am I going to know what kind of jeans to buy? I need good advice. Where do I get it?
I'm a huge fan of TLC's What Not to Wear. I've watched my fair share of episodes giving advice on how to dress.
I love WNTW because they dress real women who aren't models and can be hard to fit like me. Besides, I love the snarky, sarcastic comments all made in good fun - in the end, they always make the person look good.
So on Saturday, I felt armed with the proper advice and ready to face the jeans rack!
I started my search at Macy's. I looked around and finally settled on trying on a pair of DKNY jeans in my size. I didn't read the tag hanging from the side of the jeans describing exactly what they were - I was looking for particular features and by looking at the jeans, they had all of them.
Tried them on and they fit like a dream!
I read the tag: "slim fit."
LOL! Slim fit? You got to be kidding me! That couldn't be right, I'm not slim!
I had to be wrong so I went out and picked up a few other jeans based on the tag description.
None of them fit right.
I tried on the DKNY slim fit again. I wasn't dreaming, they did fit perfectly.
Hmmmm....I guess I don't know what "slim fit" means. If I had read that tag, I would never have picked up those jeans to try on.
Anyways, I picked up two pair of the jeans and decided to look at my cell phone to find out how much time I had left.
It was 5 minutes.
I had no other choice but to drop the jeans and run back to work.
I knew once I did that, the elusive perfect jeans would never be found in a store again.
I went back, I was right - they were gone! Some other woman had found my perfect jeans and snatched them up!
Sigh.
Do you feel my pain?
Lesson learned. Never shop for the perfect pair of jeans on your lunch hour - unless you're paying attention to the time! :-)
On a bead related note, let me give you a good look at the lovely chain I picked up last week at the Rings n Things Bead Tour.
I love those hammered links and rollo chain in the antiqued finish. What I'm really stuck on now is the gold and gunmetal chain. I love the gold links - I'm grooving on the narrow ovals and the happy sunshine-y quality of the gold. The gunmetal chain has a sparkle to it you can't see in this picture but it's there!
I've realized though I don't have any clasps in plated gold for the gold chain. ARghhh - I always overlook something when I go shopping!
So share a jean story with me or how you'd use the chain and it will enter you into the drawing for Glyph Inspired beads.
Good morning, Faithful Readers and/or Those-Anxious-for-Free-Beads! I'm a little later than normal posting to the blog. It seems I needed to sleep in this morning!
Over my morning coffee, I took some pictures of my latest addition to the Frost Links - Frost Links in White and Frost Love Links. I think these would look great on a ribbon necklace. A nice wedding necklace, either if you're attending or if you're in the wedding party. What do you think?
Yesterday, I said I'd have a weekly bead giveaway during July in celebration of my anniversary. Here is this week's set of beads, "Glyph Inspired." They are part of the "Glyph Series" beads I made a couple of years ago. I'll be revamping the series this summer so I want to share what I have left of the old ones with you before the new ones come out. I've thrown in some handmade red spacer beads for a pop of color and a few replica brass coin beads for fun.
Here's how you win the beads:
1. Make a comment between today and Friday, July 3rd.
2. I'll put all the names in a hat and draw a random winner on Saturday morning, July 4th.
3. Check my blog to see if you've won.
4. If you're the winner, send an email to me with your postal address.
That's it!
Oh, I'll make sure to ask a question so you have something to comment on!
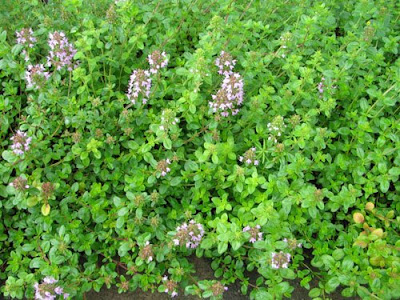
On another subject, I have a small herb garden right outside my front door. Nothing like fresh herbs to cook with! I noticed this morning the thyme is starting to bloom in places. Just before the blooms open, the thyme will be at its most flavorful. It's a good time to harvest it for drying and using it in the winter.
Looks luscious doesn't it? I've got regular thyme and lemon thyme mixed in the same small bed. I love the lemon thyme, just brushing my hand over it releases such a lovely citrus scent. Wish you all could smell it this morning!
While I'm busy harvesting the thyme, leave me some ideas on how to use the Frost Links or tell me how you'd use the Glyph Inspired beads if you won them.
Can we talk this morning? I have my morning coffee sitting on the kitchen table ready to have some friend-talk.
My blog is designed to be about glass and beadmaking. I've broadened a bit to include jewelry making but I've pretty much stayed away from mixing in personal stories. Starting now I'm going to include a little bit more about me along with the glass.
No, it's not going to turn into a confessional type blog. I will give you a little bit more about the artist behind the blog than I did before.
Why you ask? Because most of the blogs I like to read have a bit of the person's life included - like my new friend ceramic jewelry artist Nancy. I like her mix of everything. And the ever wonderful Margot Potter who writes about craft and life and the occasional feminist manifesto (which, of course, is ever empowering!)
I also realized I've been pretty stingy with the giveaways.
I'm gonna give away alot more stuff starting now.
My wedding anniversary is in July so in celebration, I'll be putting together some Beads 2 Go! boxes and posting them on my blog. Beads 2 Go! will include my handmade lampwork beads and other beads from my stash. I'll draw a winner on Saturday and post the winner. You'll need to check Saturday's post to find out if you've won. You'll need to check and send me the email.
Winners send me an email with your postal address and I'll send you the Beads 2 Go!
Easy Peasy.
A caveat - You'll need to check back to see if you've won. Since I won't have an email or postal address until you send it to me, I can't come looking for you. If you win and I don't hear from you within two (2) weeks from the date it is announced, the beads will be put back up for another giveaway.
Remember, if you're the winner on Saturday, just shoot me an email with your postal address and you'll get your free beads!
List in hand, I arrived Thursday to the Rings n Things Bead Tour. Tried to get a good shot of myself outside but seems it's not that easy to take a picture of yourself in front of a sign. I took picture after picture trying to get the sign in but either I was out of the picture or the sign was. So, since it's my blog, I chose the picture with me in it rather than a great picture of the sign.
A nice "my space" shot isn't it? You're right, I DO need a brush! But who cares about hair when there are beads to be had?!?
I grabbed a tray and made a beeline for the findings, chain and wire tables. I'm a tactile person so I like to touch and see items if I can. If I can't it won't stop me from buying based on good pictures and descriptions but this was a chance to use my sense of touch.
I had chain and navy blue on my list. I loaded up on chain, antique copper, antique brass, rollo, hammered links, plated gold and gunmetal. All just what I'd been looking for.
Next, I sought out navy blue. What's great about The Bead Tour is if you've been to one, you know the floor. The stones are organized by color so I just walked around until I found navy blue. Picked up a few strands of beads trying hard not to look at anything else.
But I had wandering eyes and looked around and before I knew it a pear green colored set of beads caught my eye. I love the combination of pear and chocolate brown. The beads had both colors in one strand of beads. I had to have them.
See - pear and chocolate brown right there! Aren't those beads gorgeous? Ok, so now I decided I had to apply tough love to myself and put my blinders on. I determinedly went straight to the check out line.
But drat!! As I'm moving up in the line, suddenly I'm mesmerized by a sea of....
....RED! Red coral in chunky sizes. I picked up a strand and started to roll the beads around in my hand. I turned first one set then another set in my hand, mesmerized by the organic quality and the color. Red is a mesmerizing color, it will grab your attention and not let it go.
I bought the strand of chunky red coral. The red contrasts nicely with the pear/chocolate stone beads.
When I got home from The Bead Tour, the news reported the death of Michael Jackson. I've written alot about punk, new wave but my musical taste is very eclectic. I love pop music too.
Music highlights your life. A song or video may play in the background and years later you'll hear it and those memories flood back.
I remember vividly one Sunday night when I was in elementary school. I was watching the Ed Sullivan Show with my family and we watched a new group of kids perform. I was mesmerized by all of them and especially the kid who was out front - Michael Jackson.
The Jackson 5 was cool, the music amazing and Michael was a kid like me!
I watched in rapt attention anytime they did a commerical. I watched the cartoon and bought the 45's.
Yep, I wore out "I'll Be There" on the stereo playing it over and over.
I grew up.
Michael grew up.
Then he recorded,"Off the Wall." A perfect album.
Disco, yes.
Perfect, yes.
If you listen now and watch the video to "Don't Stop," yes, it's disco but it's full of energy! Michael's handsome - pre-plastic surgery and you can see the resemblance between he and Janet. Michael was crazy cool.
The news played the video of the first time he moonwalked - I was watching the actual night he performed, it was electrifying. If you watch the video, the crowd screams because it was so new, so different. There's no other way to express it - ELECTRIFYING.
When things started to go badly for him, I rooted for everything to work out well for all. I rooted for Michael to be better. Afterall, I felt like he was a classmate in a way - the same generation.
When we all move on from this life, I believe each of us prefer to be remembered for the positive energy we put out into the world. "Man in the Mirror" isn't Michael Jackson's highest grossing song yet it's full of hope and heart that we can do good works in the world if we put our mind to it. Like so many of his performances, Michael Jackson is mesmerizing.
After work today, I'm heading over to the Rings n Things Bead Tour. I can't go in there willy nilly though. I got to have a list. Afterall, look at some of the beautiful beads they're going to have there. I love green and blue together using a neutral of brown. Oh and the pearls! Do I need to talk about pearls?!?
Focus, Cindy. Focus!!
I need chain and links. Seriously, I do.
Last month's goody bag from Rings n Things included a couple of hammer copper links like these.
I love them! I need more so I'll take a look to see if the Bead Tour has them. If not I can order them.
I'm making my list and checking it twice. Have you gone to a Bead Tour? What did or what would you buy?
I've got lots new components sitting on my design board. I'm starting with my Frosted Links. I love their softness and depth. Now, what to pair them with?
I've just joined the Artbeads blogging partners and have some yummy Swarovski crystal ovals coming my way. The "volcano" crystal is a nice complementary color for the blue-gray Frost Link - or even the Kelp color.
But that's not all I have. I've been talking to the awesome Andrew Thornton about doing a Collaboration Exploration. Andrew is an amazingly talented artist and brother to that superlicious artist, Cynthia Thornton of Green Girl Studios. Andrew sent a handpicked selection of Green Girl components:
How awesome is Andrew? Pretty darned awesome I'd say!
I have one last set of amazing beads on their way to me. I've signed up for Use the Muse II. Can't wait to get the set of beads.
So with all these inspirational components in front of me, I better get to work.


Web.jpg)